Federico Kereki's Allied Models
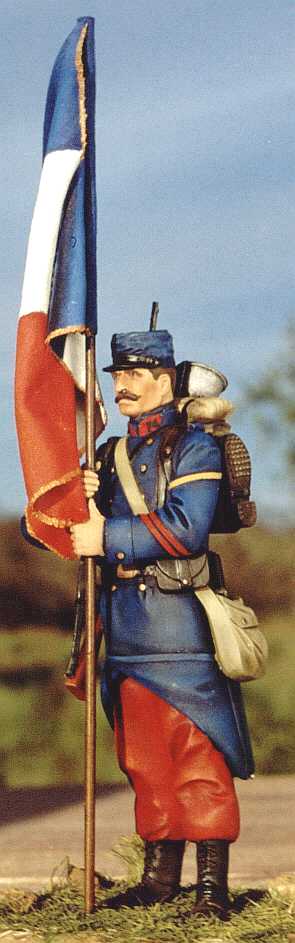
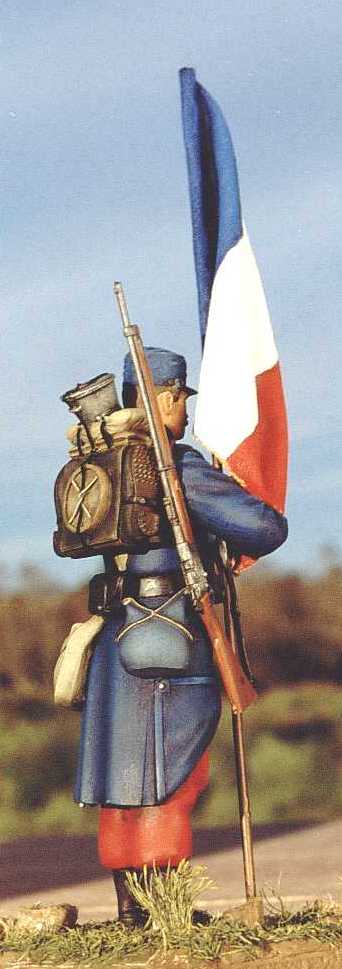
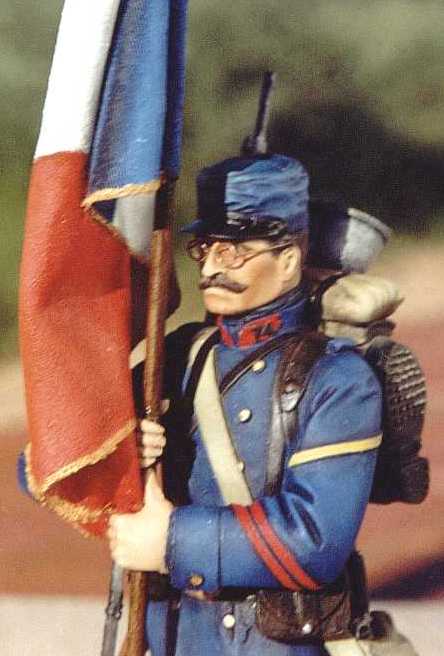
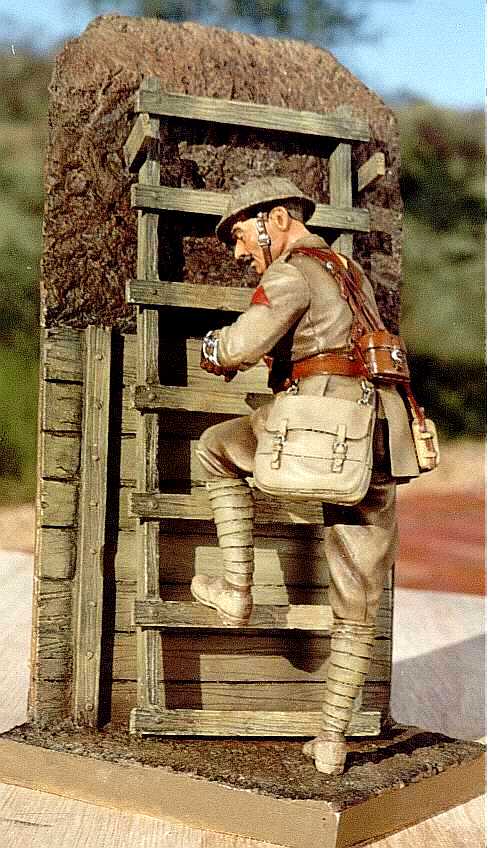
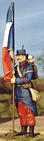
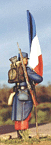
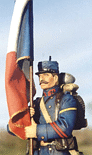
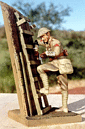
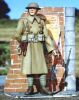
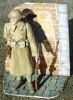
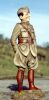
When I received this Verlinden 120mm figure, the rifle was
missing in the box. Since the figure is out of production, I started thinking
what to do, and came up with the idea of building a flag bearer. (I sent
Verlinden Productions a letter describing my problem, and in a few days
I received the missing Lebel, which ended up carried on the back with a
lead foil sling.) I had to tailor the figure hands and arms somewhat, and
managed to make it grab the flag staff, which I built out of 2mm brass
rod. The flag itself came from a piece of an old shirt of mine, soaked
in white glue diluted with water. Finally, I turned the pike at the top
of the flag out of some plastic rod, using my Dremel as a lathe -- I stuck
the plastic rod at the end, where bits go, and I used a hobby knife to
shape it as it turned.
The uniform is that of a french corporal in the first month of the
Great War, just before the battle of the Marne. Note that apart from the
képi cover (the only concession to "modern war") it still looks
like a 1870 franco-prussian war uniform! I painted everything with oils,
applied over an enamels base. I used a technique (which I later learnt
was called "glazing") to apply highlights and shadows after the oils were
dry, mostly on the flag, the coat, and the trousers. (You just apply the
merest dab of a transparent color and spread it around, so it either brightens
or darkens the paint underneath, providing the looked for highlights or
shadows.) I also used some drybrushing for the metal parts of the
rifle, and for making "leather" look used, old. For the eyes I used Archer
decals -- the easiest way I've ever found for quite realistic looking eyes,
in just a few minutes' work!
After the figure was finished, I added a scratchbuilt base (with
cut hemp "grass" and some "rocks" from my backyard) but the figure still
lacked something... so I added glasses from another Verlinden kit. I used
a "liquid glass" product for the lenses, and I was done!
For references, I checked Laurent Mirouze's "World War One Infantry
in Colour Photographs" (Windrow & Green), Andrew Mollo and Peter Turner's
"Army Uniforms of World War One" (Blandford Press), and Sumner and Embleton's
"The French Army 1914-1918" (Osprey). The first book shows a soldier wearing
the same uniform as this model, and in Mollo's book you find the drawing
which Verlinden must have used as a basis for the kit.

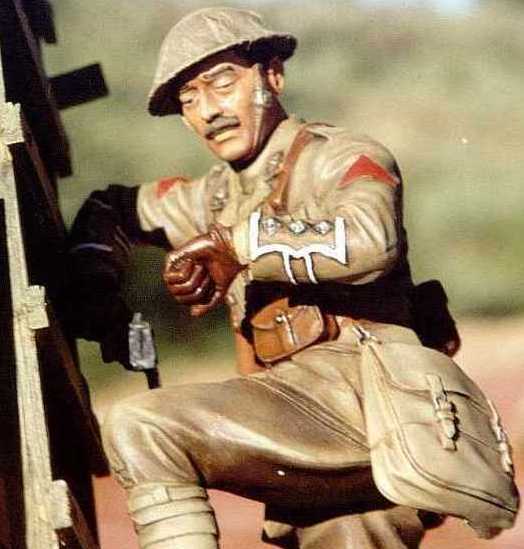
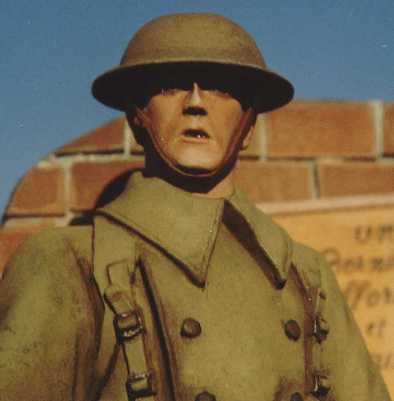
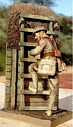
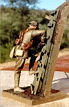
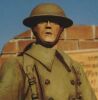
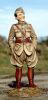
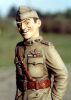
This is Jaguar's 120mm "Over the top" vignette, showing
a british captain, Webley on hand, counting down time before an attack.
The figure is just great, and I built it straight out of the box. I had
to substitute lead foil straps for the kit resin ones, which aren't pliable
at all, and don't look realistic. As a further detail, I added a "fabric"
covering for the helmet, out of paper soaked in white glue diluted with
water. Finally, I built a larnyard for the revolver out of thin soldering
wire. The trench section needed no special work.
The red triangle on the officer's sleeve shows him to belong to 29th
Div., Lancashire Fusiliers, while the red and yellow lozenge in the back
is that of Company "A" of the 1st battalion. I paint everything with oils
over enamels. I mixed myself some khakis (according to photographs and
references, just about any drab brown will do... OK, OK, not anyone, but
there were plenty of variations in color, due to the sun, mud, rain, fabric
makers, and so on!) I finished the model with pastels so as to show some
"mud" remains, mostly on the trousers and puttees. For the eyes I used,
as I always do nowadays, Archer decals: a great finish, with almost no
work at all.
For references, I checked Laurent Mirouze's "World War One Infantry
in Colour Photographs" (Windrow & Green), Westlake and Chappell's "British
Territorial Units 1914-1918" (Osprey), and P. Haythornwaite's "A Photohistory
of World War One". The first book shows a soldier of this very unit, while
further insignia detail can be also found in the other two books.

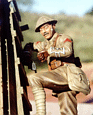
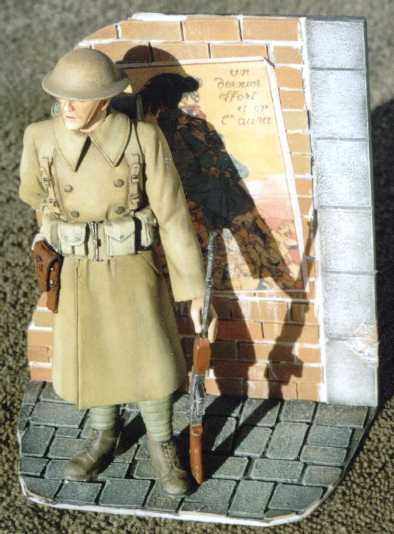
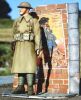
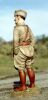
A Verlinden kit: the 1917 American Bar Gunner. This kit was somewhat harder to
build up, and I had to use more filler than usual. I painted it the same way as
I usually do, with an addition: I used thin burnt umber oil washes, applied
with a 000 brush, to highlight the edges of belts, the canteen cover, the ammo
pouches, and so on; I feel that it gives it a more natural look. I painted the
puttees dark brown, and drybrushed them (thoroughly) with olive drab; the dark
brown stays in the "shadows" and you get fast, nice results. I also used this
method for the pouches (starting with dark grey and finishing with khaki drill)
and the helmet (starting with black and finishing with dark earth). The helmet
also received some color variations with pastels, which also give a more matte
finish. The base was scratchbuilt, and quite easily at that: I used cardboard
of different thicknesses, cutting stones and bricks of the right sizes, gluing
them on to the "wall" and "ground", and finishing with a acetone-diluted putty
coat. (If you stipple --with an old brush!!-- the putty before it dries, you
will get a more realistic finish; check the cobblestones to see it.) Finally, I
got the poster on the web (just don't ask where; I surfed around until I found
it: go to YAHOO! and try looking for POSTERS and/or PROPAGANDA) and printed it
out at an appropriate size on a inkjet printer. It's an easy (and cheap!) way
to get posters for dioramas or vignettes!
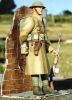
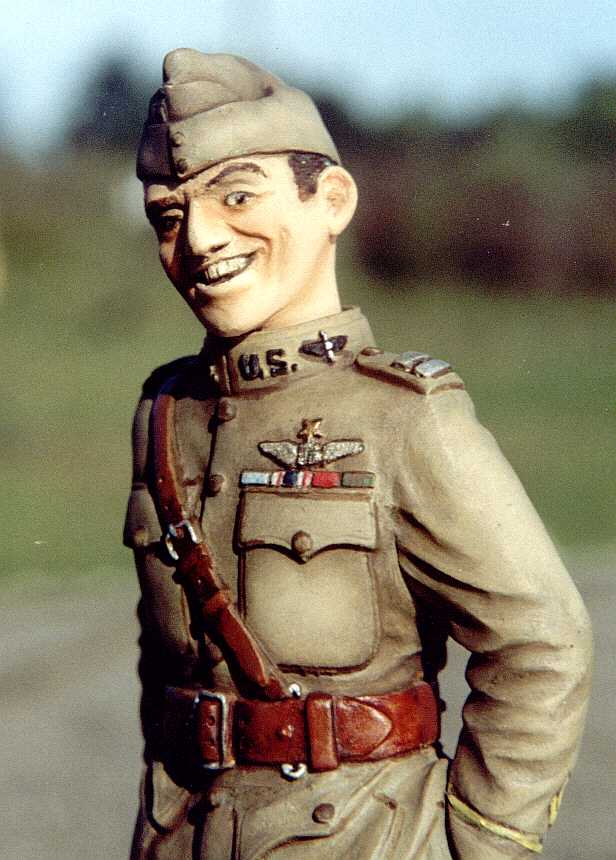
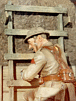
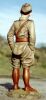
A Model Cellar figure: Eddie Rickenbacker. For this figure, I decided to try
some "preshadowing", and I painted the breeches a darker color, so there would
be some tonal variation between the two parts of the uniform, but I guess I was
too timid, for I couldn't really notice any variation. The flesh oil mix is
Titanium White, Yellow Ochre, and Burnt Sienna. After applying this color I
used Burnt Sienna and Raw Umber at the sides of the nose, below the eyes, under
the lower lip, in the ear, and under the cheekbones. I also used some pure Raw
Umber between the upper eyelid and the eyebrows and along the hairline. The tip
of the nose and the chin got pure white for extra highlighting, and the cheeks
some red – these steps actually brings the face to life! The lower lip got some
pink mixed from red and white; the upper lip got nothing. The inner part of the
mouth is a reddish brown: red plus raw umber worked. For teeth, I add some
brown or yellow to white to get an off-white color, and that works better than
straight white. And for the hair, I began with a black base and then drybrushed
brown.
For the eyes I tried a new technique: decals! Archer produces sheets of 120mm
size eyes, in plenty of colors, and they are quite easy to apply. Just paint
the eye an off-white color, put a gloss coat on it, apply the selected eyes
(they should both look the same way), and finish with another gloss coat. It
took longer to write and edit this paragraph than to apply the decals.
For the uniform, I began by mixing an appropriate khaki drab color. Colors
varied a lot during the war, and you practically cannot miss with any brown. I
made my own color starting with Van Dyke brown, lightened with a small bit of
Lemon Yellow, and modified with Naples Yellow. (All colors are Winton, by
Winsor & Newton.) I used Raw Umber for shadows and Naples Yellow for
highlights. For leather parts, I use a reddish brown color as a base, and then
apply Burnt Sienna, followed with Raw Umber shadows and Cadmium Yellow lights.
Belt holes and buckles get extra shadows.
The ribbons were a special problem – which color to paint them? This stumped me
for a while, and I turned to Internet for answers. After a while, I found
information on Eddie Rickenbacker at THE AERODROME, including the list of his
medals. I ended the model with a matt coat, and picked the leather parts with
semigloss varnish.
 Return to The WWI Images Page