
This article originally appeared in the September 2000 issue of Internet Modeler.
 Showbirds:
Kaye's Eastah Aigg
Showbirds:
Kaye's Eastah Aigg
Czechmaster 1/72 SPAD XIII

By Matt Bittner
Photography by Scott Hackney
History
Once again, the history of the SPAD 13 is vast. Not only did the French fly it - being a French design - but so did the Italians, British and - in the theme of the series - the United States Air Service (USAS).
The initial intent of the 94th Aero Showbirds was to paint their "crates" in a way to outdo each other. At some point, some higher-ranking officer decided to use these machines on the Banner Day ceremonies in 1919 to fly past the Eiffel Tower. Unfortunately, due to typical "military bungling", the flight past the Tower never happened. The first public appearance of these machines was on 2 March 1919, but not long after that the aircraft were detailed to the 138th Aero. After they appeared at the Third Army carnival at Coblenz, not much is known about these machines.
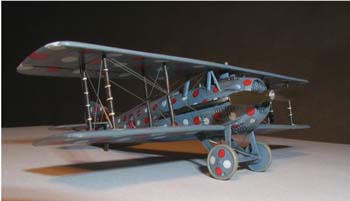
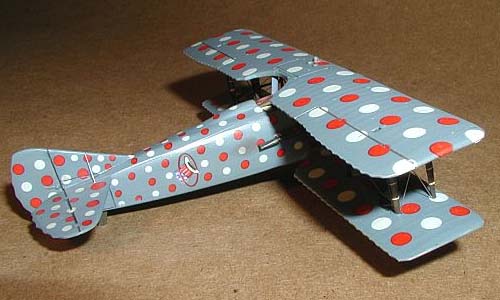
"Eastah Aigg", as the plane I have modeled is known, was the personal mount of Lt. Sammy Kaye.
The Kit
 The
Czechmaster SPAD 13 consists of 36 resin pieces and nothing else. No photoetch,
no metal, no decals and no instructions. Other references are a must to
build this model.
The
Czechmaster SPAD 13 consists of 36 resin pieces and nothing else. No photoetch,
no metal, no decals and no instructions. Other references are a must to
build this model.
Unfortunately a lot of the parts were warped. Horribly. While it was easy to fix the wings - relatively - the fuselage didn't cooperate as well, and some of the smaller parts needed un-warping as well.
Construction
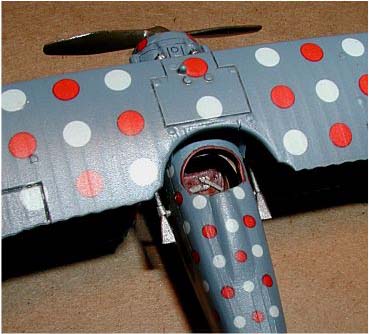
Construction with this kit first starts off with taking the warp out of the main parts. Once that is accomplished, then one can proceed to the cockpit. I decided to use the Eduard photoetch set for the Revell SPAD 13, which meant most of the parts had to be modified to fit. The kit floor was not used since it wasn't wide enough to meet the fuselage sides instead being scratched out of plastic sheet. In fact, it was made a little wider than it should have been to help with expanding the fuselage so the upper nose would fit. Neither the kit nor the Eduard p/e seat was used; instead I opted for the excellent resin seat and wheel set from Rosemont Hobbies. Another reason why I opted for the Rosemont seat was because the belts were molded in-situ with the seat.
 Once
the cockpit was finished, the arduous task of closing up the fuselage
halves could begin. Even though I took out most of the warp in the fuselage
halves, some of it was still there. I had to use plenty of CA and "muscle"
power to get these to line up. Since the forward, top nose is separate,
you start at the back and glue a little at a time, making sure all is
true and straight. However, I left a portion of the top unglued right
behind the cockpit. This was because if you glued the nose of the fuselage
halves together directly, then the upper nose is too wide for the rest
of the fuselage.
Once
the cockpit was finished, the arduous task of closing up the fuselage
halves could begin. Even though I took out most of the warp in the fuselage
halves, some of it was still there. I had to use plenty of CA and "muscle"
power to get these to line up. Since the forward, top nose is separate,
you start at the back and glue a little at a time, making sure all is
true and straight. However, I left a portion of the top unglued right
behind the cockpit. This was because if you glued the nose of the fuselage
halves together directly, then the upper nose is too wide for the rest
of the fuselage.
So, once the rear of the fuselage is glued and dried completely, then I worked on gluing the upper nose to the fuselage. I glued on one side first, let it dry completely, and then glued on the other side. This left me with about a 1/8th-inch gap on the lower fuselage that would have to be filled later. Yikes!
 It
was here that I noticed the horrible fit of the whole kit. The gap in
the fuselage halves was terrible and unfortunately I had to sand away
all the raised "stringer" detail on the turtledeck and underside fuselage.
Cripes! To restore the turtledeck (I ignored the underside) I photocopied
the plans from the Datafile and cut out the turtledeck area from the photocopy.
I tacked glued this onto a piece of sheet plastic and using the back edge
(held completely flat so the tip of the blade does not touch) of
a rounded X-Acto blade I scored where each stringer was on the photocopy,
resulting in fine lines on the other side of the .005" Evergreen plastic
sheet. This took me three times to finally get right, but it looks great
and fulfills the need of representing stringers on the top of the fuselage.
It
was here that I noticed the horrible fit of the whole kit. The gap in
the fuselage halves was terrible and unfortunately I had to sand away
all the raised "stringer" detail on the turtledeck and underside fuselage.
Cripes! To restore the turtledeck (I ignored the underside) I photocopied
the plans from the Datafile and cut out the turtledeck area from the photocopy.
I tacked glued this onto a piece of sheet plastic and using the back edge
(held completely flat so the tip of the blade does not touch) of
a rounded X-Acto blade I scored where each stringer was on the photocopy,
resulting in fine lines on the other side of the .005" Evergreen plastic
sheet. This took me three times to finally get right, but it looks great
and fulfills the need of representing stringers on the top of the fuselage.
 Once
this whole area was assembled I could start working on adding the lower
wing to the whole assembly. Before I put it on, though, I noticed it "re-warped".
Bah, off to heat it up again. After "un-warping" it I glued the lower
wing on, and started to deal with the gaps. The worse gap was the wing
to underside-rear-fuselage that required plastic sheet and plenty of CA
to fill.
Once
this whole area was assembled I could start working on adding the lower
wing to the whole assembly. Before I put it on, though, I noticed it "re-warped".
Bah, off to heat it up again. After "un-warping" it I glued the lower
wing on, and started to deal with the gaps. The worse gap was the wing
to underside-rear-fuselage that required plastic sheet and plenty of CA
to fill.
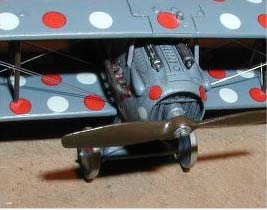
I added the horizontal tail - again needing plenty of CA to fill the gaps - and separated the fin from the rudder and added the fin (and filled it - gee, there's a common theme here). In addition, the entire aircraft was a single color, so I also added the undercarriage and made sure all gaps in this area were filled before hand.
Final Assembly and Painting
 Since
the overall color of "Eastah Aigg" was blue, there was an excellent chance
it was the same color as the blue found in the French cockade. Since I
adhere to the "dark power blue" theory, Aeromaster Acrylic US Intermediate
Blue is a perfect match, so the entire model was sprayed this color. It
took a couple of coats to get an even finish, and after letting dry for
24 hours the first coat of Future was sprayed on. This was let dry 24
hours and then decaling could start.
Since
the overall color of "Eastah Aigg" was blue, there was an excellent chance
it was the same color as the blue found in the French cockade. Since I
adhere to the "dark power blue" theory, Aeromaster Acrylic US Intermediate
Blue is a perfect match, so the entire model was sprayed this color. It
took a couple of coats to get an even finish, and after letting dry for
24 hours the first coat of Future was sprayed on. This was let dry 24
hours and then decaling could start.
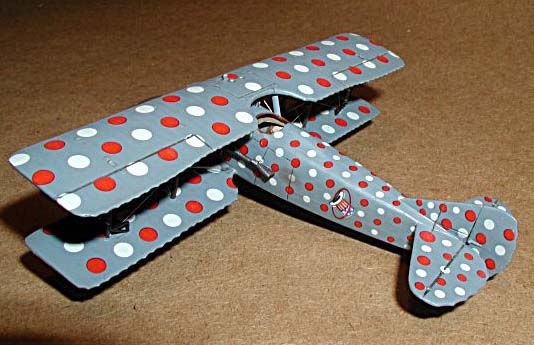
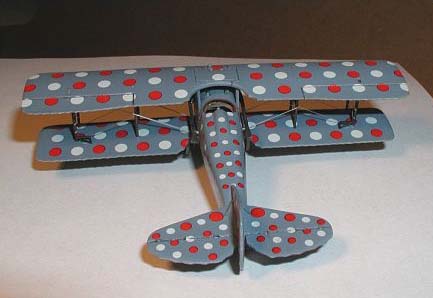
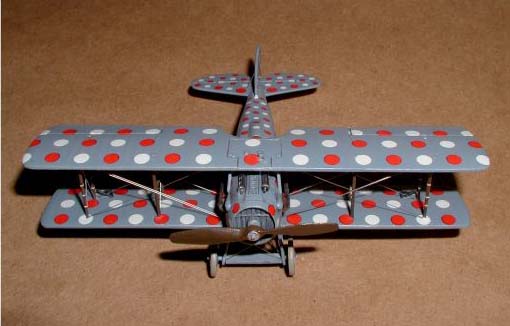
I may have been the luckiest of the Showbird's builders because Blue Rider already made the polka dots on "Eastah Aigg". I just had to track down the sheet, which was supplied by Rosemont (once again, coming to my rescue). Each surface had its own decal, so the upper wing consisted of two pieces, one upper, and one lower; the lower wings two pieces each side; the fuselage three pieces (the underside of the fuselage wasn't covered); the horizontal tail two pieces each side; the fin/rudder two pieces; and there was one decal for each outer wheel covering. This just took time and patience to cover. However, I noticed on the upper wing that there was a milky substance that came off the backing sheet when I slid the decal on. I was worried this would have an effect on the appearance of the model but was happy to see the following day that everything dried clear and fine.
 Once
all decals were in place, I covered the whole plane with another coat
of Future to give the model a resistant overcoat so the decals wouldn't
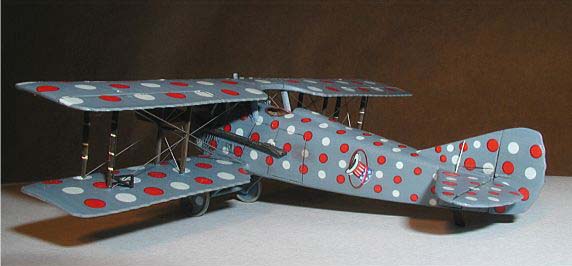
rub off. I then scratched new outer interplane struts; painted the kit's
inner interplane struts; and attached the upper wing to the lower using
only the inner interplane struts to begin with. When I was certain they
were dry, I then added the outer interplane struts. Once those were dry,
I scratched the rear-most cabane struts out of Contrail stock (which I
used for the outer interplane struts) and used the kit supplied 'V' for
the forward-most cabane struts.
Once
all decals were in place, I covered the whole plane with another coat
of Future to give the model a resistant overcoat so the decals wouldn't
rub off. I then scratched new outer interplane struts; painted the kit's
inner interplane struts; and attached the upper wing to the lower using
only the inner interplane struts to begin with. When I was certain they
were dry, I then added the outer interplane struts. Once those were dry,
I scratched the rear-most cabane struts out of Contrail stock (which I
used for the outer interplane struts) and used the kit supplied 'V' for
the forward-most cabane struts.
I had to add a new tailskid made out of "squished" brass tubing due to removing the molded-on one when attacking the horrible gaps. I also added the tail struts out of .020" Evergreen rod. Rigging was accomplished using .005" stainless steel wire, and I used oils to bring out (only a little) the excellent detail around the nose.
Conclusion
 This
kit was a major pain! The fit was the worst I have ever encountered. However,
keep in mind a couple of things: the mold is old, and this kit was lying
around for quite some time. The level of detail is fantastic – typical
Czechmaster level – but the fit is not warranted for such a nice
kit, since you'll remove a lot of the excellent detail when you sand the
awful seams.
This
kit was a major pain! The fit was the worst I have ever encountered. However,
keep in mind a couple of things: the mold is old, and this kit was lying
around for quite some time. The level of detail is fantastic – typical
Czechmaster level – but the fit is not warranted for such a nice
kit, since you'll remove a lot of the excellent detail when you sand the
awful seams.
Yes I am upset at this kit, but it did come out okay. I just wish I had replaced that lower wing. Even after I "un-warped" it for the second time, it still "warped back" after it was on the model. Ugh.
Thanks to Greg Van Wyngarden, Bob Pearson and Steven Perry for the help in this project.
References
-
Albatros Publications, SPAD 13, Datafile #32
-
Cross & Cockade International, Vol 29 No 1