
This article originally appeared in the July 2000 issue of Internet Modeler.
 Revell
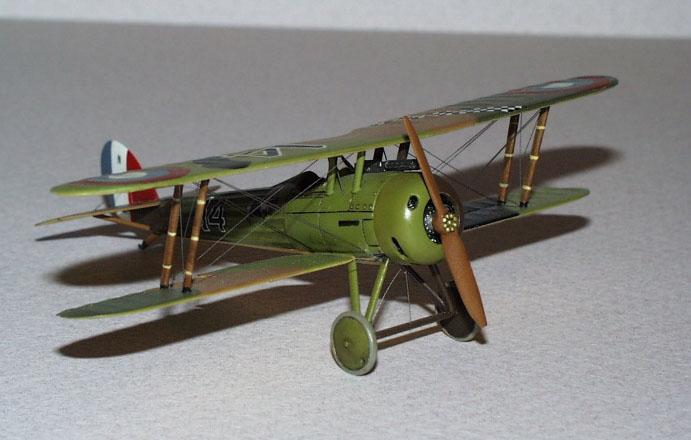
1/72nd Nieuport 28
Revell
1/72nd Nieuport 28

By Matt Bittner
Photography by David Van Wagoner and Don Van Hook
History
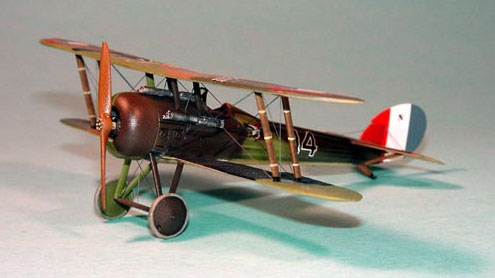
The Nieuport 28 was a drastic turn in development for the Nieuport Company. They abandoned their typical 'V' strut and sesquiplane arrangement, opting for a 'true' biplane instead. Unfortunately the Nieuport (Nie) 28 was not viewed favorably by the French, but it helped launch a fledgling air force just entering into WW1 - the United States Air Service (USAS). It was with the Nie.28 that the first aces of the USAS were born.
The Kit
The Revell Nieuport 28 has been around a long time. Even with its age it is a very accurate aircraft. There are 28 injected molded parts and a decal sheet providing two schemes: Lt. Campbell's from the 94th Aero; and an unknown example from the 27th Aero.
Construction
 I
started construction by correcting the wing. Although the wing is about
.5mm short in span and chord, this discrepancy was deemed too minor to
worry about. However, the cutout that would sit above the fuselage is
too deep, so I added .010 plastic sheet until I filled this area out more,
and sanded it smooth. The fabric weave evident on all parts is bogus,
and needs to be either filled or sanded away (I opted for sanding the
fabric weave away).
I
started construction by correcting the wing. Although the wing is about
.5mm short in span and chord, this discrepancy was deemed too minor to
worry about. However, the cutout that would sit above the fuselage is
too deep, so I added .010 plastic sheet until I filled this area out more,
and sanded it smooth. The fabric weave evident on all parts is bogus,
and needs to be either filled or sanded away (I opted for sanding the
fabric weave away).
The lower wing suffers the same shortness problem as the upper wing, but like the upper wing it was deemed too minor to deal with. I did cut out the ailerons, and added 'hinges' in the wing (and cut corresponding slots in the aileron) out of pieces of brass sheet from the frame of a photoetch set.
I had the Airwaves photoetch set so I decided to use it to dress up the cockpit. Unfortunately the Airwaves set doesn't fit. I had to cut the 'floor' brass away, and built the 'floor' back up with plastic rod (the floor itself was the bottom of the fuselage and there were just 'rods' at the bottom of the cockpit going from each sides' vertical members). In addition, the seat was too large - if it was built as the Airwaves instructions shown it would have stuck out of the fuselage. I cut away portions of the back of the seat and added CA to the top to represent the curved piece. In actuality, even the Airwaves seat isn't very accurate, since the Nie.28 seat is built up in multiple 'layers'. It's difficult to explain and pictures are needed to show exactly what I mean. I did add the Airwaves rudder pedals and 'kick plate', as well as the seat belts to the modified seat. The fuselage sides forward of the seat, 'floor' and control column were painted medium gray, while the Airwaves, cockpit sides, rudder pedal and 'kick plate' were painted a wood brown.
 Once
the cockpit was in and the fuselage sides glued together, I then sanded
away the fabric weave and the molded on venturi tube. This was later replaced
by a scratchbuilt example. The forward, underside of the fuselage needs
to be modified. The way Revell represents it in the kit is not 100% accurate.
Another area difficult to explain exactly what needs to be done, but studying
photos in the Datafile should help. Basically part of this area needs
a concave shape sanded into it.
Once
the cockpit was in and the fuselage sides glued together, I then sanded
away the fabric weave and the molded on venturi tube. This was later replaced
by a scratchbuilt example. The forward, underside of the fuselage needs
to be modified. The way Revell represents it in the kit is not 100% accurate.
Another area difficult to explain exactly what needs to be done, but studying
photos in the Datafile should help. Basically part of this area needs
a concave shape sanded into it.
After the horizontal tail surfaces were sanded to remove the fabric weave, the control surfaces were cut out and repositioned. There is a bar attaching both stabilizers to each other that is missing and this is easily added with plastic rod. Also, there's a part missing. The fuselage in essence blends into the horizontal tail. The basic shape was cut out of plastic sheet and after gluing it onto the horizontal tail it was blended into the fuselage and the horizontal tail.
 The
vertical tail surfaces needs modification. Not to the shape, as the shape
is basically correct, but to a few things Revell left off. First of all,
the 'fin' part of the tail is supposed to extend down to the fuselage,
at the aft end of the horizontal surface (past the stabilizer connecting
bar). Also, the fin is supposed to extend down to the horizontal just
in front of this point. Basically, Revell's 'cut out' in the vertical
surface is too much. I just ended up adding sheet styrene to the kit part
until it looked correct. I also separated the rudder - not only because
I wanted to reposition it, but it also helped with the 'fin"' reshape.
You will also need to add control horns to both sides of the rudder.
The
vertical tail surfaces needs modification. Not to the shape, as the shape
is basically correct, but to a few things Revell left off. First of all,
the 'fin' part of the tail is supposed to extend down to the fuselage,
at the aft end of the horizontal surface (past the stabilizer connecting
bar). Also, the fin is supposed to extend down to the horizontal just
in front of this point. Basically, Revell's 'cut out' in the vertical
surface is too much. I just ended up adding sheet styrene to the kit part
until it looked correct. I also separated the rudder - not only because
I wanted to reposition it, but it also helped with the 'fin"' reshape.
You will also need to add control horns to both sides of the rudder.
Final Assembly and Painting
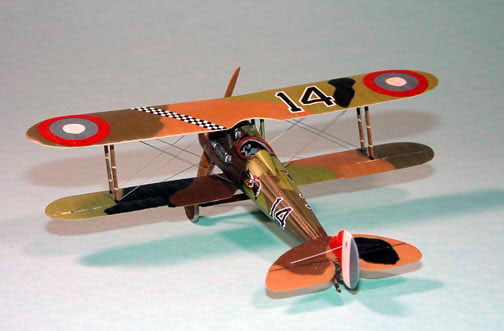
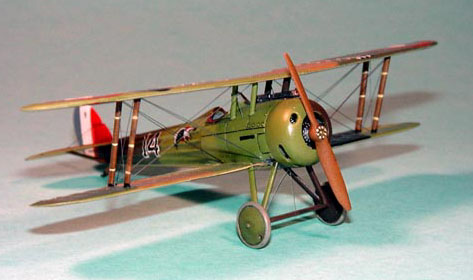
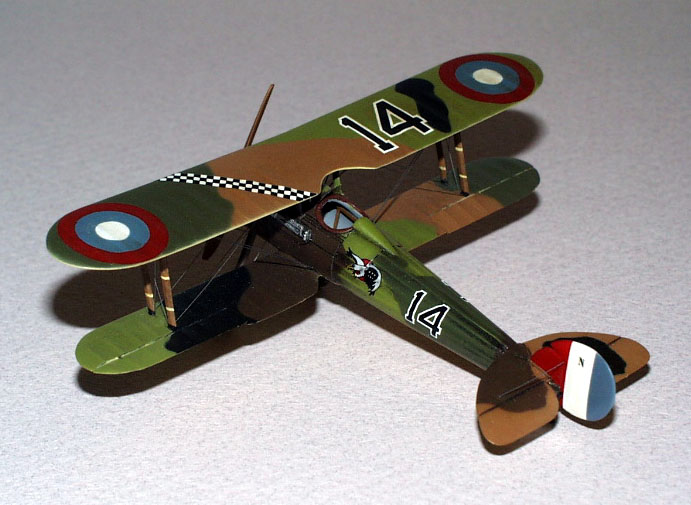
With the lower wing and vertical tail glued on and any gaps taken care of, painting can now commence. The French five-color is painted using Polly Scale colors. After the paint dried for all colors, I added the decals - which were all from various Microscale/Superscale sheets – and finished it as Zenos Miller's machine from the 27th Aero.
 The
cowl was replaced with an out of production Roseparts resin replacement
and the engine is the one from the kit. However, the propeller is wrong
out of the box, and it was substituted with one from the spares box and
the Vickers guns are Roseparts replacements.
The
cowl was replaced with an out of production Roseparts resin replacement
and the engine is the one from the kit. However, the propeller is wrong
out of the box, and it was substituted with one from the spares box and
the Vickers guns are Roseparts replacements.
The struts are scratched out of Contrail injected strut stock. The only thing that needs to be modified on the landing gear struts is the removal of the mounting pins from the forward part of the struts. Replacement wheels should be found since the kit supplied ones are too small - Rosemont makes the best replacement wheels. The axle/cross bars will need to be replaced, as Revell provides a snap in affair that is supposed to turn. These were made by making a brass rod axle and trapping this in two pieces of plastic to create the airfoil shape of the cover.
Conclusion
 Although
an older kit, its the only 1/72nd kit of the Nieuport 28 still on the
market. With some modifications it can be made into an accurate example
of this machine that brought the USAS into the fray.
Although
an older kit, its the only 1/72nd kit of the Nieuport 28 still on the
market. With some modifications it can be made into an accurate example
of this machine that brought the USAS into the fray.
References
-
Windsock Datafile #36, Nieuport 28
-
Over the Front, Vol. 11 No. 3