
This article originally appeared in the May 1999 issue of Internet Modeler.
 Building the
Dako Sikorsky S-16
Building the
Dako Sikorsky S-16
by Michael Kendix
Igor Sikorsky may be best known for his rotary wing (helicopters!) designs, however, during the First World War he was the architect of several successful aeroplanes flown by the Russian Imperial Air Service. The most famous of these is the legendary "Il'ya Mourametz" large four-engine bomber, but in the war's early years he developed a number of small fighters - the "S" series - including the various types of S-16.
Let me begin by recommending the Dako S-16 kit. It is inexpensive, fairly well detailed, and (for those less experienced modelers such as myself) it is not too difficult to build into a decent looking model. That being said, the kit has a number of inaccuracies that require a modicum of effort to correct, and other inaccuracies whose correction needs more skill and time than I possess. None of these inaccuracies need be addressed in order to actually assemble the model.
THE KIT:
 The kit looks good
on the sprue; there are only minor amounts of flash, all of which can
be cleaned up with some easy filing and sanding. The kit's downside is
the lack of accuracy, at least, compared with references in the Flying
Machine Press (FMP) publication "Sikorski S-16". A number of S-16 types
were produced by the Russians during World War I, and the Dako model does
not appear to have confined itself to representing a specific version;
the kit appears to be a hybrid, containing features of the different types
of S-16's. The kit's top wing has a larger span than the bottom wing,
and scales out to 8m in 1/72nd. A larger upper wing is a characteristic
of the S-16ser, S-16a and the S-163, whose upper wing spans measure 8.8m,
8.8m and 8.4m, respectively. The plain "S-16" - numbers 154, and 155 -
all have an 8.3m wing span for both their upper and lower wings, according
to FMP. There are no ailerons on the lower wing of the S-16ser, but the
kit has ailerons on the lower wing. Thus, it is unclear which particular
model this represents.
The kit looks good
on the sprue; there are only minor amounts of flash, all of which can
be cleaned up with some easy filing and sanding. The kit's downside is
the lack of accuracy, at least, compared with references in the Flying
Machine Press (FMP) publication "Sikorski S-16". A number of S-16 types
were produced by the Russians during World War I, and the Dako model does
not appear to have confined itself to representing a specific version;
the kit appears to be a hybrid, containing features of the different types
of S-16's. The kit's top wing has a larger span than the bottom wing,
and scales out to 8m in 1/72nd. A larger upper wing is a characteristic
of the S-16ser, S-16a and the S-163, whose upper wing spans measure 8.8m,
8.8m and 8.4m, respectively. The plain "S-16" - numbers 154, and 155 -
all have an 8.3m wing span for both their upper and lower wings, according
to FMP. There are no ailerons on the lower wing of the S-16ser, but the
kit has ailerons on the lower wing. Thus, it is unclear which particular
model this represents.
 The kit has other
minor deficiencies. First, there is no detailing on the fuselage sides
representing the inner struts and rigging showing through the fabric,
such as appear on the fuselage of ICM's Il'ya Mourmetz kit. Second, I
could find no pictures of the S-16ser with canvas covered wheels; all
pictures, including the box art, show wire wheels without any canvas cover.
Fortunately, the kit provides skis as an alternative; more on these later.
The kit has other
minor deficiencies. First, there is no detailing on the fuselage sides
representing the inner struts and rigging showing through the fabric,
such as appear on the fuselage of ICM's Il'ya Mourmetz kit. Second, I
could find no pictures of the S-16ser with canvas covered wheels; all
pictures, including the box art, show wire wheels without any canvas cover.
Fortunately, the kit provides skis as an alternative; more on these later.
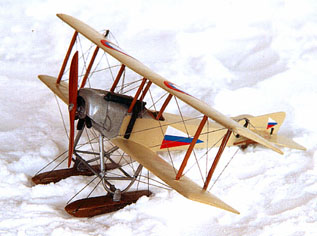
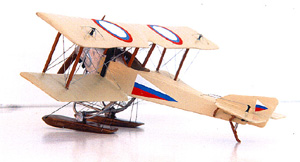
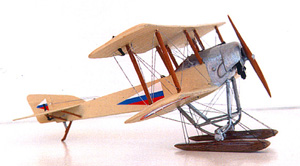
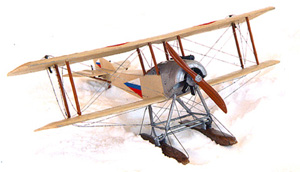
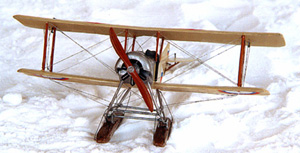
At this point I had to make a decision as to which model to reproduce. My choice was the S-16ser (also shown on the kit's decaling instructions), which has no lower wing ailerons, and a shorter lower wing span. It is also well documented in the FMP book with plenty of photographs of the original aeroplane and reproductions of plan drawings, and a large 3-dimensional drawing.
 The upper wing
at 1/72 scale measures only 8m, which is smaller than any of the specifications
in FMP, however, other sources have this wing's span at 8m. Overall, if
it purports to represent an S-16ser, the model appears to be somewhat
small, and as far as I can tell, the whole kit is about 10% too small
for 1/72 scale; thus, it's approximately a 1/81 scale model. The wing
tips and ailerons are straight and flush in all the diagrams and pictures,
however, the kit's ailerons protrude out in the model. They need to be
sanded down and made flush with the wingtips. The ailerons are also too
short; they should extend further toward the fuselage. The horizontal
tail surface and the tail fin are shaped incorrectly. There are too few
ribs on the wings' surface, so any alterations to the ailerons have to
be made proportionately, rather than counting the number of ribs, unless
you decide to scratch build a new set of wings, or put a new plastic skin
on the wings.
The upper wing
at 1/72 scale measures only 8m, which is smaller than any of the specifications
in FMP, however, other sources have this wing's span at 8m. Overall, if
it purports to represent an S-16ser, the model appears to be somewhat
small, and as far as I can tell, the whole kit is about 10% too small
for 1/72 scale; thus, it's approximately a 1/81 scale model. The wing
tips and ailerons are straight and flush in all the diagrams and pictures,
however, the kit's ailerons protrude out in the model. They need to be
sanded down and made flush with the wingtips. The ailerons are also too
short; they should extend further toward the fuselage. The horizontal
tail surface and the tail fin are shaped incorrectly. There are too few
ribs on the wings' surface, so any alterations to the ailerons have to
be made proportionately, rather than counting the number of ribs, unless
you decide to scratch build a new set of wings, or put a new plastic skin
on the wings.
CONSTRUCTION:
My first task was to begin correcting some of these inaccuracies. I sanded down the protruding ailerons until they were flush with the straight edged wing tips. The S-16ser has no ailerons on its lower wings; (it is like the Il'ya Mourmetz in that respect) so these were filled-in using Squadron White putty, then sanded, after which a couple of coats of paint were applied.
 I painted the
fuselage CDL, inside and out, the cowl aluminum, the control wheel black
with its center spokes aluminum, and the seat looks like wicker in the
profile so I painted it wood brown (Humbrol 110) with some brown pencil
lines criss-crossing the surface to give a wicker look. I painted the
landing gear aluminum, the foot rudder brass, the engine black, the gun
and ammunition chute gun metal, and the instrument panel wood brown. I
could not find a clear picture of the instrument panel, so it is difficult
to know what it should look like. The cockpit materials are mounted on
top of the center of the lower wing part.
I painted the
fuselage CDL, inside and out, the cowl aluminum, the control wheel black
with its center spokes aluminum, and the seat looks like wicker in the
profile so I painted it wood brown (Humbrol 110) with some brown pencil
lines criss-crossing the surface to give a wicker look. I painted the
landing gear aluminum, the foot rudder brass, the engine black, the gun
and ammunition chute gun metal, and the instrument panel wood brown. I
could not find a clear picture of the instrument panel, so it is difficult
to know what it should look like. The cockpit materials are mounted on
top of the center of the lower wing part.
The kit provides a choice of covered wheels or skis. As mentioned above, I chose to build the model with skis rather than use the covered wheels. I glued the skis together with CA and puttied them to cover the join. I painted the skis wood brown (Humbrol 110), which incidentally looks nothing like wood, and left it to dry for a couple of days. I took some "Kiwi" brown shoe polish so that a trace amount of it was on my finger. Then I gently rolled my finger over the surface and smudged a little. I added a little more and rubbed a little more in until it looked more like wood grain. Then, I covered it with a coat of "Future".
I scribed new lines to extend the upper wing ailerons towards the fuselage, using a scribing tool and a 3 square needle file to shape the groove. The top wing was then sanded down and painted over.
The fuselage port and starboard halves did not fit that well and significant
puttying and sanding efforts had to be made, however, since you always
have to putty the fuselage halves to make the join disappear,  it made little difference. The instrument panel had to be sanded down
in order for the fuselage to have any hope of fitting together. I sanded
down both the sides and the top. I also sanded down the bottom, including
getting rid of the 2 sprockets that go into the holes of the cockpit floor.
This allowed further shortening and sanding of the instrument panel which
was necessary for it to fit. The cockpit is a fairly open design, and
although the instrument panel is barely visible, the seat and control
stick are quite easy to see. Thus, it's worth doing a decent job on the
latter.
it made little difference. The instrument panel had to be sanded down
in order for the fuselage to have any hope of fitting together. I sanded
down both the sides and the top. I also sanded down the bottom, including
getting rid of the 2 sprockets that go into the holes of the cockpit floor.
This allowed further shortening and sanding of the instrument panel which
was necessary for it to fit. The cockpit is a fairly open design, and
although the instrument panel is barely visible, the seat and control
stick are quite easy to see. Thus, it's worth doing a decent job on the
latter.
Next I sanded down the bumps on the front left and right sides of the end of the fuselage, to make the end flush. This enabled the engine cowl to be glued on straight and without gaps. I glued speaker wire filament to the front of each of the engine cylinders to represent the tappet rods on the 7 cylinder Gnome 80 h.p. engine. The inside of the cowling needed shaving down to accommodate the engine, which otherwise would not fit under the cowling.
 I then began building
a new horizontal tail surface and tail fin from .020 card. This was a
little difficult because I could not simply trace the outline of the plan
drawing because the kit is in a smaller scale than the 1/72 scale drawing
in the FMP reference. After cutting the correct shape for the tail pieces,
I scribed grooves for the ribs. I then glued .020" plastic rod into the
grooves and sanded it until it was barely visible. A couple of coats of
paints were enough to cover most of the imperfections.
I then began building
a new horizontal tail surface and tail fin from .020 card. This was a
little difficult because I could not simply trace the outline of the plan
drawing because the kit is in a smaller scale than the 1/72 scale drawing
in the FMP reference. After cutting the correct shape for the tail pieces,
I scribed grooves for the ribs. I then glued .020" plastic rod into the
grooves and sanded it until it was barely visible. A couple of coats of
paints were enough to cover most of the imperfections.
The gun stuck out too far to port, preventing the cabane struts from fitting properly. I needed to carve out a space toward the center of the fuselage so the gun could move to the center a bit. This allowed the cabane strut to fit without the gun being in the way. After gluing the top wing on with the interplane struts, I found the cabane struts were too short, so I scratched some from Evergreen StripStyrene. More experienced modelers recommend gluing the cabane struts first, and replacing the interplane struts if necessary. This could be done, however, it would require scratch building aerofoil shaped struts or purchasing strut material. The former is fairly challenging, at least for me, and the latter adds to the expense.
I then assembled and attached the landing gear. The axle rod broke as I was trying to poke it through the holes in the bracket attached to the skis. I replaced the axle with a piece of similar gauge wire from a paper clip. The holes in the bracket had to be widened slightly to accommodate the axle.
 Although there's
only one bay per side, the wing rigging is a little unusual because there
are control horns on both the top and bottom of the upper wing. There
are no ailerons on the lower wing. I used pieces of Evergreen Strip Styrene
.010" x .080" to make the aileron control horns, and attached the rigging
using the "Dennis Ugulano" method. This requires drilling holes with a
size 80 drill bit before construction, at the ends of the struts and other
connecting points. I used "Invisible Thread" for the rigging and painted
it aluminum, except for the bungee chords stretching from the landing
gear to the skis, which were painted black.
Although there's
only one bay per side, the wing rigging is a little unusual because there
are control horns on both the top and bottom of the upper wing. There
are no ailerons on the lower wing. I used pieces of Evergreen Strip Styrene
.010" x .080" to make the aileron control horns, and attached the rigging
using the "Dennis Ugulano" method. This requires drilling holes with a
size 80 drill bit before construction, at the ends of the struts and other
connecting points. I used "Invisible Thread" for the rigging and painted
it aluminum, except for the bungee chords stretching from the landing
gear to the skis, which were painted black.
I covered the surfaces that were to receive decals with "Future". The decals were a little thick and even with the application of Decal Set, they did not really "melt" into the surfaces. The Russian roundels on the upper surface of the top wing were placed closer to the fuselage, as shown in both the FMP book and the kit's instructions. The under surface of the lower wing has the decals in the more conventional position, as shown in the kit instructions, although the FMP book showed examples of roundels in that position and closer to the fuselage.
CONCLUSION:
In summary, I recommend this kit. It is straightforward if you build it out-of-the-box, but is more challenging if you want to make the various changes described above. Additional features that I did not have the time or skill to build might include, a windshield, bungee lagging for the skis or wheels (do this prior to attaching the skis or wheels), and cutting out the control surfaces and gluing them back in up/down position. The more experienced and adventurous modelers may want to re-skin the fuselage in order to add the missing inner strut and cable detail, and similarly for the wings to create the correct number of ribs.
REFERENCE:
Mikheyev, Vadim. "Sikorsky S16.: Great War Aircraft in Profile No.1"; Flying Machines Press , 1997
ACKNOWLEDGMENTS:
The Dako Sikorski S-16 kit was supplied by Barry Stettler of Rosemont Hobby Shop . Many thanks to Bob Pearson for his advice, Dave Vosburgh for support and Robert Kane for his tips on making snow.