
This article originally appeared in the July 2000 issue of Internet Modeler.
 Model
Cellar 120mm Eddie Rickenbacker
Model
Cellar 120mm Eddie Rickenbacker
By Federico Kereki
Introduction
Model Cellar (MC) has a very interesting WWI 120mm figures line, surpassed in quantity, as far as I know, only by "Firing Line". The line includes many pilots – von Richthofen (which I already built), Lufberry, Bishop, Rickenbacker, and more are on the way as I ascertained from MC itself. I am building myself a 120mm WWI figures collection, and this article shows how I built and finished Eddie Rickenbacker's model.
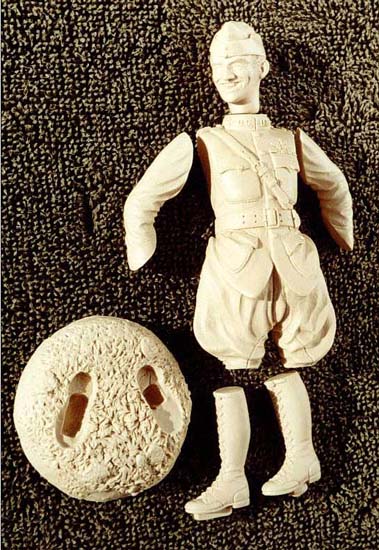 Cleaning
up didn't take too long, for MC helpfully removes the larger pieces itself,
leaving you only with an easy sanding job. (I would really like it if
other figure manufacturers took the hint!)
Cleaning
up didn't take too long, for MC helpfully removes the larger pieces itself,
leaving you only with an easy sanding job. (I would really like it if
other figure manufacturers took the hint!)
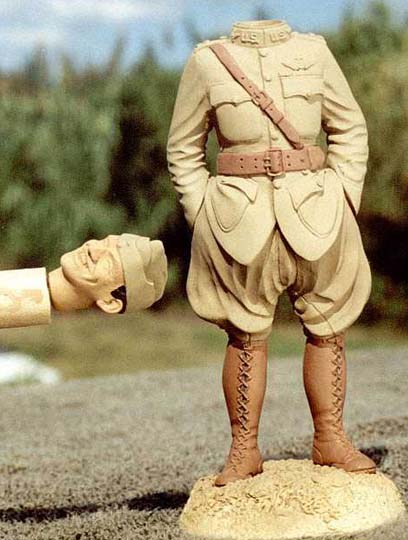 I
am of the "build-first, paint-later" school, and thus prefer gluing as
much as possible before painting. I use either cyanoacrylate (CAA) or
epoxy to build the figure, and in this case, I used the former, together
with Testors' accelerator. I had to fix some slight gaps in the shoulder
joints, but this was easy to do. Note that the head isn't actually glued
on; I just put it on for the effect, but it's easier to paint it separately
and only then put it into place. I use oils, and since these paints are
more or less transparent, a good base is mandatory. I airbrushed a khaki
drab color overall, and then picked out the belt, boots, and face, with
enamels. I didn't worry about the smaller details, like buckles, ribbons
or captain bars; it's too easy to mess them up, and so I leave these things
for later. See, in figure 3, the "head-on-a-stick" method for avoiding
fingerprints while you paint. In addition, the base was quite helpful,
letting the figure stand without having to touch it.
I
am of the "build-first, paint-later" school, and thus prefer gluing as
much as possible before painting. I use either cyanoacrylate (CAA) or
epoxy to build the figure, and in this case, I used the former, together
with Testors' accelerator. I had to fix some slight gaps in the shoulder
joints, but this was easy to do. Note that the head isn't actually glued
on; I just put it on for the effect, but it's easier to paint it separately
and only then put it into place. I use oils, and since these paints are
more or less transparent, a good base is mandatory. I airbrushed a khaki
drab color overall, and then picked out the belt, boots, and face, with
enamels. I didn't worry about the smaller details, like buckles, ribbons
or captain bars; it's too easy to mess them up, and so I leave these things
for later. See, in figure 3, the "head-on-a-stick" method for avoiding
fingerprints while you paint. In addition, the base was quite helpful,
letting the figure stand without having to touch it.
For this figure, I decided to try something that actually didn't make much of a difference. I painted the breeches a darker color, so there would be some tonal variation between the two parts of the uniform. This kind of "pre-shadowing" does work, but in my case I was too timid, and after applying the oils I couldn't really notice any variation – next time I'll exaggerate the effect a little more!
Now on to the painting!
 I
always begin with the face – it's the hardest part for me to get
right, and if I mess up at least I won't spoil other painting jobs I might
have done. The enamel base is a mix of sand, orange and white. The flesh
oil mix is Titanium White, Yellow Ochre, and Burnt Sienna. After applying
this color (quite lightly; the brush mustn't leave any marks) I use a
mixture of Burnt Sienna and Raw Umber at the sides of the nose, below
the eyes, under the lower lip, in the ear, and under the cheekbones, and
I blend it carefully with the base color using the thinnest 000 brush
I have. Darker shadows (Raw Umber) go between the upper eyelid and the
eyebrows and along the hairline. Finally, the tip of the nose and the
chin get pure white (just the smallest dab) for extra highlighting, and
the cheeks some red - these steps actually bring the face to life!
I
always begin with the face – it's the hardest part for me to get
right, and if I mess up at least I won't spoil other painting jobs I might
have done. The enamel base is a mix of sand, orange and white. The flesh
oil mix is Titanium White, Yellow Ochre, and Burnt Sienna. After applying
this color (quite lightly; the brush mustn't leave any marks) I use a
mixture of Burnt Sienna and Raw Umber at the sides of the nose, below
the eyes, under the lower lip, in the ear, and under the cheekbones, and
I blend it carefully with the base color using the thinnest 000 brush
I have. Darker shadows (Raw Umber) go between the upper eyelid and the
eyebrows and along the hairline. Finally, the tip of the nose and the
chin get pure white (just the smallest dab) for extra highlighting, and
the cheeks some red - these steps actually bring the face to life!
Some details now. The lower lip gets pink mixed from red and white; the upper lip gets nothing. The inner part of the mouth is a reddish brown: red plus raw umber works. Don't go for full white for the teeth; I add some brown or yellow to white to get an off-white color, and that works better. Hair is reasonably easy to paint. I usually begin with a black or dark brown base (I used the former in this case) and then drybrush the final color (brown for Rickenbacker) carefully --- if you drybrush the ear it won't look nice!
The hardest part is painting the eyes. I used to do this the hard way, trying to put the smallest touches of white, brown, and black in the appropriate spots between the eyelids - but my pulse and painting abilities really aren't quite up to the task. What to do? I just discovered the solution: decals! Archer produces sheets of 120mm size eyes in plenty of colors, and they are quite easy to apply. Just paint the eye an off-white color, put a gloss coat on it, apply the selected eyes (they should both be looking in the same direction), and finish with another gloss coat. A suggestion: try to make the eyes look sideways; straight-ahead looking faces don't seem quite real.
 I
must say using these decals makes it really quite easy and fast! It took
longer to write and edit this paragraph and the previous one than to apply
the decals. If you want great looking results with the least work, go
for them. (They are quite cheap, too; a page costs only a few dollars,
and includes about 200 pairs of eyes.)
I
must say using these decals makes it really quite easy and fast! It took
longer to write and edit this paragraph and the previous one than to apply
the decals. If you want great looking results with the least work, go
for them. (They are quite cheap, too; a page costs only a few dollars,
and includes about 200 pairs of eyes.)
For the uniform, I began by mixing an appropriate khaki drab color. Colors varied a lot during the war, and you can't miss with practically any brown. I made my own color starting with Van Dyke brown, lightened with a small bit of Lemon Yellow, and modified with Naples Yellow. (All colors are Winton, by Windsor & Newton.) I checked the color with some samples of Humbrol colors like 29 (Dark Earth), 26 (Khaki), 155 (Olive Drab), and so on.
I applied drab overall, leaving just the merest coat on; you must remove paint until the brush leaves no marks. I used Raw Umber for shadows and Naples Yellow for highlights. I applied these two colors by stippling: I just touch the point of the brush to the color, then dab a few dots, and I mix the old color with the new by stippling with a clean brush. I use a brush especially for this; painting by stippling will ruin the bristles, and the brush won't be useful for anything else. Doing lights and shadows is rather straightforward. Edges (for example, pockets, creases.) usually get the shadow color. Flat surfaces that would get most of the light from above get the light color. Folds get both colors: shadow inside, light on the very border. Success depends on how well you manage to meld colors together, and stippling manages just that. Try not to merge the light and shadow colors together, however. If you make a mistake, you can always try cleaning the spot with a clean rag, and start anew with the basic color.
 After
finishing the uniform, I did the leather parts. This is one of the jobs
I like the most; by using oils, the effect is remarkable, and quite easy
at that. I use a reddish brown color as a base: in this case, I believe
I used german brown armor camouflage color, having run out of my usual
brick (Humbrol 70) color. Burnt Sienna goes on next as described above,
followed with Raw Umber shadows and Cadmium Yellow lights. Belt holes
and buckles get extra shadows. I try to apply the light color only at
the center of the belt, leaving darker colors at the edges. Check the
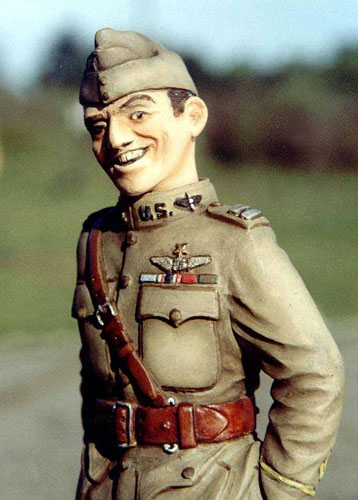
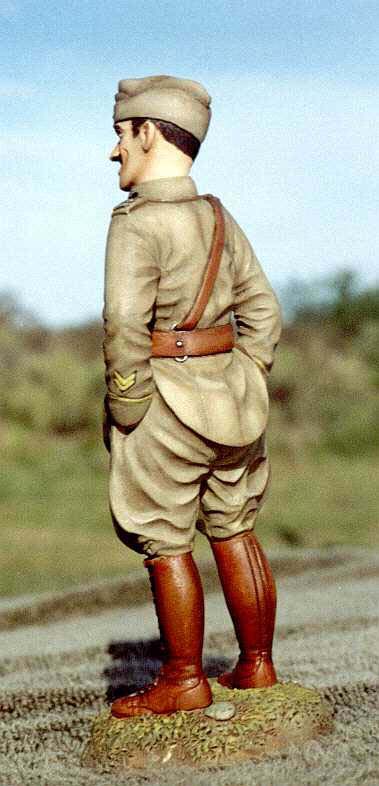
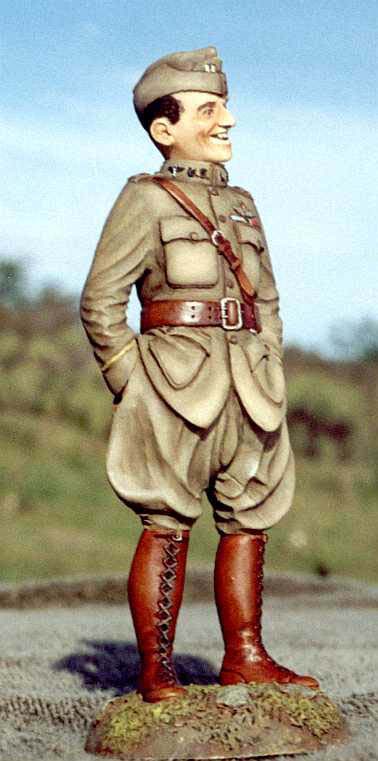
results on figures 4 through 7.
After
finishing the uniform, I did the leather parts. This is one of the jobs
I like the most; by using oils, the effect is remarkable, and quite easy
at that. I use a reddish brown color as a base: in this case, I believe
I used german brown armor camouflage color, having run out of my usual
brick (Humbrol 70) color. Burnt Sienna goes on next as described above,
followed with Raw Umber shadows and Cadmium Yellow lights. Belt holes
and buckles get extra shadows. I try to apply the light color only at
the center of the belt, leaving darker colors at the edges. Check the
results on figures 4 through 7.
Now to details.
I drybrushed the bootlaces with Khaki Drill (Humbrol 72). I applied a very thin Raw Umber wash along the edges of all the leather parts, to make them look separate from the uniform fabric. (The pocket edges and the ribbons also got this wash.) Buttons are easy: first paint them black, and when dry fill just the center with the correct color; that way, the black edge will give a 3D look to the buttons. I used the same method for the captain bars, drybrushing them later with metallic silver. (In fact, I use this method for all metals; check the buckles, for example.)
The ribbons were a special problem - which color to paint them? This stumped me for a while, and I turned to the Internet for answers. After a while, I found information on Eddie Rickenbacker at THE AERODROME, (including the list of his medals) and the ribbons themselves at other website. By the way, and though I can't vouch for this, it seems like most ribbons are just, more or less, a short piece of the original medal ribbon; the Medal of Honor shows little differences (the number of stars and their pattern aren't the same) but this rule apparently holds.
After all this work, the base was simple. It isn't a great base, but it does the job of presenting the figure nicely; I certainly do wish that all kits included at least such a basic base (forgive the pun). I just painted it overall brown for starters, and painted the rest by drybrushing, finishing with a dark wash. The grass parts got green first and yellow afterwards, and the rocks got different gray tones. On the earth I just spot drybrushed different drab colors.
Now to the finish.
 Some
figure painters dislike giving clear coats to the figures, and manage
to get flat or gloss finishes by adding different products to oils. Having
built quite a lot of armor models, clear (flat, semigloss, or gloss) coats
are nothing new to me, and I gave the figure a matt coat overall, brushing
semigloss afterwards on the leather parts and captain bars, and gloss
on the eyes.
Some
figure painters dislike giving clear coats to the figures, and manage
to get flat or gloss finishes by adding different products to oils. Having
built quite a lot of armor models, clear (flat, semigloss, or gloss) coats
are nothing new to me, and I gave the figure a matt coat overall, brushing
semigloss afterwards on the leather parts and captain bars, and gloss
on the eyes.
The very last touch was adding some pastels to the boots, to make them look dusty. The lower part, nearer to the sole, got the heavier layer of "dust".
How long did all of this take? I am mostly a weekend modeler, and the figure took four weekends, almost a month. Let us see: I built everything and applied a base coat on the first weekend. Next week I did the face and the uniform. I did the eyes, ribbons, and leather parts, as well as the base, on the third weekend, and on the last one I glued the last separate parts together, and applied the clear coats. A month sounds a lot, but you could do it faster, though you would have to find some way to make the oils dry sooner.
I am quite satisfied with the results, and plan to build the whole MC line. As of now, I have only finished two of them, but I already have another couple in the wings!