
This article originally appeared in the February 2000 issue of Internet Modeler.
 The
120mm WW1 Figures of
The
120mm WW1 Figures of
Federico Kereki
[Editor's note - Federico submitted these photos for the reader's gallery, Rather than just use one or two I thought they all should be seen. Therefore, I asked Federico for a little more information. His comments are included below–RNP]
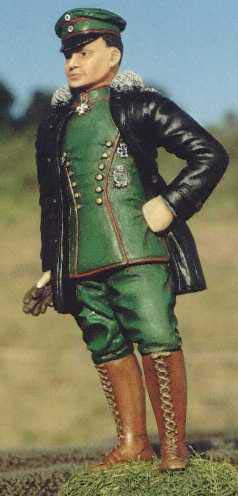
Hi! I'm a Uruguayan modeler (IPMS Uruguay member since about ten years ago) and these are pictures of my first WWI 120mm figures – The Red Baron is from MODEL CELLAR, and the BAR gunner and the Stosstrupp are VERLINDEN. I used to model in 1/72, but since I realized that it took about the same time to finish a small or large scale figure -- and that the larger models looked better -- I changed over to 1/35 tanks (mainly of the Korean war), 1/48 aircraft and 120mm figures (WWI).
I usually build the whole figure before painting, leaving only small details, weapons, and sometimes heads and hands out. All the figures are outstanding as to detail, and they aren't hard to build; the only boring part is removing the pouring blocks of resin. (By the way, at the beginning I removed them by sawing; hard, slow, and leaving lots of dust in the air, but then I started using the "scribe and snap" method and I got quicker and cleaner results. Of course, in both methods you must finish up with some sanding.)
I start painting with a general coat of a sand-like color, which also doubles as a base for the flesh parts. I glue (lightly!) hands and heads to any kind of support I can manage, so I won't have to handle them directly. My painting technique is a mixture of different methods I have found, such as Sheperd Paine's, Verlinden's, and others, so I won't claim any kind of originality; I will only say it works for me! I mix a flesh color out of titanium white, raw sienna and cadmium yellow, and apply it all over the flesh areas. Then, I apply raw sienna in the middle shadow areas (the sides of the nose, the ear, under the lip), blending it with the previous flesh color by stippling, and then burnt umber in the dark shadow areas (the eyes, behind the ears, the hair border). Then I apply and blend a small red dot on the cheeks, and dabs of pure white to the tip of the nose and the chin. The eyes come at the end; I do them in black acrylic paint, and then pick out the corners of the eye with white (also acrylic), usually using a pin or a sharpened toothpick for it, and finishing with a small drop of gloss varnish. The eyebrows and hair get a base coat (usually black) and some drybrushing for contrast and highlights.
 |
 |
 |
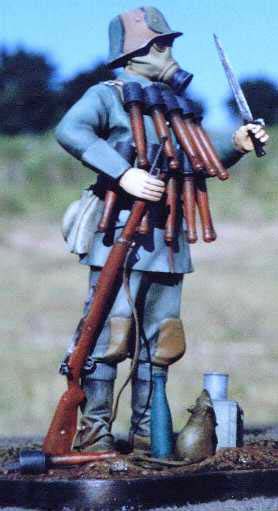 |
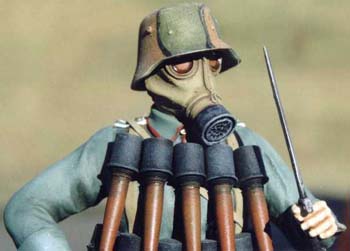
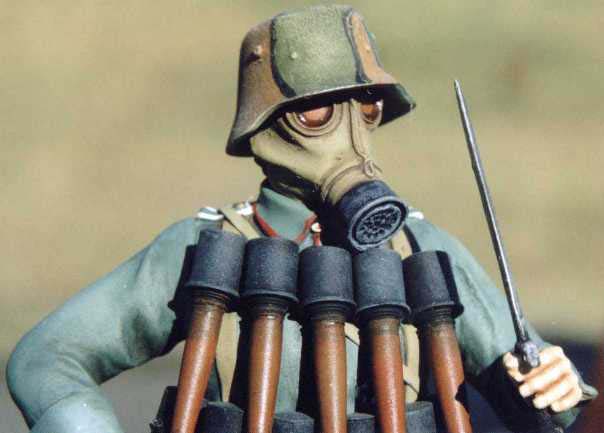
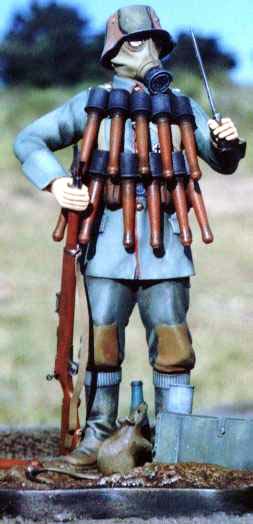
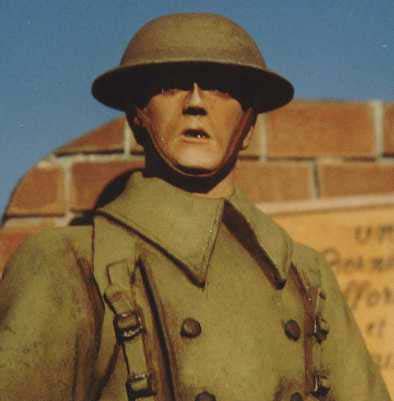
The assault trooper (Stosstrupp) went easily together, though I had to leave many parts for afterwards; the (eleven!) grenades, the gas mask container, the canteen, and so on. Mixing oils is really hard for me, but Internet helps. I started with a slate gray base coat for the uniform, and then managed to get a Feldgrau color for the blouse, and a Steingrau for the trousers. (I doubt I will ever manage to come up with the same mixes, but during WWI there were many variations due not only to different fabric makers but to the effect of the sun, mud, wetness, and so on, so I won't worry too much about the actual shades.) The buttons and medals were painted as I described above. The boots got a heavy drybrushing with khaki drill. The camouflaged helmet (a German specialty) was also drybrushed this way, with some aluminum used on the edges. I scratchbuilt a sling for the rifle out of lead foil and thin wire. I painted all wood (the rifle stock and the grenade handles) with oils (sienna, yellow, burnt umber). I always use drybrushing for the metal parts, over a black coat; the rifle got finished that way. Finally, I used washes and drybrushing for the mask (I practically never use washes, for I generally manage to foul things up, but this time they worked fine), along with a drop of clear gloss varnish for the eyes. As to the base, the kit provided it, so it was only a question of painting it: enamels and a wash with acrylic paints were enough. The rat got a special job, with oils and some drybrushing. (I even thought about adding stretched sprue whiskers to the rat's muzzle, but in the end sanity prevailed!)
 |
 |
 |
 |
 |
|
 |
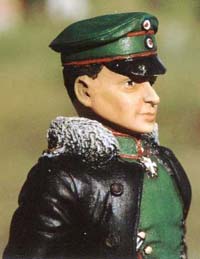 |
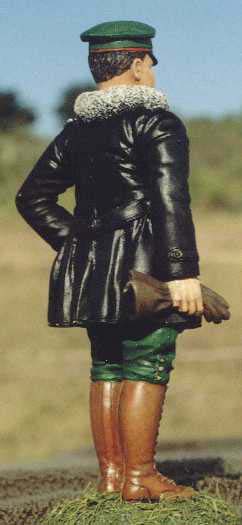
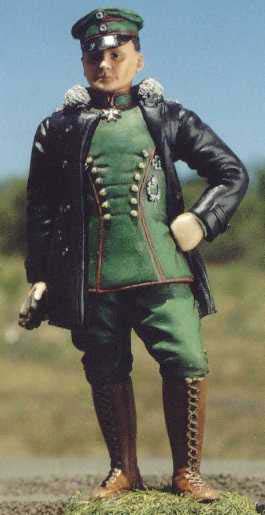
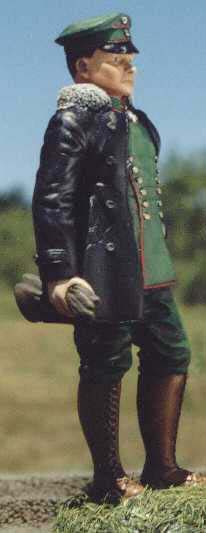
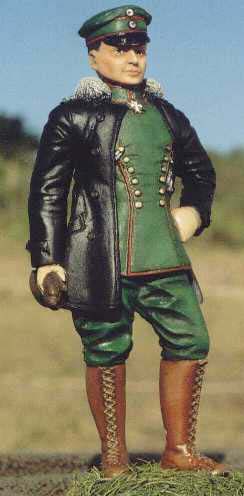
Manfred von Richthofen actually was a Ulan (cavalry) officer, and I had to experiment quite a lot to mix the right shade of green. (At least, the right shade according to some references I dug up; let's not be too finicky about it!) I painted the buttons and medals black, and then applied Humbrol metallics to finish them; this way, you get a "shadow" around them, which gives more of a three dimensional look. One thing I really like to do with oils is painting leather or wood; I used many different colors over a raw sienna base in order to paint the boots, and I really like how they look. The black leather jacket was no problem, but I was stumped for a while with the epaulettes; as usual, the kit includes no instructions, and I couldn't find out which color to paint them. Luckily, over at the Track-Link newsgroups, someone had already found the answer to that: they are quite similar to the WWII Luftwaffe shoulderboards, and I painted them that way. After gluing the missing parts, I finished the figure with a matt coat and then brushed on a semigloss coat on the jacket and boots, so as to restore the appropriate look. The grass on the base is finely cut hemp rope, painted green and drybrushed with yellower tones.
 |
 |
 |
|
 |
 |
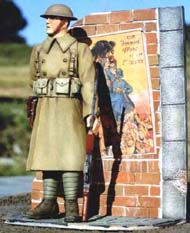
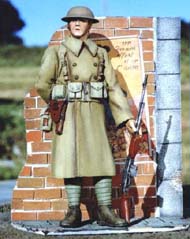
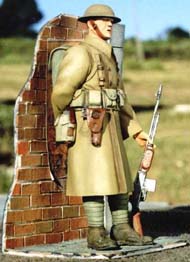
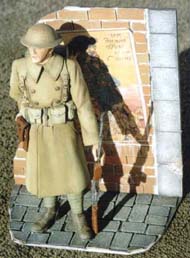
Finally, the American BAR gunner was somewhat harder to build up, and I had to use more filler than usual. I painted it the same way as the other figures, with an addition: I used thin burnt umber oil washes, applied with a 000 brush, to highlight the edges of belts, the canteen cover, the ammo pouches, and so on; I feel that it gives it a more natural look. I painted the puttees dark brown, and drybrushed them (thoroughly) with olive drab; the dark brown stays in the "shadows" and you get fast, nice results. I also used this method for the pouches (starting with dark grey and finishing with khaki drill) and the helmet (starting with black and finishing with dark earth). The helmet also received some color variations with pastels, which also give a more matte finish. The base was scratchbuilt, and quite easily at that: I used cardboard of different thicknesses, cutting stones and bricks of the right sizes, gluing them on to the "wall" and "ground", and finishing with a acetone-diluted putty coat. (If you stipple --with an old brush!!-- the putty before it dries, you will get a more realistic finish; check the cobblestones to see it.) Finally, I got the poster on the web (just don't ask where; I surfed around until I found it: go to YAHOO! and try looking for POSTERS and/or PROPAGANDA) and printed it out at an appropriate size on a inkjet printer. It's an easy (and cheap!) way to get posters for dioramas or vignettes!