
This article originally appeared in the October 2000 issue of Internet Modeler.
 Ernst Udet's
"Candy-Striped" Fokker D.VII
Ernst Udet's
"Candy-Striped" Fokker D.VII
By Bob Laskodi
History
Almost everyone can tell you who was the highest ranking German ace during World War I, as the famous "Red Baron", AKA Manfred von Richthofen was probably the most widely known warrior from the "Great War". But who was number two will probably elicit shrugs and wrong answers from most individuals. His name was Ernst Udet and he earned 62 victories against the allied forces, second to only Richthofen. Udet was born in Frankfurt on 26 April, 1896 and proved at an early age a daredevil streak burned within as he used to enjoy jumping off the roof of his house with only an umbrella to act as his imaginary parachute. Little did he know that playful act might have helped save his life many years later when he was forced to parachute from his stricken aircraft. His first taste of the war was not in the air, but on the ground, serving as a motorcycle courier through the early stages of the war. Evidently, riding motorcycles was not thrilling enough for him, so he transferred into the German Air Service where he started his aerial career flying two-seat observation aircraft.
His career as a two-seater pilot came to an abrupt end when he stalled his aircraft in a shallow turn just after takeoff and crashed on the end of the runway as a complete wreck. His CO was infuriated at his carelessness and threw him in the base stockade for a week to think about his actions. Immediately upon his release, he took an unauthorized trip on a bombing mission to release his frustrations further irritating his CO. Frustrated by his recklessness and independent charge, the CO transferred him to a single seat Eindecker unit, where the only person he could kill while flying was himself. Thus the second highest-ranking German ace was on his way to becoming an eventual war hero.
The Kit
 The
kit is DML/Shanghai Dragon's 1:48 Fokker D.VII #5908-01. It is not currently
in production, however kits can still be found with some searching. It
is interesting to note that the kit is still listed as currently in production
in Shanghai Dragon's 2000 catalog. An e-mail response indicated that they
have no plans to re-issue the kit at this time, however if demand warrants
they will reconsider another production run. That is a shame as this kit
is one of the best Fokker D.VII models available. E-mails to comment@dragon-models.com
may be helpful to prod them to place this kit back into production. This
is a multi-media kit featuring injected molded plastic parts (42 parts),
two P/E sheets (16 items), stainless steel wire for rigging, a 1:12 scale
bust of Ernst Udet, and lozenge decals (although they are not in the correct
colors). The instruction sheet is an eight-page diagram assembly with
marked color painting guidelines.
The
kit is DML/Shanghai Dragon's 1:48 Fokker D.VII #5908-01. It is not currently
in production, however kits can still be found with some searching. It
is interesting to note that the kit is still listed as currently in production
in Shanghai Dragon's 2000 catalog. An e-mail response indicated that they
have no plans to re-issue the kit at this time, however if demand warrants
they will reconsider another production run. That is a shame as this kit
is one of the best Fokker D.VII models available. E-mails to comment@dragon-models.com
may be helpful to prod them to place this kit back into production. This
is a multi-media kit featuring injected molded plastic parts (42 parts),
two P/E sheets (16 items), stainless steel wire for rigging, a 1:12 scale
bust of Ernst Udet, and lozenge decals (although they are not in the correct
colors). The instruction sheet is an eight-page diagram assembly with
marked color painting guidelines.
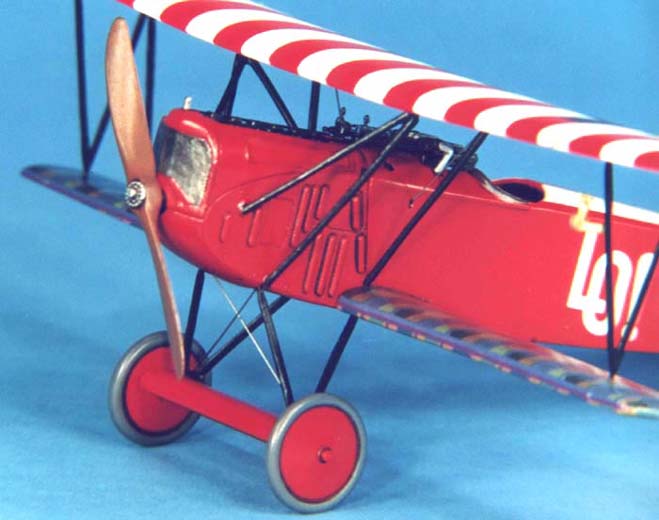
Construction
 The
first job up was to pre-paint all the parts as indicated in the instructions.
Interior fuselage walls were painted a dark olive. Assembly of the fuselage
components was accomplished using super-thin superglue. Assembly proceeded
as described in the instructions, with no major problems. The engine was
next as I painted it flat black and then drybrushed Metalizer Aluminum
on the cylinder heads and crankcase cover and assembled the components
as indicated. I wrapped the engine assembly in Parafilm and then glued
it to the engine mounts.
The
first job up was to pre-paint all the parts as indicated in the instructions.
Interior fuselage walls were painted a dark olive. Assembly of the fuselage
components was accomplished using super-thin superglue. Assembly proceeded
as described in the instructions, with no major problems. The engine was
next as I painted it flat black and then drybrushed Metalizer Aluminum
on the cylinder heads and crankcase cover and assembled the components
as indicated. I wrapped the engine assembly in Parafilm and then glued
it to the engine mounts.
I then closed up the fuselage with liquid cement. Next, I glued with liquid cement the tail fin, horizontal stabilizer, and lower wing to the fuselage. All joins were then sanded smooth, and no putty was required for gap filling. Then I drilled and dry-fitted all of the rigging, strut, and landing gear mounting holes to assist in final assembly as nothing is more frustrating as trying to get these pieces together with a fragile biplane. Next stop was the paint shop.
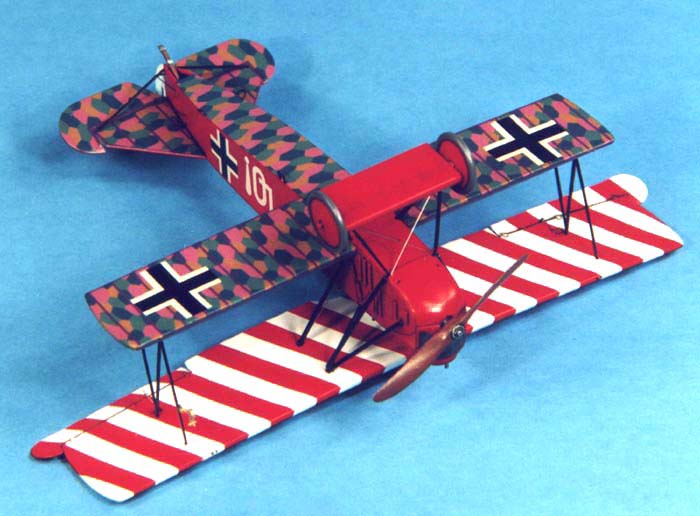
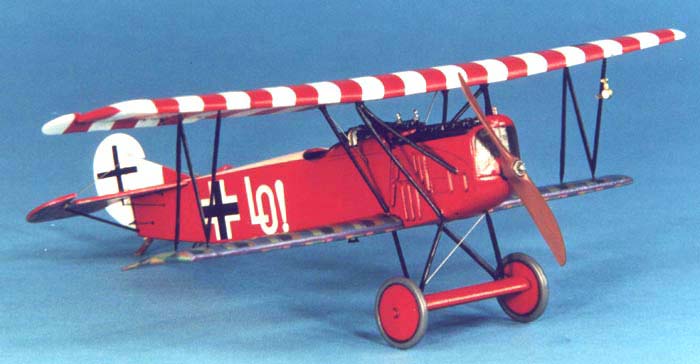
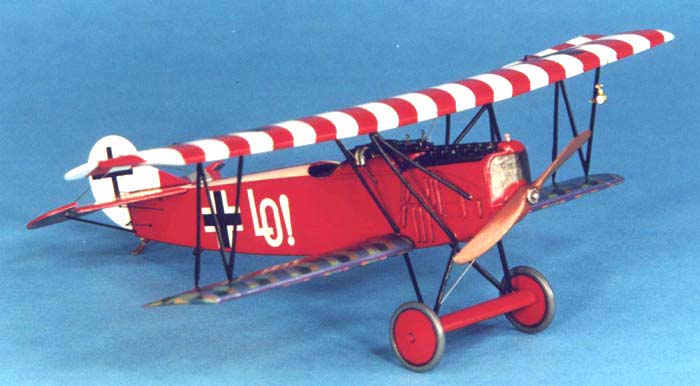
Painting and Decals
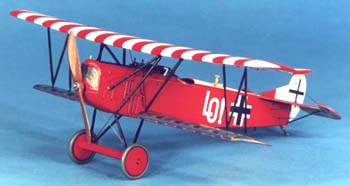
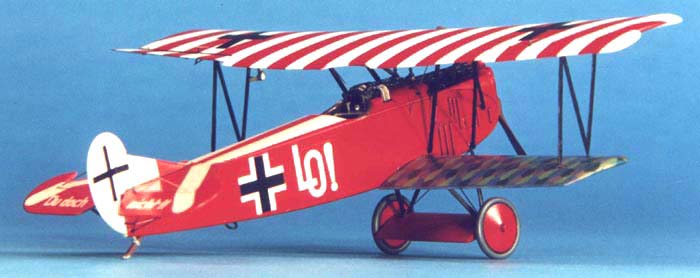
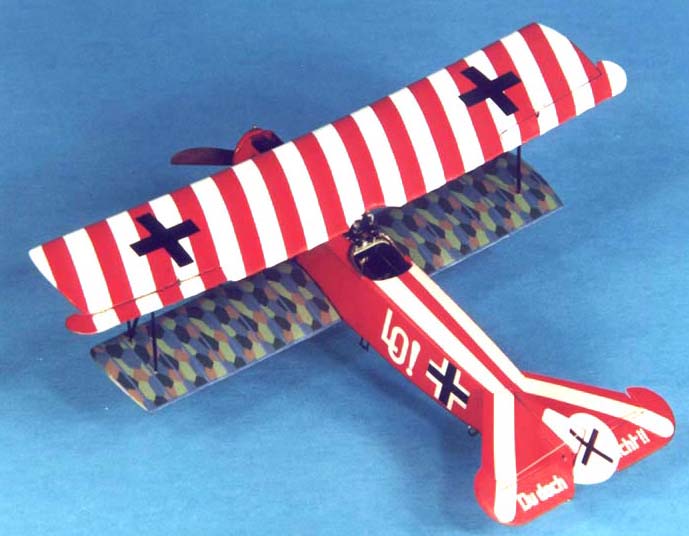
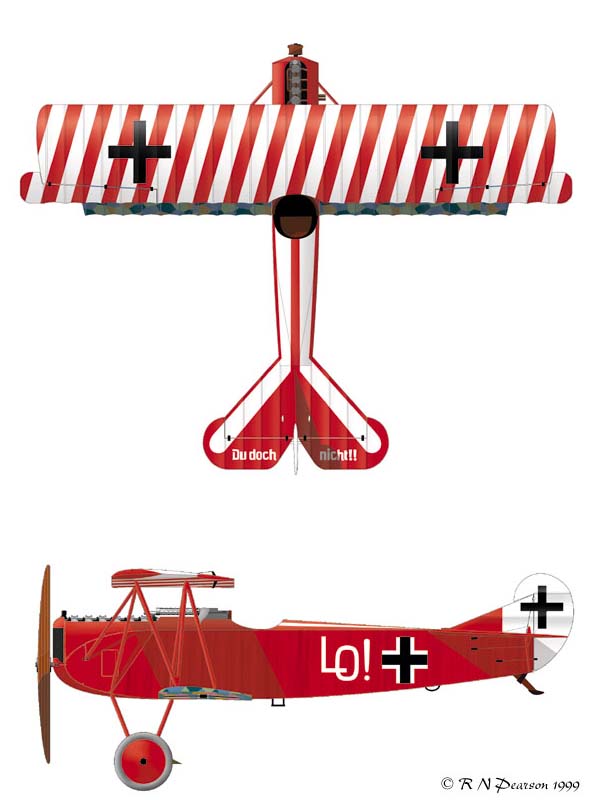 There
is some controversy in the modeling community as to exactly how Udets
"Candy Striped" D.VII looks. This stems from the fact that only one photo
is known of this specific plane and it doesn't show the whole aircraft.
I chose to ignore these controversies and model the aircraft pretty much
as indicated in the painting instructions with the only exception being
that I painted the landing gear airfoil instead of using the lozenge decal.
There
is some controversy in the modeling community as to exactly how Udets
"Candy Striped" D.VII looks. This stems from the fact that only one photo
is known of this specific plane and it doesn't show the whole aircraft.
I chose to ignore these controversies and model the aircraft pretty much
as indicated in the painting instructions with the only exception being
that I painted the landing gear airfoil instead of using the lozenge decal.
The first order of business was to airbrush the entire aircraft and top wing in Polly Scale White RLM21. After letting the paint dry overnight, I masked off all the portions that were to remain white including the "Candy Striped" top wing. I measured (in scale) the width of the stripes and they were exactly 5mm in width. I applied the tape strips over the entire wing (to maintain correct spacing) and then removed every other strip. Next I shot multiple coats of Gunze Sangyo Red Madder (H86) over the fuselage and wing. After letting it dry for a few hours, I carefully removed all the masking tape and went on vacation for a week! The timing of my vacation was fortuitous as gloss Gunze paints take forever to fully cure and this way I would not be tempted to finish the model before it was fully cured and mar the finish (been there, done that!).
 The
first order of business after vacation was to prepare the surface for
decals and a light coat of Future was airbrushed on. The kit decals are
adequate, but the lozenge decals are printed in incorrect colors so I
substituted Americal Four Color Lozenge and German Rib Tapes. Some of
the white decals are ivory (as opposed to white) but I used them any ways.
In addition, some of the German Crosses were only printed in white (instead
of black) so I rummaged through my decal stash and found some acceptable
substitutes. All of the decals went on smoothly and responded very well
to MicroSol decal solution. After drying overnight, I wiped the decals
off with a moist cloth with Pollys Plastic Prep to remove any residue
and after drying I shot a light coat of Future over the decals to seal
them. To provide a modest amount of weathering and to highlight the detailed
engraving, a light wash of burnt umber was applied.
The
first order of business after vacation was to prepare the surface for
decals and a light coat of Future was airbrushed on. The kit decals are
adequate, but the lozenge decals are printed in incorrect colors so I
substituted Americal Four Color Lozenge and German Rib Tapes. Some of
the white decals are ivory (as opposed to white) but I used them any ways.
In addition, some of the German Crosses were only printed in white (instead
of black) so I rummaged through my decal stash and found some acceptable
substitutes. All of the decals went on smoothly and responded very well
to MicroSol decal solution. After drying overnight, I wiped the decals
off with a moist cloth with Pollys Plastic Prep to remove any residue
and after drying I shot a light coat of Future over the decals to seal
them. To provide a modest amount of weathering and to highlight the detailed
engraving, a light wash of burnt umber was applied.
Final Assembly
 Now
it was time to assemble the machine guns as shown in the instructions.
Even though I annealed the P/E jackets I still had a devil of a time getting
them into a circular shape using the wonderful circular tool provided.
I painted the machine guns in Testor Metalizer Gun Metal and dry brushed
with Floquil Gun Metal and then superglued them to the top of the fuselage.
Now
it was time to assemble the machine guns as shown in the instructions.
Even though I annealed the P/E jackets I still had a devil of a time getting
them into a circular shape using the wonderful circular tool provided.
I painted the machine guns in Testor Metalizer Gun Metal and dry brushed
with Floquil Gun Metal and then superglued them to the top of the fuselage.
I installed the interplane and cabane struts into place with superglue and calipers to set the correct distances and angles using the top wing as a guide. I used small rubber bands to help hold both wings in place and then checked alignment of the top to bottom wing. When all was to my liking, I superglued the struts to the wing.
 Now
on to the landing gear! I pushed the pinned legs of the landing gear into
the airfoil and set the approximate width of the landing gear sockets.
After carefully aligning everything I glued it in place. Lastly I install
the painted wheels into place on the axle with superglue, and the tailskid.
I carefully installed the propeller with superglue.
Now
on to the landing gear! I pushed the pinned legs of the landing gear into
the airfoil and set the approximate width of the landing gear sockets.
After carefully aligning everything I glued it in place. Lastly I install
the painted wheels into place on the axle with superglue, and the tailskid.
I carefully installed the propeller with superglue.
I install all the remaining pieces as indicated in the instructions and rigged the model as indicated on the instruction sheet with the supplied stainless steel wire. Words of caution: use the dimensions printed on the instruction sheet to size the rigging wires and not the little blue lines (which are supposed to be the correct length-but arent!). Finally, several coats of Polly S Satin Finish was shot to achieve the semi-gloss finish common to most WWI aircraft.
Conclusion
 I
have built many models of Shanghai Dragon WW II aircraft and have been
generally disappointed in their accuracy and quality of fit. However,
the WW I Knights of the Sky Series are in my opinion, among the best detailed
WW I model kits available today without the fit problems experienced in
their WW 2 series. They represent a very good value for approximately
$20 and build up into an impressive model with their highly detailed engraving
and photo-etch parts. A minor drawback is that they are currently difficult
to find; a situation that will hopefully become better if Shanghai Dragon
would commit to production of this series during 2000 (send those e-mails!).
I
have built many models of Shanghai Dragon WW II aircraft and have been
generally disappointed in their accuracy and quality of fit. However,
the WW I Knights of the Sky Series are in my opinion, among the best detailed
WW I model kits available today without the fit problems experienced in
their WW 2 series. They represent a very good value for approximately
$20 and build up into an impressive model with their highly detailed engraving
and photo-etch parts. A minor drawback is that they are currently difficult
to find; a situation that will hopefully become better if Shanghai Dragon
would commit to production of this series during 2000 (send those e-mails!).
This is an excellent model of an important WW I aircraft. The accuracy and level of detail engraved in the kit is outstanding and no after-market sets are really needed for a beautiful build. I highly recommend this kit for all levels of builders including beginners and I enjoyed the building of this model. The kit is easy to build and a joy to look at when finished!
I would like to personally thank and dedicate this model to Otis Goodin from the WWI Modeling List. After listening to my "whining" about wanting to build a D.VII, Otis was kind enough to let me have this kit from his personal collection.
References
-
Albatros Productions LTD, Fokker D.VII Anthology, $30.00
-
Squadron/Signal Publications, Fokker D.VII in Action, SS1156, $8.95