
This article originally appeared in the August 1999 issue of Internet Modeler.
 Pegasus 1/72 nd
LFG Roland D.II
By Matt Bittner
Photography by
David Van Wagoner
History
The Luftfahrzeug Gesellschaft (LFG) Roland D.II was a very sleek design for the period. With Roland's Wickelrumpf (a molded two-piece shell composed of thin bands of veneer reinforced with fabric) fuselage, it created a very strong and pleasing-to-the-eye aircraft. While it appeared to be a good design for the time, actual performance was very poor. This was due in part to the engine (especially the D.IIa with the Argus engine) as well as the wing cellule. It is estimated that the majority of D.II/IIa fighters served for only four months.
The Kit
 The Pegasus kit of the Roland D.II consists of 16 injection-molded and
5 white-metal pieces. The decal sheet provides decals for one scheme
only, an unknown machine that flew on the Eastern Front, 1917.
The Pegasus kit of the Roland D.II consists of 16 injection-molded and
5 white-metal pieces. The decal sheet provides decals for one scheme
only, an unknown machine that flew on the Eastern Front, 1917.
Overall, the exterior detail on the Roland kit is very petite and well done. However, there are some surface flaws that appear to be dirt or dust that made its way into the mold during the injection process. There are numerous small bumps and pips that need to be sanded down to smooth the surfaces. This must be done carefully on the wings and horizontal tail surfaces so you don't destroy the wonderful rib tapes the kit provides.
The cockpit - out of the box - consists of a floor, seat, "instrument panel" and control column. Unfortunately, none of these parts are representative of the real cockpit. You may be able to use the seat and floor, but everything else will be put into the spare's box. There was no instrument panel per se; instead the instruments were hung in different places within the cockpit. There is no interior structure on the kit cockpit surfaces – instead, this all needs to be scratchbuilt.
 Since the inside of the fuselage is rounded, I needed a way to easily
replicate the round formers. At first I thought of using clay, or another
type of "moldable" material to get the basic outline. Using this clay
I would then cut out a piece from sheet styrene and sand and fit until
a perfect fit was achieved. Instead, Steven Hustad told me of a better
solution. Using strip styrene and liquid cement, "sandwich" the strip,
one on top of the other, until the proper "height" was achieved to the
formers. In other words, glue one strip in the area it needs to be with
liquid cement. When dry, glue another strip on top of the first. Repeat
until the fuselage former is of the proper "height". I went a little
too far, and had to sand the formers down in "height", which was not
difficult. This worked a lot better than trying to cut the correct shape
out of sheet styrene.
Since the inside of the fuselage is rounded, I needed a way to easily
replicate the round formers. At first I thought of using clay, or another
type of "moldable" material to get the basic outline. Using this clay
I would then cut out a piece from sheet styrene and sand and fit until
a perfect fit was achieved. Instead, Steven Hustad told me of a better
solution. Using strip styrene and liquid cement, "sandwich" the strip,
one on top of the other, until the proper "height" was achieved to the
formers. In other words, glue one strip in the area it needs to be with
liquid cement. When dry, glue another strip on top of the first. Repeat
until the fuselage former is of the proper "height". I went a little
too far, and had to sand the formers down in "height", which was not
difficult. This worked a lot better than trying to cut the correct shape
out of sheet styrene.
Since it was new at the time (I started this kit about four years ago) I decided to use the PropagTeam wood decals on the inside of the fuselage. This worked great, and I may do this from now on with wood fuselage sides. While the "grain" on the decals may be a bit large for the exterior of the plane, on the inside the large "grain" actually helps to give a good impression.
 The majority of the cockpit is scratchbuilt, using and thinning the
kit seat and floor, while Tom's Modelworks provided the top of the control
column (mounted to a piece of round sprue), the rudder pedals, the engine
"throttle" and the seat belts. Gun butts (since these were embedded
in the fuselage) were the ends of resin Roseparts (from Rosemont
Hobby Shop ) Spandau replacement guns.
The majority of the cockpit is scratchbuilt, using and thinning the
kit seat and floor, while Tom's Modelworks provided the top of the control
column (mounted to a piece of round sprue), the rudder pedals, the engine
"throttle" and the seat belts. Gun butts (since these were embedded
in the fuselage) were the ends of resin Roseparts (from Rosemont
Hobby Shop ) Spandau replacement guns.
A word of warning. Since I was at the point of gluing the fuselage halves together, I proceeded without thinking. In hindsight, it would be better to glue a strip of plastic across the lower fuselage joint on the inside of the fuselage halves. I had a lot of problems with this area remaining glued together, and a strip of plastic on the inside would have helped tremendously. Also keep in mind the engine will have to be glued into one fuselage half before the halves are glued together, Pegasus' engine being an excellent mold.
 I had some small gaps on the fuselage to contend with, but nothing out
of the ordinary. The worst fit was the wing to fuselage joint. Since
I decided to correct the landing gear struts (out of the box they're
too wide and make the plane sit too low to the ground) I should have
glued the lower wing on with epoxy for strength. As it is, I popped
the lower wing off a couple of times while trying to work with the landing
gear struts.
I had some small gaps on the fuselage to contend with, but nothing out
of the ordinary. The worst fit was the wing to fuselage joint. Since
I decided to correct the landing gear struts (out of the box they're
too wide and make the plane sit too low to the ground) I should have
glued the lower wing on with epoxy for strength. As it is, I popped
the lower wing off a couple of times while trying to work with the landing
gear struts.
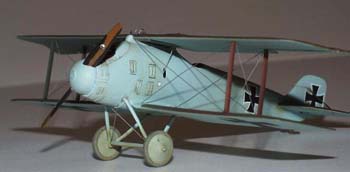
Since the landing gear struts are basically glued to the centerline of the aircraft, I was worried about the struts popping off at a later date. Using brass Strutz! I bent new struts according to the Datafile drawings (just be sure to use the drawings for the D.II and not the D.IIa). I also cut holes through the fuselage for the struts to glue into. I then epoxied these struts into the fuselage, so I doubt I have to ever worry about these struts breaking off. Keep in mind the rear of the landing gear struts pass through the lower wing.
I decided to cut off the molded on aileron crank and replace with suitable wire. While this area didn't turn out as nice as I had hoped, I think the general idea is there. The connection rod between the aileron crank and the control column pass through the sides of the fuselage. While it appears to me that these holes in the Pegasus kit are not in the correct location, I decided to leave it as is.
 As the rudder/fin area was a bit thick, I sanded it more to scale. I
separated the rudder and the ailerons to be positioned later. Since
the hinge-point for the ailerons were covered by a thin piece of fabric
at the factory, and since removing the ailerons from the upper wing
destroyed this area, I replicated the fabric with plastic sheet.
As the rudder/fin area was a bit thick, I sanded it more to scale. I
separated the rudder and the ailerons to be positioned later. Since
the hinge-point for the ailerons were covered by a thin piece of fabric
at the factory, and since removing the ailerons from the upper wing
destroyed this area, I replicated the fabric with plastic sheet.
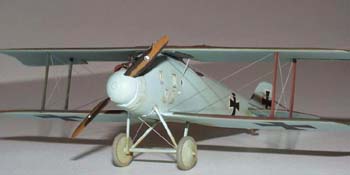
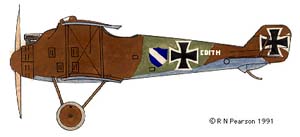
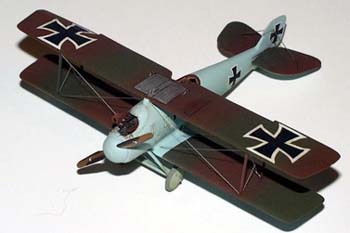
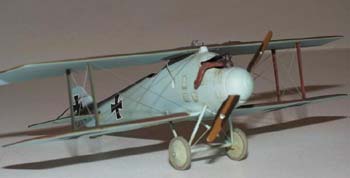
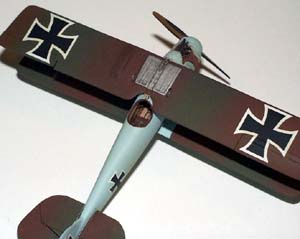
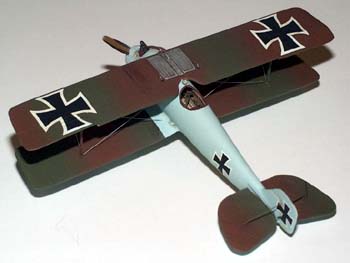
There were at least two basic schemes for Roland D.IIs. One is an overall green and red/brown camouflage scheme with blue/grey undersurfaces while the other is an overall blue/grey fuselage and undersurfaces, with the green and red/brown camouflage on the upper part of the flying surfaces only. It was the later scheme I chose. I really think the camouflage with the overall blue/grey is very striking. I used Polly Scale Panzer Red/Brown for the red/brown, French Fokker Dark Green for the green, and German RLM64 Lt. Blue for the blue/grey. Decals are all from the kit. I then applied of coat of oil over everything. Rigging is .005" stainless steel "surgical" wire.
Conclusion
This kit was unfortunately years in the making. Since I decided to correct the landing gear struts - which included gluing them into the fuselage, I put the model away until I could find a decent enough way to replicate these struts. When Strutz! appeared on the market, I knew I had the correct material.
 Once I figured out this area, it didn't take long to finish the kit.
One of the best things about the Roland D.II is there are no tricky
alignment problems with the upper wing. Since the upper wing rests directly
on the fuselage, this eliminates the center struts. If you don't go
to the extreme I did with the cockpit and leave the landing gear struts
alone, this is a relatively easy build, and one I would recommend as
a first short-run WW1 kit. Overall, the Pegasus Roland D.II is an excellent
kit.
Once I figured out this area, it didn't take long to finish the kit.
One of the best things about the Roland D.II is there are no tricky
alignment problems with the upper wing. Since the upper wing rests directly
on the fuselage, this eliminates the center struts. If you don't go
to the extreme I did with the cockpit and leave the landing gear struts
alone, this is a relatively easy build, and one I would recommend as
a first short-run WW1 kit. Overall, the Pegasus Roland D.II is an excellent
kit.
References
- Grosz, PM, LFG Roland D.II , Windsock Datafile #47, Albatros Productions
- Stair, Ian, "Roland D.II", Aeromodeller , March 1973.
- VanWyngarden, Greg, "Colors: The Roland D.II and D.IIa", Over the Front, Volume 5 Number 3.