
This article originally appeared in the May 1999 issue of Internet Modeler.
 Albatros D. I Conversion of a Conversion
Passchendaele Albatros D.II to a D.I
By Robert Karr
After getting my hands on the Eduard 1/48 Albatros D.III, I couldn't wait to get started. This kit looked LUSCIOUS just resting in its box. However, before I could dive into this kit, I had the Passchendaele Albatros D.II resin conversion set flung at me. Equally as luscious looking as the Eduard, I was now completely inflamed. When I could finally devote my entire supply of modeling attention and affection towards this project, I dove in!
 Eduard kits
are getting slicker and slicker all the time. Their days of generally
accurate but crude, flash-ridden moldings with a bucket full of tiny,
flat brass etchings are over. Their Albatros D.III is world class and
absolutely deserves to be considered with the big boys of the industry.
The kit has a few problems with accuracy (more on that in a bit), but
if built straight out of the box, it should yield a pretty good-looking
D.III.
Eduard kits
are getting slicker and slicker all the time. Their days of generally
accurate but crude, flash-ridden moldings with a bucket full of tiny,
flat brass etchings are over. Their Albatros D.III is world class and
absolutely deserves to be considered with the big boys of the industry.
The kit has a few problems with accuracy (more on that in a bit), but
if built straight out of the box, it should yield a pretty good-looking
D.III.
The recent Passchendaele conversion kit for changing a D.III to an earlier D.II was made for the old Glencoe D.III, but it works just fine with the new Eduard. I went a step beyond and converted the conversion to an even still earlier D.I.
The contents include the vastly different wings of the D.I-D.II, new wheels with rubber "o" tires - in two sizes(!), a header tank, decals, and saving the best for last- a couple of side mounted Windhoff ear radiators. These radiators are among the BEST-molded pieces I've ever seen in ANY medium. The relief of the finning is so deep and delicate that I could barely get paint down into the recesses! The instructions are also well done and include a couple of Dan-San Abbott's color marking guides.
 Combining
these two kits was a joy. I first made a few corrections to the basic
Eduard. A new larger engine was made from an old Glencoe piece, the underside
contour of the nose was deepened by building up with plastic strip and
CA, thickening of the fin and under-fin cross section done with red auto-body
putty, the panel lines filled with same, and I modified the spinner so
it appears smaller in diameter than the cowl. Although it doesn't really
show in the photos, I added ripples in the fuselage skinning to duplicate
the texture of the real thing. Drawing a grid of the internal structure
on the outside of the fuselage, and using thick oil based paint, I filled
in the areas between the structural members with several coats. After
drying completely, I sanded almost all of this paint away. I figured now
was a good time to determine where the holes should be drilled to receive
the spar ends when it came time to mount the wings. This done, I shot
a good covering layer of matte white over my fuselage. After drying, the
wood effect was done with light yellow, tan, brown and off-white Prisma
Color pencils. The panel lines were LIGHTLY drawn in with pencil after
consulting photos. Note - in many cases, Albatros skin joins are NOT over
the internal structure. The top coats consisted of a misting of Future
tinted light brown, another coat of Future tinted light yellow, and a
couple of heavy runny coats of just Future! The final effect is quite
subtle but discernible as thin plywood tacked to a framework.
Combining
these two kits was a joy. I first made a few corrections to the basic
Eduard. A new larger engine was made from an old Glencoe piece, the underside
contour of the nose was deepened by building up with plastic strip and
CA, thickening of the fin and under-fin cross section done with red auto-body
putty, the panel lines filled with same, and I modified the spinner so
it appears smaller in diameter than the cowl. Although it doesn't really
show in the photos, I added ripples in the fuselage skinning to duplicate
the texture of the real thing. Drawing a grid of the internal structure
on the outside of the fuselage, and using thick oil based paint, I filled
in the areas between the structural members with several coats. After
drying completely, I sanded almost all of this paint away. I figured now
was a good time to determine where the holes should be drilled to receive
the spar ends when it came time to mount the wings. This done, I shot
a good covering layer of matte white over my fuselage. After drying, the
wood effect was done with light yellow, tan, brown and off-white Prisma
Color pencils. The panel lines were LIGHTLY drawn in with pencil after
consulting photos. Note - in many cases, Albatros skin joins are NOT over
the internal structure. The top coats consisted of a misting of Future
tinted light brown, another coat of Future tinted light yellow, and a
couple of heavy runny coats of just Future! The final effect is quite
subtle but discernible as thin plywood tacked to a framework.
 With the fuselage
out of the way, I turned to the conversion parts. Cleanup of the resin
parts went smoothly and with no problems, and the resin itself was pleasant
to work with. I have only two complaints about the Passchendaele kit:
the wings are a bit too thick (although the trailing edges are FINE),
and the half-ribs are missing. I added these with stretched sprue, so
no big deal, and only a bit of tedium. The main ribs got tapes added by
masking and heavy painting. The ailerons were separated and their guide
slots in the wings opened up. When all this was set, I ran hot water over
the wings and ailerons and put in a bit of washout to the trailing edges.
I drilled into the inner wing edges at the true spar points and glued
music wire into the holes so I would have something of substance with
which to attach the wings to the fuselage.
With the fuselage
out of the way, I turned to the conversion parts. Cleanup of the resin
parts went smoothly and with no problems, and the resin itself was pleasant
to work with. I have only two complaints about the Passchendaele kit:
the wings are a bit too thick (although the trailing edges are FINE),
and the half-ribs are missing. I added these with stretched sprue, so
no big deal, and only a bit of tedium. The main ribs got tapes added by
masking and heavy painting. The ailerons were separated and their guide
slots in the wings opened up. When all this was set, I ran hot water over
the wings and ailerons and put in a bit of washout to the trailing edges.
I drilled into the inner wing edges at the true spar points and glued
music wire into the holes so I would have something of substance with
which to attach the wings to the fuselage.
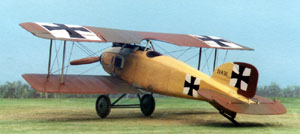
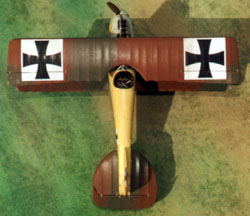 Recent research
has indicated that most members of the Albatros D.I-D.III family had three
colors in the wing camouflage, except for a few clear doped prototypes,
and a small run of two-color D.Is. This was my scheme. I broadly sprayed
my reddish brown and olive green as it seems that the two color job was
much looser and fuzzier than the three color. Finished in these final
colors, I let the wings and myself rest.
Recent research
has indicated that most members of the Albatros D.I-D.III family had three
colors in the wing camouflage, except for a few clear doped prototypes,
and a small run of two-color D.Is. This was my scheme. I broadly sprayed
my reddish brown and olive green as it seems that the two color job was
much looser and fuzzier than the three color. Finished in these final
colors, I let the wings and myself rest.
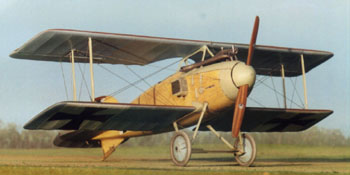
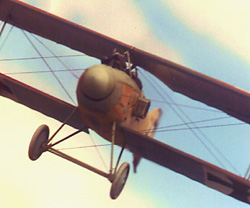
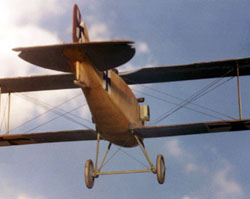
The main differences between the D.I and D.II are the way the top wing is attached, and a larger gap in the D.I. Working from the Albatros Fighter DataFile Special and photographs scattered about in other sources, I figured my new gap. The D.I has a four legged trestle cabane arrangement, rather than the splayed "n" struts of the D.II. I made this trestle from thinned bamboo. Determining the four points in the fuselage decking where the trestle would attach, I drilled and hacked holes for the trestle legs. The main interplane struts were also constructed from thinned bamboo. After drilling out all the appropriate holes for rigging, I started attaching the top wing by gluing it to the trestle. After the CA set for a minute, I wedged in my interplane struts and the wing was on! This was the easiest time I'd ever had attaching a top wing.
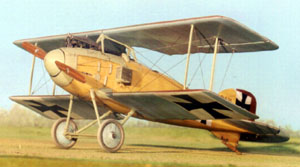
 Before the
next step could proceed, I had a moment of panic as I noticed that I hadn't
dealt with those great little radiators yet. If I would've went ahead
and started rigging, it would've been next to impossible to get them little
dudes snuggled onto the fuselage sides. The only mods I made to these
jewels was to add a tiny drain-cock under each unit from bits of .007"
guitar string, and mounting lugs from small rectangles of acrylic saturated
typing paper. A bit of CA and my Albatros had a cooling system.
Before the
next step could proceed, I had a moment of panic as I noticed that I hadn't
dealt with those great little radiators yet. If I would've went ahead
and started rigging, it would've been next to impossible to get them little
dudes snuggled onto the fuselage sides. The only mods I made to these
jewels was to add a tiny drain-cock under each unit from bits of .007"
guitar string, and mounting lugs from small rectangles of acrylic saturated
typing paper. A bit of CA and my Albatros had a cooling system.
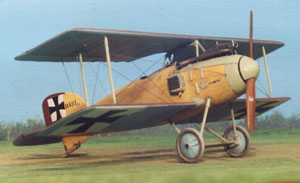
Now the rigging with the invisible thread could proceed and this went very smoothly. The landing gear was glued on and the tail parts and all the other bits- smooth and swift work. Before I knew it, it was ready for wheels and the final heavy Future drenching. The kit's resin wheels are well done, and the inclusion of two sizes of rubber tires leaves it up to the modeler what size to use. I froze! I couldn't make up my mind. I dug some wheels out of the scrap box- I think they were Glencoe-ex-Aurora Spad XIII items. I looked for the largest wheels I could find as so many Albatros models from years gone by have looked...squirrely...because the wheels were too small. I still wouldn't mind a bit more diameter in the parts I used. Anyway, I fiddled them into Albatros shape and used them! The Passchendaele wheels went in to the scrap box.
 Decaling
was a breeze, and I was able to cut the numbers I needed from the Passchendaele
sheet. After drying overnight, I shot another coat of Future all over
the entire airplane and let THAT dry. A small bit of weathering with colored
chalk powder and some judicious use of Aeromaster flat and it was finished.
Decaling
was a breeze, and I was able to cut the numbers I needed from the Passchendaele
sheet. After drying overnight, I shot another coat of Future all over
the entire airplane and let THAT dry. A small bit of weathering with colored
chalk powder and some judicious use of Aeromaster flat and it was finished.
A bit of truth-in-reviewing: John Cyganowski of Passchendaele was the one who flung the conversion kit at me, and everything I've written in this article, I've said to him. There now- disclaimer out of the way, and I can truthfully say...Bring on more Passchendaele stuff!