
This article originally appeared in the July 1999 issue of Internet Modeler.
 Copper State Models Pfalz Dr.I
By Candice Uhlir
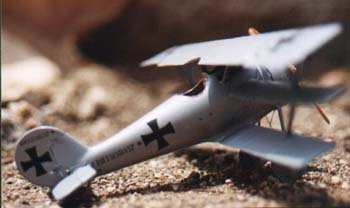
My first resin kit is finished and it turned out to be a pleasure and a learning experience. Copper State really turns out a nice product and my Pfalz Dr.I is a nice looking model. Building it wasn't difficult, but there is more work that has to be done to get a resin kit to turn out nice. But more on that later.
Resin is Different!
My first impressions: Resin isn't that hard to work with if you're careful ! It isn't worthwhile to take shortcuts with a resin kit. First, you must wash the resin parts before you start to build. The mold release agent is really slippery stuff. Before I washed the parts in soapy water I couldn't get a piece of masking tape to stick to the material. All I wanted to do was check the fit a little ! But once washed off, the resin took tape just fine.
 Second, building a resin kit takes more planning than the average injection
molded kit. While the supplied drawings are good, they don't detail
individual construction steps as we are used to from the majority of
injection molded kits. There isn't any "glue part 3 to part 4" kind
of steps. You get drawings, you get photo-etch, you get white metal.
Look at the drawings and lots of pictures if you can find them. While
you're at it, get yourself a good pair of calipers. Copper State provides
excellent 3 view drawings of the Dr.I, but you'll find that a pair of
calipers are essential to measure proper part spacing that will be critical
for proper part alignment. This is especially critical for a triplane
subject.
Second, building a resin kit takes more planning than the average injection
molded kit. While the supplied drawings are good, they don't detail
individual construction steps as we are used to from the majority of
injection molded kits. There isn't any "glue part 3 to part 4" kind
of steps. You get drawings, you get photo-etch, you get white metal.
Look at the drawings and lots of pictures if you can find them. While
you're at it, get yourself a good pair of calipers. Copper State provides
excellent 3 view drawings of the Dr.I, but you'll find that a pair of
calipers are essential to measure proper part spacing that will be critical
for proper part alignment. This is especially critical for a triplane
subject.
Third, dry fit everything !!! While resin is great material for capturing detail, the fit can be a little tricky. Dry fit is even more important when you keep in mind that you will be using cyanoacrylate glue to put this kit together; there isn't much room for error before the glue sets up. It's not like injection molded - resin can't be tugged around as much as good old solid forgiving plastic.
Getting to Work
I have to admit when I started the kit, I was a little apprehensive. Copper State provides photo etch for instrument panels and some cockpit interior, but they are pretty much standard pieces for German WWI aircraft. You have to get a good photo of what the cockpit for the subject looks like in order to decide which of the supplied pieces to use. So, with that discovery, I started to scratchbuild my first cockpit.
The Cockpit
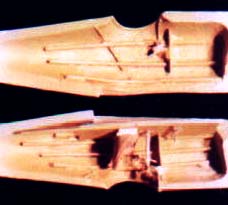 I modeled my cockpit after the Eduard Pfalz DIII. The Dr.I doesn't come
with any photoetch for fuselage longerons so I made my own. I used .040
styrene rod for longerons and glued these to both fuselage halves. The
lowest longeron was most important because I had to build a cockpit
floor and these longerons would be the foundation for that flooring.
I used .015" sheet styrene to cut flooring for the cockpit which extended
from the far front of the fuselage to about half way between the cockpit
and the leading edge of the tail. Here's where my calipers came in handy
first by allowing me to measure the interior profile of the fuselage
and to accurately position the foundation longerons to produce a level
floor. Even then I used thin cardboard for my floor template. I used
.020 rod for any stringer that would be visible, along with some more
.015 sheet styrene for a Pfalz instrument panel and switch plates. I
sanded all the rods that would be visible square with an emery board.
I modeled my cockpit after the Eduard Pfalz DIII. The Dr.I doesn't come
with any photoetch for fuselage longerons so I made my own. I used .040
styrene rod for longerons and glued these to both fuselage halves. The
lowest longeron was most important because I had to build a cockpit
floor and these longerons would be the foundation for that flooring.
I used .015" sheet styrene to cut flooring for the cockpit which extended
from the far front of the fuselage to about half way between the cockpit
and the leading edge of the tail. Here's where my calipers came in handy
first by allowing me to measure the interior profile of the fuselage
and to accurately position the foundation longerons to produce a level
floor. Even then I used thin cardboard for my floor template. I used
.020 rod for any stringer that would be visible, along with some more
.015 sheet styrene for a Pfalz instrument panel and switch plates. I
sanded all the rods that would be visible square with an emery board.
 Copper State provided a white metal seat that I painted to look like
worn leather. Interior painting was done in wood, instrument panels
in gray. I made seatbelts from masking tape that I put together along
with the Copper State supplied photo-etch fittings. The control column
was built from .020" rod. I didn't use the photo-etch control stick
head. I didn't like the two-dimensional look of it so I made a control
head from .020" rod by bending it gently in hot water. I capped it off
with Copper State-supplied photo-etch gun triggers.
Copper State provided a white metal seat that I painted to look like
worn leather. Interior painting was done in wood, instrument panels
in gray. I made seatbelts from masking tape that I put together along
with the Copper State supplied photo-etch fittings. The control column
was built from .020" rod. I didn't use the photo-etch control stick
head. I didn't like the two-dimensional look of it so I made a control
head from .020" rod by bending it gently in hot water. I capped it off
with Copper State-supplied photo-etch gun triggers.
The instrument panel is .015" styrene sheet. Copper State provides a generic German gauge set with the kit but the Pfalz DIII didn't have many gauges. I put in two where my Eduard D.III instructions showed dials. I used a tachometer and a compass because their size looked right for a D.III. Fitting them into the supplied bezels was easy using MicroScale's Krystal Klear. I finished up the cockpit with some spare photoetch switches I had stashed away. For my first cockpit scratchbuild, it actually came out better than I thought but I still have a lot to learn. But the key here was dry fit. It is essential to the proper positioning of the seat and cockpit controls relative to the cockpit opening!
Fuselage Assembly
This part was easy once the parts were washed and I could hold parts together with tape to dry fit. The fuselage halves fit together well, just a little clean up with a rifler file was needed to round out the cockpit entry. Any gaps were filled with Squadron Green. I usually use CA as a filler but decided I didn't want to tempt fate with the soft resin. The "green stuff" bonded to the resin without any problems.
Wing Assembly
 The wings were a different matter. The lower wing is one assembly that
also comprises a portion of the underside of the fuselage. This fit
is critical because the alignment of the two other wing surfaces depend
upon it. And remember that scratchbuilt cockpit floor? If I hadn't done
a thorough dry fit throughout the building of this kit I could have
easily aligned the floor so that it threw the lower wings out of alignment
with the fuselage. The lower wing assembly needed a little sanding to
align properly along with some putty to hide the seams. Once that was
complete and looking good, I went on to attach the port and starboard
mid wings to the fuselage.
The wings were a different matter. The lower wing is one assembly that
also comprises a portion of the underside of the fuselage. This fit
is critical because the alignment of the two other wing surfaces depend
upon it. And remember that scratchbuilt cockpit floor? If I hadn't done
a thorough dry fit throughout the building of this kit I could have
easily aligned the floor so that it threw the lower wings out of alignment
with the fuselage. The lower wing assembly needed a little sanding to
align properly along with some putty to hide the seams. Once that was
complete and looking good, I went on to attach the port and starboard
mid wings to the fuselage.
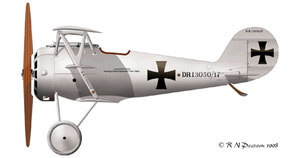
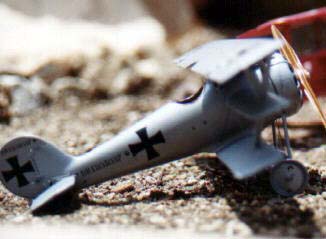
When you compare drawings of the Pfalz Dr.I to the more familiar Fokker Dr.I, you should notice that the Pfalz uses external rigging to brace the wing structures. This observation should scream a warning: the wings are really thin ! Thin wings made with soft resin led to my only real struggle with this kit - they like to bend�.a lot ! The wing struts are a single piece of white metal that attach to the lower wing, go through the middle wing, and attach to the underside of the upper wing. You have to bore a rectangular notch into the middle wing to pass the strut through. Once that is done, the fun begins.
Before I attached the lower wing to the fuselage I had to take out some mild warping the wing, using a hot water bath. I thought I had it straight. Wrong! Straight is defined relative to the fuselage! Now it was attached to the fuselage using CA! Now what! It wasn't a bad warp, but I hate warped wings!! So back to the hot bath with the entire assembly. I finally got the wings to look ok. My husband caught me talking to myself at this part of the build.
 So, now I had two sets of wings attached. I inserted the wing struts
though the notch I prepared in the mid wing. Time to align again. I
found myself sliding the mid wing up the strut because the lower wing
had dipped a bit. It was like a lesson in Heisenberg's Uncertainty Principle:
focus on one aspect and the other isn't where you thought it would or
should be! This was a real pain, and it seemed to take forever. Actually,
I only spent about an hour on alignment. Looking back, I would try making
some stiff spacers from dowel to put between the wings at this point.
At least then the wings may bend uniformly during the assembly process
making it easier to get alignment back. This was the step where my calipers
were essential to attain proper wing spacing. I constantly referred
to the drawings, measured spacing, measured my assembly, adjusted, and
did it over again. There isn't much room for error.
So, now I had two sets of wings attached. I inserted the wing struts
though the notch I prepared in the mid wing. Time to align again. I
found myself sliding the mid wing up the strut because the lower wing
had dipped a bit. It was like a lesson in Heisenberg's Uncertainty Principle:
focus on one aspect and the other isn't where you thought it would or
should be! This was a real pain, and it seemed to take forever. Actually,
I only spent about an hour on alignment. Looking back, I would try making
some stiff spacers from dowel to put between the wings at this point.
At least then the wings may bend uniformly during the assembly process
making it easier to get alignment back. This was the step where my calipers
were essential to attain proper wing spacing. I constantly referred
to the drawings, measured spacing, measured my assembly, adjusted, and
did it over again. There isn't much room for error.
The top wing was tricky for the same reasons. It needed the same angle of attack, and alignment to those pliable lower wings was difficult. I used lots of masking tape to hold this puppy together here. When I finally got it right, I glued it down.
Final Assembly
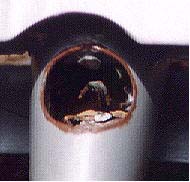
The rest of the kit is a piece of cake. Resin cuts a lot easier than injection molded plastic. I separated the control surfaces with a razor saw. That cut really fast ! Landing gear struts were a little tricky, but after tackling the wings, I had the tough part behind me. Engine assembly was a combination of white metal and photoetch. I always spend time on the engines getting them to look good but in this case the white metal cowling completely surrounds the engine. The small vents in the cowling don't leave much engine to see.
The only other Copper State part I didn't use was their white metal tail skid. Its flimsy ! I made my own out of bamboo meat skewers. It looks better and is a lot stronger. If I had to do again, I would use bamboo for the landing gear struts also. White metal is too soft for my tastes here.
Painting
 For painting I used Model Master enamels. I experimented first with
some of the resin parts before I started assembly by airbrushing on
some paint without primer. That was foolish because the paint just didn't
cover well. Once I applied two coats of MM primer, my paint went on
without any problems. Because of the multi-wing assembly I had confronted,
I painted the entire aircraft after it was assembled. This worked out
fine. Flaws in any putty I had applied were easily detected by the primer
coat. Because the wings were made of a soft resin, I was reluctant to
sand near their surfaces. In this situation I thinned out some "Green
Stuff" with acetone and applied it with a small brush. This served to
fill small gaps just fine without any sanding , like those between the
mid wing and the wing struts caused by the notch put there to insert
the struts through.
For painting I used Model Master enamels. I experimented first with
some of the resin parts before I started assembly by airbrushing on
some paint without primer. That was foolish because the paint just didn't
cover well. Once I applied two coats of MM primer, my paint went on
without any problems. Because of the multi-wing assembly I had confronted,
I painted the entire aircraft after it was assembled. This worked out
fine. Flaws in any putty I had applied were easily detected by the primer
coat. Because the wings were made of a soft resin, I was reluctant to
sand near their surfaces. In this situation I thinned out some "Green
Stuff" with acetone and applied it with a small brush. This served to
fill small gaps just fine without any sanding , like those between the
mid wing and the wing struts caused by the notch put there to insert
the struts through.
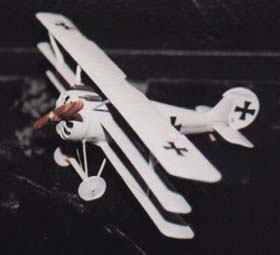
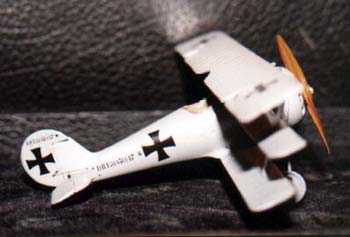
The entire model is painted in "SilberGrau". I made my own using 3 parts of Model Master Chrome Silver enamel and one part Model Master Medium Grey. It came out a dull silver color that I think looks pretty darn good without any silver sheen. The prop and tail skid are both done in wood grain. I did the tires in a light gray to simulate the synthetic rubber used by Germany late in the war.
Decals
After a good coat of Future I installed the MicroScale decals which represent the prototype Dr.I flight tested by von Richthofen; they went on without any problem. The only problem with the decals was the weight table. It is not as crisp as I would like. Besides that, the decals were just fine after the setting solution laid them nice and flat. Once dry, I put on another coat of Future followed two days later by a couple coats of Model Master lacquer clear flat. I had to make my own windscreen and installed that using Krystal Klear as an adhesive. Rigging was completed using .007 stiff steel wire. The Copper State drawings laid out the rigging scheme very well.
Overall
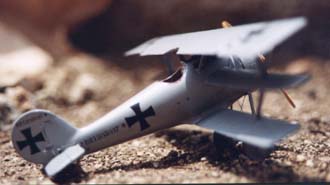 The scale of the model is actually very good. Bob Pearson provided me
with the Pfalz Dr.I's measurements. The full scale Dr.I had a fuselage
length of 5.5 meters and a wingspan of 8.5 meters. The kit scales out
to 8.61 meters for wingspan and 5.4 meters of fuselage length. The error
is .2% and 1.8% respectively.
The scale of the model is actually very good. Bob Pearson provided me
with the Pfalz Dr.I's measurements. The full scale Dr.I had a fuselage
length of 5.5 meters and a wingspan of 8.5 meters. The kit scales out
to 8.61 meters for wingspan and 5.4 meters of fuselage length. The error
is .2% and 1.8% respectively.
So what's the bottom line? I enjoyed building this kit. Resin kits aren't really as difficult as I thought. They may take more discipline to build, but the rare subjects available in resin make that extra care required worthwhile. I have four more Copper State kits to build in my stash of kits! You can probably tell I haven't been dissuaded from resin kits by my experience with the Dr.I. All in all, Copper State did a nice job! Any problems I had were really due to inexperience than anything else. Give a resin kit a try - I think you'll enjoy it!