
This article originally appeared in the May 2000 issue of Internet Modeler.
 Building
the Toko 1/72 Pfalz D.XII
Building
the Toko 1/72 Pfalz D.XII

By Michael Kendix
Background
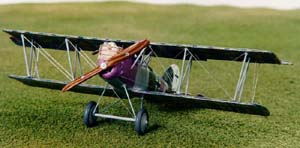
The Pfalz D.XII, manufactured by the Pfalz Flugzeugwerke, entered service in June 1918. This late World War One aircraft was designed as a replacement for the obsolescent Albatros D.Va and Pfalz D.IIIa. Although regarded by German pilots, such as Stark and von Hippel, as inferior in performance to the Fokker D.VII, it was able to serve adequately in a second line capacity. Pilots claimed that although faster in a dive, it was less maneuverable than the Fokker D.VII; it was, however, able to accompany the latter on missions. Ultimately over 750 Pfalz D.XII fighters were built. The fuselage design was advanced, comprising a layer of veneer strip on top of which was glued a layer of fabric, and then a second layer of veneer strip glued on top of that. Powered by a Mercedes D.IIIa engine, housed behind the Pfalz D.XII's distinctive brass-colored nose radiator and starboard side exhaust, this makes this an attractive subject.
The Kit
 Upon
opening the kit and laying out its contents, I compared it with the Windsock
Datafile diagrams. Most of the kit measures up well to the diagrams, however,
there are some small discrepancies. The lower wing is 3mm too long compared
to the profile, however, according to the Datafile on page 34, the lower
wing is 7.9m but the data in the drawing from the "Aldershof engineers"
gives this as 7.99m. The top wing span is also 3mm too big and the fuselage
is approximately 2mm too short. The horizontal tail is fine as is the
vertical tail and the gap between the wings.
Upon
opening the kit and laying out its contents, I compared it with the Windsock
Datafile diagrams. Most of the kit measures up well to the diagrams, however,
there are some small discrepancies. The lower wing is 3mm too long compared
to the profile, however, according to the Datafile on page 34, the lower
wing is 7.9m but the data in the drawing from the "Aldershof engineers"
gives this as 7.99m. The top wing span is also 3mm too big and the fuselage
is approximately 2mm too short. The horizontal tail is fine as is the
vertical tail and the gap between the wings.
Cutting and Drilling
 An
examination of the somewhat thin wing struts left me lacking in confidence
as to the efficacy of the "DURAS" method for rigging; namely, drilling
holes in the ends of the struts for the thread to pass through. I, therefore,
decided to use .005" stainless steel wire from SmallParts, which leads
to a slower method of construction but is more certain of success in this
particular case. The kit's upper wing aileron "hinges" were removed since
these would eventually interfere with the smooth application of the lozenge
decals. These hinges were molded on to the wing as solid semi-discs rather
than loops and since I was going to cut off the ailerons, their removal
was necessary. I cut off the ailerons and tail elevators using a scribing
tool and continually scoring down until the piece separated. I then lightly
sanded where the piece had been separated to ensure a smooth fit when
the pieces were reassembled. I opened out the ventilation hole in the
chin of the cowl. Other openings on various parts of the front fuselage
could have been made but for lack of technical competence on the part
of yours truly; for example; the 3 and 4 cooling holes on the port and
starboard sides, respectively.
An
examination of the somewhat thin wing struts left me lacking in confidence
as to the efficacy of the "DURAS" method for rigging; namely, drilling
holes in the ends of the struts for the thread to pass through. I, therefore,
decided to use .005" stainless steel wire from SmallParts, which leads
to a slower method of construction but is more certain of success in this
particular case. The kit's upper wing aileron "hinges" were removed since
these would eventually interfere with the smooth application of the lozenge
decals. These hinges were molded on to the wing as solid semi-discs rather
than loops and since I was going to cut off the ailerons, their removal
was necessary. I cut off the ailerons and tail elevators using a scribing
tool and continually scoring down until the piece separated. I then lightly
sanded where the piece had been separated to ensure a smooth fit when
the pieces were reassembled. I opened out the ventilation hole in the
chin of the cowl. Other openings on various parts of the front fuselage
could have been made but for lack of technical competence on the part
of yours truly; for example; the 3 and 4 cooling holes on the port and
starboard sides, respectively.
Painting and Assembling; Part One
 The
wheels proved difficult to paint. The wheel covers were not raised enough
and it was hard to put a fine edge on the wheel cover-tire join line.
After several attempts to use the kit's wheels, I gave up and used the
wheels from my "spares" box which were the same size and had a round access
hole as per the Datafile's photographs, rather than the rectangular access
hole on the kit's wheels. The wheels' covers were painted ghost light
grey, the same as the struts, and the tires were painted dark grey. The
landing gear struts were painted light blue, the same as the underside
of the fuselage.
The
wheels proved difficult to paint. The wheel covers were not raised enough
and it was hard to put a fine edge on the wheel cover-tire join line.
After several attempts to use the kit's wheels, I gave up and used the
wheels from my "spares" box which were the same size and had a round access
hole as per the Datafile's photographs, rather than the rectangular access
hole on the kit's wheels. The wheels' covers were painted ghost light
grey, the same as the struts, and the tires were painted dark grey. The
landing gear struts were painted light blue, the same as the underside
of the fuselage.
The cockpit was a surprisingly tricky entity; not because it was complex
or detailed but primarily due to my not locating research material in
a timely fashion. First, after I had closed the fuselage, and sanded and
painted, I found that the cockpit interior should be grey, not brown as
per the kit's instructions. I am afraid that my model will remain forever
in error in this regard. Secondly, the Pfalz D.XII has no instrument panel;
the kit's is mythical, as shown in Robert Karr's pictures posted on the
World War One Modeling website. Thirdly,  having
glued the two halves of the fuselage together, I had some difficulty actually
getting the cockpit floor, which is first glued to the lower wing, to
fit through the opening in the underside of the fuselage. I ended up shaving
off the ends and sides of the cockpit floor to make this easier. The alternative
is to simultaneously glue the fuselage halves and the lower wing together,
but lining up everything for that method seemed like it might be problematic.
having
glued the two halves of the fuselage together, I had some difficulty actually
getting the cockpit floor, which is first glued to the lower wing, to
fit through the opening in the underside of the fuselage. I ended up shaving
off the ends and sides of the cockpit floor to make this easier. The alternative
is to simultaneously glue the fuselage halves and the lower wing together,
but lining up everything for that method seemed like it might be problematic.
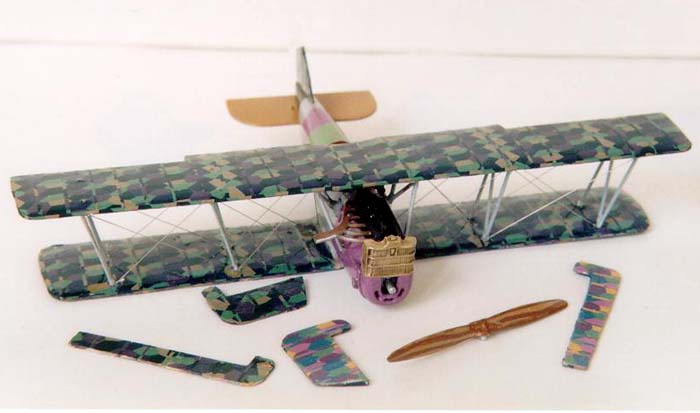
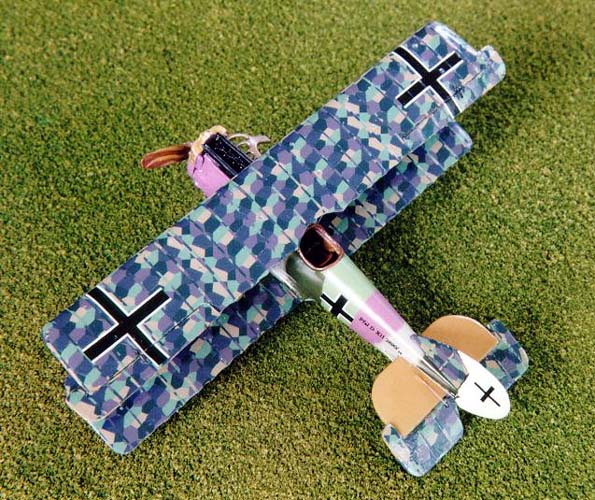
The fuselage needed a fair amount of putty to cover the joins both along the long axis and where it meets the lower wing. The engine fit together well and I painted it a combination of black and aluminum. I did not attach the starboard exhaust pipes until later. These pipes are a copper-type color and since I could not find any water-based acrylic copper paint, I mixed a little "Leather Brown with "Aluminum", which gave a pleasing sort of "Burned" effect. The radiator grill was painted brass and was then given a black wash; that is, "Future" plus a small amount of black paint dry-brushed on. The radiator and propeller housing was painted "German mauve" to match the camouflage pattern.
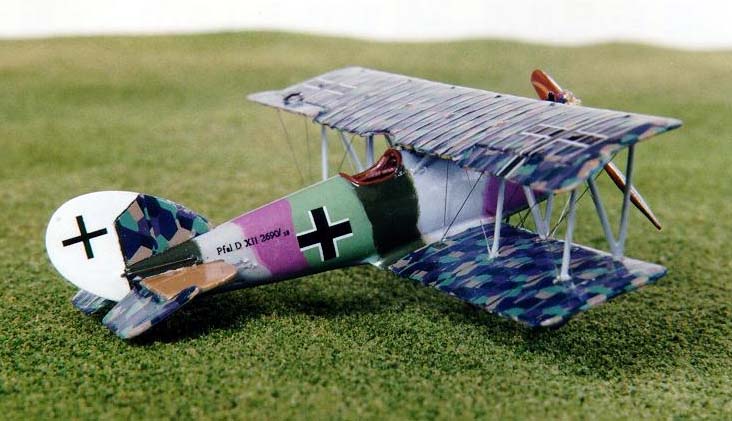
The fuselage was done in 4-color camouflage - German mauve, ghost light grey, dark green, and pale green. The masking was done using bits of blue tack under the masking tape to give a soft edge to the camouflage.
Applying the Lozenge Decals
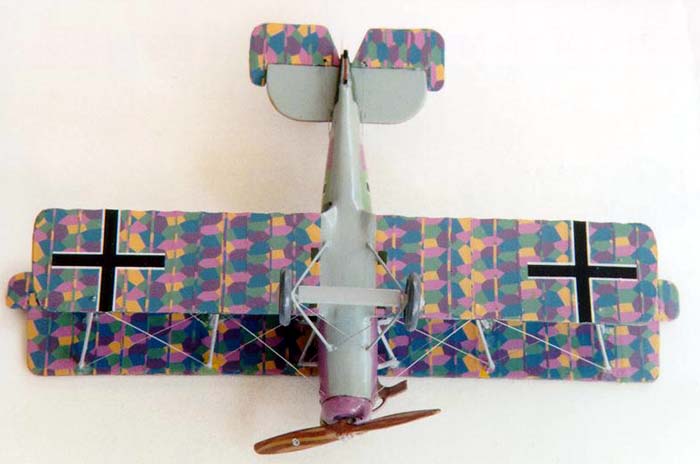 Whereas
great care needs to be taken when adhering any kit's decals, the lozenge
pattern for this model presents extra challenges. The lozenge decals supplied
in the kit are 4-color, whereas all the evidence I have shows only 5-color
lozenge for this model. Also, the kit's lozenge decals are the same for
the upper and lower facing surfaces; again, an unlikely occurrence. Since
I had decided to reproduce the scheme for 2690/18, I used Americal/Gryphon
5-color lozenge decals applied to upper and lower facing surfaces and
tail fin applied chordwise, with lozenge rib tapes. I looked closely at
my sources; namely, the Datafile, and some pictures of 2600/18 taken by
Shane Weier. I tried to lay down the lozenge decals as neatly as possible,
lining up the chords so that they end and start at the ribs. I used a
fair amount of Decal Set and Solvaset to ensure these adhered well. I
found the Americal/Gryphon lozenge not too thick and relatively easy to
work with. I tried to match the lozenge pattern across chords as far as
I could. I recognize this latter point may seem trivial but it looks better
if you do it.
Whereas
great care needs to be taken when adhering any kit's decals, the lozenge
pattern for this model presents extra challenges. The lozenge decals supplied
in the kit are 4-color, whereas all the evidence I have shows only 5-color
lozenge for this model. Also, the kit's lozenge decals are the same for
the upper and lower facing surfaces; again, an unlikely occurrence. Since
I had decided to reproduce the scheme for 2690/18, I used Americal/Gryphon
5-color lozenge decals applied to upper and lower facing surfaces and
tail fin applied chordwise, with lozenge rib tapes. I looked closely at
my sources; namely, the Datafile, and some pictures of 2600/18 taken by
Shane Weier. I tried to lay down the lozenge decals as neatly as possible,
lining up the chords so that they end and start at the ribs. I used a
fair amount of Decal Set and Solvaset to ensure these adhered well. I
found the Americal/Gryphon lozenge not too thick and relatively easy to
work with. I tried to match the lozenge pattern across chords as far as
I could. I recognize this latter point may seem trivial but it looks better
if you do it.
After finishing the lozenge chords, I covered the surface with "Future" to enhance the adherence of the lozenge rib tapes. The rib tapes should be about .67mm in 1/72nd scale. I cut the rib tapes from the Americal lozenge decals using the entire length of the flat edge of a Number 11 Xacto blade. If you attempt to simply use the point of the knife to cut extremely narrow strips, the strips will curl up and crinkle as you cut. There are approximately 100 rib tapes on the kit, so this whole process took a while. I then added leading edge rib tapes to the wings and tail surfaces, but declined to do the same for the scalloped trailing edge. I then added another coat of Future because the wing crosses were going to sit on the lozenge decals. I added small dark green rectangles of decal paper at the wing roots to represent the access hatches, and a small strip of dark grey painted decal paper to make the non-slip walk way on the wing.
Painting and Assembling; Part Two
 Mounting
the top wing presented the usual set of problems associated with biplane
kits, especially since there are two bays per side. Although this is mitigated
by the "N"-type interplane struts, the thinness and consequent fragility
of these struts was problematic. After a couple of attempts, I decided
to first adhere the cabane struts using tube glue. This allowed me to
dry-fit the upper wing and ensure that the cabane struts met the upper
wing at the right places. When this was done, I dry fitted the interplane
struts to ensure that they fit. It took some time and was a little frustrating
but eventually the interplane struts were in place, adhered with tube
glue. Once the upper wing was on, the remainder of the kit presented few
assembly problems. The tail assembled easily with no problem. The upper
facing horizontal tail was painted "Wood Brown" and the lower side was
painted light blue to match the fuselage's underside. The tail elevators
were covered with upper and lower lozenge. The tail rudder was painted
white and the tail fin was covered with upper 5-color lozenge. The guns
and their blast troughs were then glued in place and painted black.
Mounting
the top wing presented the usual set of problems associated with biplane
kits, especially since there are two bays per side. Although this is mitigated
by the "N"-type interplane struts, the thinness and consequent fragility
of these struts was problematic. After a couple of attempts, I decided
to first adhere the cabane struts using tube glue. This allowed me to
dry-fit the upper wing and ensure that the cabane struts met the upper
wing at the right places. When this was done, I dry fitted the interplane
struts to ensure that they fit. It took some time and was a little frustrating
but eventually the interplane struts were in place, adhered with tube
glue. Once the upper wing was on, the remainder of the kit presented few
assembly problems. The tail assembled easily with no problem. The upper
facing horizontal tail was painted "Wood Brown" and the lower side was
painted light blue to match the fuselage's underside. The tail elevators
were covered with upper and lower lozenge. The tail rudder was painted
white and the tail fin was covered with upper 5-color lozenge. The guns
and their blast troughs were then glued in place and painted black.
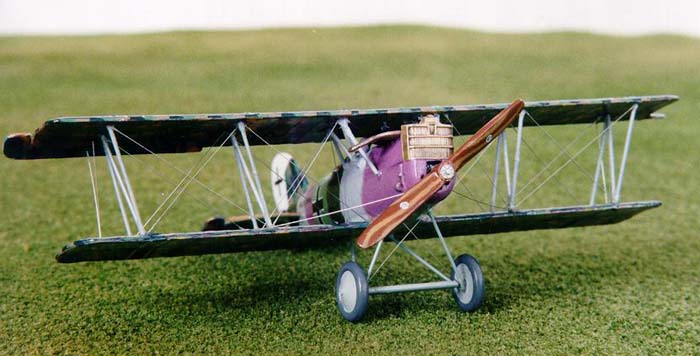
The undercarriage was then assembled. The undercarriage struts were replaced with brass rod since the kit's plastic ones were too flimsy and one of them broke. The brass struts were easy to create by simply bending a piece of brass wire rod and laying it over the top of the kit's undercarriage struts until it matched. The propeller was painted "Wood Brown" and "Leather" to simulate the wood laminate as per the photographs.
 The
rigging for this kit is fairly straightforward, as rigging goes. The "N"
shaped interplane struts means you do not have to rig between the fore
and aft struts. I used tiny pieces of thin plastic card to make the ailerons
and 0.005" diameter wire, as mentioned above for rigging material. The
wire was glued with CA glue.
The
rigging for this kit is fairly straightforward, as rigging goes. The "N"
shaped interplane struts means you do not have to rig between the fore
and aft struts. I used tiny pieces of thin plastic card to make the ailerons
and 0.005" diameter wire, as mentioned above for rigging material. The
wire was glued with CA glue.
The kit's black and white cross decals are fine and laid down nicely both on top of the lozenged wings, and along the fuselage sides and tail. I used font size 3.5 to print "Pfal. D.XII 2690/18" onto decal paper using my HP LaserJet 3P, and adhered these to the rear fuselage sides. I must confess to some nervousness about the decal paper melting into my printer. I think it helps to do this immediately the machine warms up rather than wait until the machine has been used and becomes really hot.
I found this kit to be somewhat of a challenge due to the thin struts, the lozenge decals and the four-color camouflage that I chose. Nevertheless, I recommend it, perhaps not as a first biplane kit but certainly as a third or fourth one. Toko has done a fine job representing this fairly attractive late World War One model and it definitely was a worthwhile experience.
References
-
Grosz, P. M. "Pfalz D.XII." Series: Windsock Datafile 41.
Albatros Productions, Ltd., Berkhampsted, Hertfordshire, UK.
Acknowledgements
Thanks to Barry Stettler of Rosemont Hobby for providing the kit. I am grateful to Shane Weier for answering my numerous and sometimes duplicative questions. Shane was also kind enough to give me a few of his photographs that he took of the Pfalz D.XII 2600/18 housed in the Australian War Memorial Museum; this was also most helpful. Thank you to Bob Pearson for providing help and with the color scheme and other general guidance.