
This article originally appeared in the August 2000 issue of Internet Modeler.
 Tom-M
1/72nd Fokker D.VI
Tom-M
1/72nd Fokker D.VI

By Matt Bittner
History
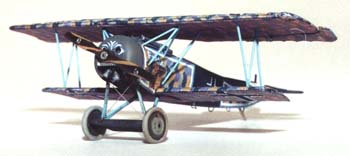
The Fokker D.VI was – in a way – a stop gap measure to help cope with the attrition the German fighters were suffering during WW1. It was basically a combination of the Fokker Dr.I and the upcoming D.VII. It had the fuselage, rudder, horizontal tail and undercarriage of the Dr.I with the (shortened) wings of the D.VII.
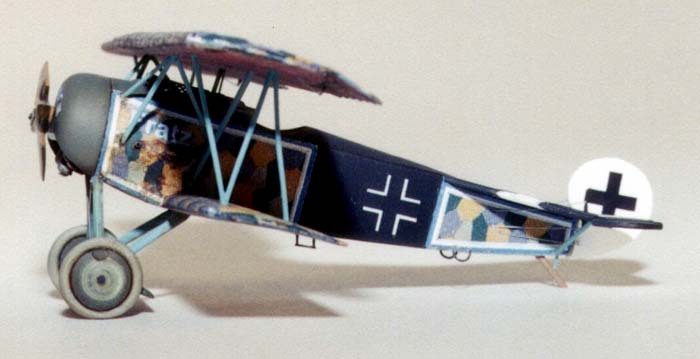
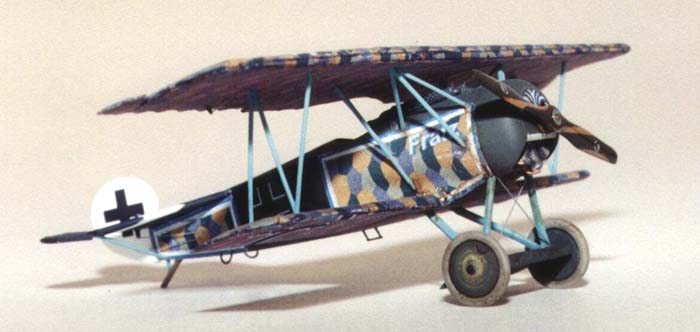
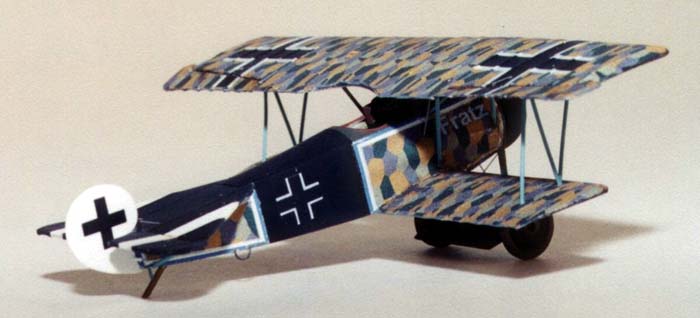
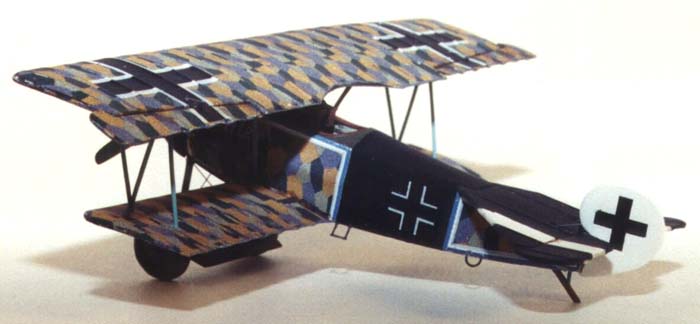
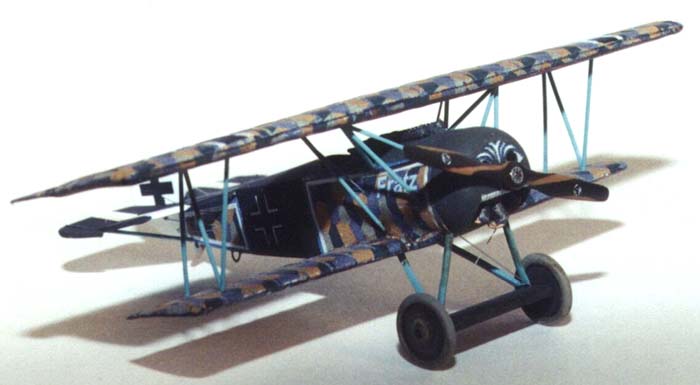
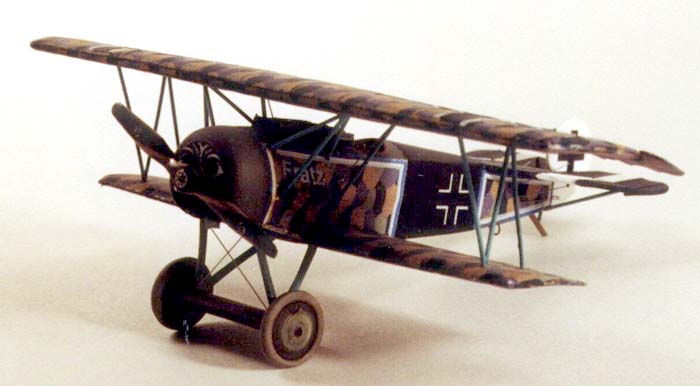
Since the D.VI was considered transitional, not many German units received the type. The German squadron most photographed using the D.VI was Jasta 80b, and it was in this squadron that Ltn. Seit flew 'Fratz'.
 The
Kit
The
Kit
The Tom-M resin kit of the Fokker D.VI consists of 20 parts with the only decals provided being the crosses. The instructions are basic, and show where each part goes.
As with most kits of the D.VI, the Tom-M example started with the Revell Fokker Dr.I and D.VII as its basis. Luckily Tom-M didn't just keep the 'straight' Revell Dr.I fuselage, instead they deepened it correctly at the upper forward and lower rear sections. Plus they also shortened the D.VII wings appropriately. However, the master pattern maker made a few mistakes, and kept a few Revell flaws with the kit. These will be talked about in detail in the construction section.
Construction
 Naturally
one starts a resin kit by removing the parts needed from the pour blocks.
Tom-M has the pour blocks for the fuselage toward the front of the fuselage,
but instead of just cutting the block away, you also have to sand the
extra away from the mating surface right behind the engine. This could
be a problem if this area isn't sanded carefully. Plus, they include a
small 'pour block' inside the cockpit cut out and the lower wing cutout.
Take care sanding these away as well. Since the only cockpit item Tom-M
provides is a seat – and an inaccurate one at that – it is best
replaced with one that resembles a Dr.I seat. Knowing that, I decided
to use a number of parts from the Hawkeye Fokker Dr.I kit, including all
cockpit parts.
Naturally
one starts a resin kit by removing the parts needed from the pour blocks.
Tom-M has the pour blocks for the fuselage toward the front of the fuselage,
but instead of just cutting the block away, you also have to sand the
extra away from the mating surface right behind the engine. This could
be a problem if this area isn't sanded carefully. Plus, they include a
small 'pour block' inside the cockpit cut out and the lower wing cutout.
Take care sanding these away as well. Since the only cockpit item Tom-M
provides is a seat – and an inaccurate one at that – it is best
replaced with one that resembles a Dr.I seat. Knowing that, I decided
to use a number of parts from the Hawkeye Fokker Dr.I kit, including all
cockpit parts.
 Since
Tom-M left the 'bulges' on the cockpit side as hollow 'bulges', these
areas on the inside of the fuselage needed to be dealt with. I used .010
Evergreen plastic sheet to fabricate the wood sides in this area. Since
all D.VI's were delivered with lozenge-covered fuselage, I added Americal/Gryphon
reverse four-color lozenge into the cockpit. Once dry I then tacked the
wood-painted 'inserts' over the top. At this time I assembled the Hawkeye
photoetch cockpit, painted the seat and installed the seat belts, and
when it was all together and painted, inserted the cockpit into the D.VI's
fuselage. It was almost a perfect match, with just some sanding needed
on the cockpit sides prior to covering the cockpit in lozenge. I also
added a sheet plastic 'baffle' to the cockpit behind the seat.
Since
Tom-M left the 'bulges' on the cockpit side as hollow 'bulges', these
areas on the inside of the fuselage needed to be dealt with. I used .010
Evergreen plastic sheet to fabricate the wood sides in this area. Since
all D.VI's were delivered with lozenge-covered fuselage, I added Americal/Gryphon
reverse four-color lozenge into the cockpit. Once dry I then tacked the
wood-painted 'inserts' over the top. At this time I assembled the Hawkeye
photoetch cockpit, painted the seat and installed the seat belts, and
when it was all together and painted, inserted the cockpit into the D.VI's
fuselage. It was almost a perfect match, with just some sanding needed
on the cockpit sides prior to covering the cockpit in lozenge. I also
added a sheet plastic 'baffle' to the cockpit behind the seat.
 Now
that the cockpit was in, I was able to glue the fuselage together. It
was after the fuselage was together that I noticed a few things. First
of all, the areas the master pattern maker added to deepen the fuselage
both in the rear and the front weren't properly filled. The seams were
extremely noticeable. Plus, the port fuselage was not symmetrical with
the starboard side. I needed to sand it a bit to get it to match. Luckily,
doing this sanding meant the seams for the master additions were eliminated
at the same time. Unfortunately Tom-M did not mold location holes for
any struts. This I consider very poor planning since getting these to
line up after the fuselage halves are together was very difficult indeed.
I used the plans from the WW1 Warplanes book to mark these areas off on
each side, then drilled through the fuselage. Even taking the care to
use the plans and line them up, I was still off with the holes on one
side. Unfortunately this meant making the holes larger on one side of
the fuselage, in hopes that they would line up later, and the extra hole
would have to be filled. Even doing this resulted in one set of holes
a hair off from the other side. This was because the front of the fuselage
was not even, and it wasn't noticed until after everything was together.
Now
that the cockpit was in, I was able to glue the fuselage together. It
was after the fuselage was together that I noticed a few things. First
of all, the areas the master pattern maker added to deepen the fuselage
both in the rear and the front weren't properly filled. The seams were
extremely noticeable. Plus, the port fuselage was not symmetrical with
the starboard side. I needed to sand it a bit to get it to match. Luckily,
doing this sanding meant the seams for the master additions were eliminated
at the same time. Unfortunately Tom-M did not mold location holes for
any struts. This I consider very poor planning since getting these to
line up after the fuselage halves are together was very difficult indeed.
I used the plans from the WW1 Warplanes book to mark these areas off on
each side, then drilled through the fuselage. Even taking the care to
use the plans and line them up, I was still off with the holes on one
side. Unfortunately this meant making the holes larger on one side of
the fuselage, in hopes that they would line up later, and the extra hole
would have to be filled. Even doing this resulted in one set of holes
a hair off from the other side. This was because the front of the fuselage
was not even, and it wasn't noticed until after everything was together.
 At
this point I added the horizontal tail after cutting off the stabilizers
for deflection. Unfortunately, after gluing the fixed portion of the horizontal
tail on I noticed it wasn't 100% accurate, and the master maker left the
rib positions on for the D.VII, which werent the same. Plus, the master
maker left all the errors in the Revell parts as well – molding 'dimples',
bogus fabric weave, etc. I sanded all the fabric weave off (since they
were to be painted in a solid color) and filled the dimples. Plus, the
two 'saw teeth', at the front of the horizontal tail did not meet the
fuselage. I had to fill this area in with plastic sheet and CA. This was
not a flush fit, so this was best tackled before the tail was added to
the fuselage. At this point I'm becoming more and more discouraged with
the kit.
At
this point I added the horizontal tail after cutting off the stabilizers
for deflection. Unfortunately, after gluing the fixed portion of the horizontal
tail on I noticed it wasn't 100% accurate, and the master maker left the
rib positions on for the D.VII, which werent the same. Plus, the master
maker left all the errors in the Revell parts as well – molding 'dimples',
bogus fabric weave, etc. I sanded all the fabric weave off (since they
were to be painted in a solid color) and filled the dimples. Plus, the
two 'saw teeth', at the front of the horizontal tail did not meet the
fuselage. I had to fill this area in with plastic sheet and CA. This was
not a flush fit, so this was best tackled before the tail was added to
the fuselage. At this point I'm becoming more and more discouraged with
the kit.
 I
then started to tackle the wings. I sanded off all the left on Revell
bogus fabric weave, and in doing so noticed a few things. First, the lower
wing wasnt symmetrical. The master pattern maker made one side longer
than the other, which was at the center point. I was able to deal with
this by adding sheet plastic to one side of the inboard trailing edge
root, and sanding the other. It actually worked, but when the wing was
offered to the fuselage, I noticed the portion of the lower wing that
was supposed to be part of the fuselage was left as for the D.VII. It
was too wide to fit the Dr.I fuselage. So, after gluing this on, I had
to sand and scrape the 'fuselage area' until it actually met the fuselage.
More discouragement.
I
then started to tackle the wings. I sanded off all the left on Revell
bogus fabric weave, and in doing so noticed a few things. First, the lower
wing wasnt symmetrical. The master pattern maker made one side longer
than the other, which was at the center point. I was able to deal with
this by adding sheet plastic to one side of the inboard trailing edge
root, and sanding the other. It actually worked, but when the wing was
offered to the fuselage, I noticed the portion of the lower wing that
was supposed to be part of the fuselage was left as for the D.VII. It
was too wide to fit the Dr.I fuselage. So, after gluing this on, I had
to sand and scrape the 'fuselage area' until it actually met the fuselage.
More discouragement.
 Also
while sanding the upper wing, I noticed the master maker didn't join the
wing halves together as good as they should have been. There was a step
in the direct center that had to be sanded away – and it wasn't a
small step either, especially underneath. After sanding the step, and
the bogus fabric weave I had to fill in the left over Revell dimples.
Personally, I would have thought the master maker would have taken care
of this process for the modeler. Turned out not to be so. The modeler
is left to deal with the master maker's short sightedness.
Also
while sanding the upper wing, I noticed the master maker didn't join the
wing halves together as good as they should have been. There was a step
in the direct center that had to be sanded away – and it wasn't a
small step either, especially underneath. After sanding the step, and
the bogus fabric weave I had to fill in the left over Revell dimples.
Personally, I would have thought the master maker would have taken care
of this process for the modeler. Turned out not to be so. The modeler
is left to deal with the master maker's short sightedness.
I also decided to use the Hawkeye Dr.I gun piece – this is a one piece affair that contains part of the upper fuselage and gun butts in one piece. With a little bit of sanding it slotted into the D.VI fuselage perfectly. Since I considered the Tom-M guns a bit anemic, they needed replacing anyway and the Hawkeye piece just made life a little easier with this model.
 I
didn't like the looks of the 'N' interplane struts, so using a template
I created for the Revell D.VII I made new ones out of Evergreen .020"
rod. Although Tom-M provides copper wire for the rest of the wing and
tail struts, I decided to use the Evergreen .020" rod for these areas
as well. I consider it easier to work with plastic than metal.
I
didn't like the looks of the 'N' interplane struts, so using a template
I created for the Revell D.VII I made new ones out of Evergreen .020"
rod. Although Tom-M provides copper wire for the rest of the wing and
tail struts, I decided to use the Evergreen .020" rod for these areas
as well. I consider it easier to work with plastic than metal.
Final Assembly and Painting
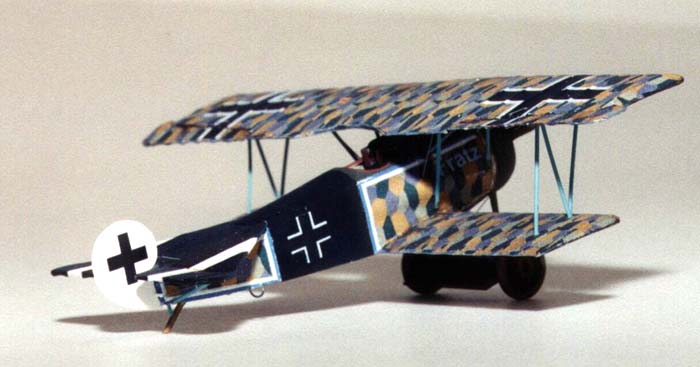
Since the majority of the model was to be covered with ALPS-generated lozenge, the entire model was sprayed white. I then masked off the white areas where the lozenge would go, and sprayed the olive upper fuselage and black tail and upper rear fuselage. Once dry I then covered the lozenge areas with the ALPS-generated decals (a single decal for the top of the upper wing; a single decal for the bottom of the upper wing, etc., which meant no lozenge decal or rib tape 'assembly'). I then over-sprayed with Future and applied black-stripe decals behind the cockpit.
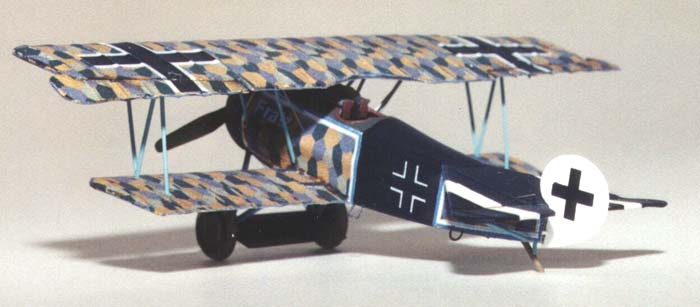
 I
then installed the interplane struts, mounted the upper wing and assembled
the center struts on the model. I also added the struts to the underside
of the horizontal tail and added the undercarriage. The cowl and engine
(with the photoetch) came from a Hawkeye Dr.I (the Hawkeye Dr.I cowl being
the most accurate in 1/72nd scale). I rigged, over-sprayed with Polly
Scale flat, and have the first model representation of 'Fratz'.
I
then installed the interplane struts, mounted the upper wing and assembled
the center struts on the model. I also added the struts to the underside
of the horizontal tail and added the undercarriage. The cowl and engine
(with the photoetch) came from a Hawkeye Dr.I (the Hawkeye Dr.I cowl being
the most accurate in 1/72nd scale). I rigged, over-sprayed with Polly
Scale flat, and have the first model representation of 'Fratz'.
Conclusion
While the Tom-M is pretty accurate, there are a lot of problems to overcome. Poor master making is the number one reason for these problems. However, the Tom-M kit is a lot thinner than the Aeroclub kit. So, you trade scale thickness for construction woes.
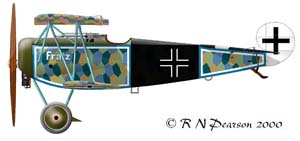
Researching Ltn. Seit's machine 'Fratz' was extremely fun. Seeing photos of the machine for the first time made my mind up to build this machine – before anyone else had time to tackle it.
I would like to thank Greg Van Wyngarden, Bob Pearson, Erik Pilawskii and Steve Hustad for help figuring out the scheme for 'Fratz'.
Thanks also go to Tom-M and Michal Beran for providing the review kit.
References
-
WW1 Warplanes, Vol. 1, Albatros Productions