
This article originally appeared in the February 2000 issue of Internet Modeler.
 Building
the DFW T28 Floh.
Building
the DFW T28 Floh.
(or how to be happy upon getting a flea from a friend)
By Pedro Nuno Soares
History
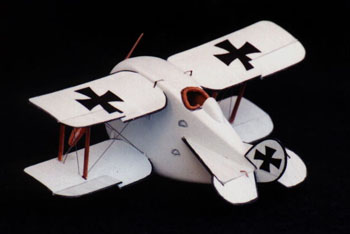
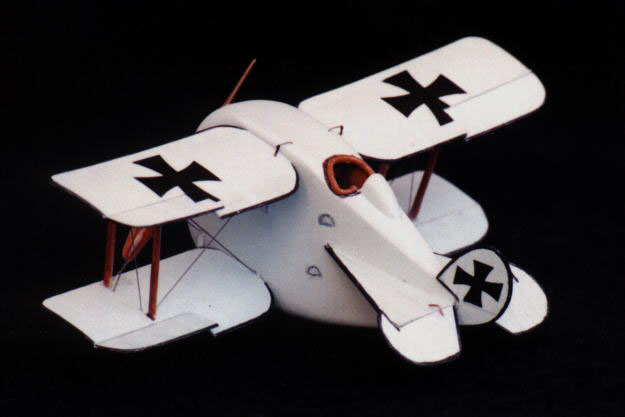
The DFW T28 Floh (Flea) was designed in 1915 by the Chief Engineer of the Deutsche Flugzeugwerke GmbH of Leipzig-Lindenthal, Dipl.Ing. Hermann Dorner, and with it, its creator aimed at building a high speed fighter, hence the special emphasis put on streamlining that led to the aircrafts unparalleled silhouette. In fact it seems that in the beginning the Floh was projected as a strut and wire less aircraft but when it finally reached prototype form, struts and wires were conventionally added to an aeroplane that did not look conventional at all.
Powered by a 100hp in-line Mercedes D1 engine and armed with a single machine gun installed over the engine inside the fuselage, the Floh made a very promising first flight during which a speed of 180 Km/h was recorded, a feat at the time. This notwithstanding, German authorities chose not to sponsor the development of the aircraft due to its difficult landing characteristics (extant on the very first flight that resulted in light damage to the wing cell) and the Floh passed into history as another curiosity in military aircraft development.
Building the model
I had wanted to make a model of the Floh ever since I first I saw a picture of the original airplane, but I had never come across any of the at least four 1/72nd kits that were produced of this unique aircraft.
Some time ago, through the generosity of a friend, I came into possession of the Classic Plane vac formed 1/72nd kit and I started working on it right away. I had not much experience on vacs (in fact I had never finished one till then) but the kit parts looked good and I felt confident I would be able to get a model done.
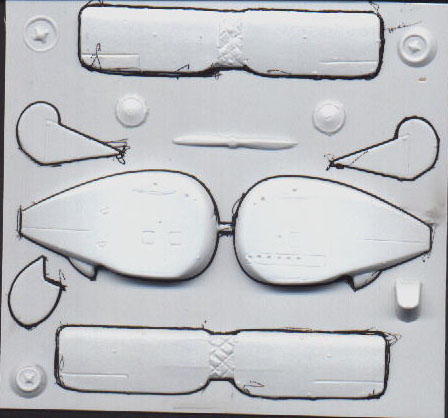 First
thing I did was to prepare the parts for separation from the vac sheet
and this I did using a permanent marker to trace the contours, so as to
have a guiding line as to where to stop sanding later on.
First
thing I did was to prepare the parts for separation from the vac sheet
and this I did using a permanent marker to trace the contours, so as to
have a guiding line as to where to stop sanding later on.
I separated the fuselage halves first, sanded the excess plastic away and then proceded to cut the wings. Once I had the lower wing separated from the carrier, and after having already sanded most of its excess plastic, I started to think that it looked too narrow in chord when compared to the photos I had access to. The kit mentions, as a source of reference, an article in an old Air International and engaging the help of a friend who had that particular issue, I came to the conclusion that the kit was probably mastered around the 3 view plan published in that magazine, since it also shows the narrow chord wings.
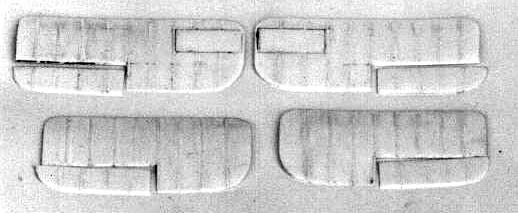 Not
happy with the way the wings looked, I decided to go the hard way and
scratchbuild a new set. Since the tailplane, rudder and elevators also
differed from the other set of drawings I could consult, those of Colin
Owers in WW1 Warplanes Volume One, I ended up scratchbuilding them all
and, in the end, all I kept from the original kit were the two fuselage
halves.
Not
happy with the way the wings looked, I decided to go the hard way and
scratchbuild a new set. Since the tailplane, rudder and elevators also
differed from the other set of drawings I could consult, those of Colin
Owers in WW1 Warplanes Volume One, I ended up scratchbuilding them all
and, in the end, all I kept from the original kit were the two fuselage
halves.
The wings were built on a suitably cambered strip of 15thou Evergreen
sheet onto which were glued very thin strips of .005" plastic to replicate
rib detail. These were sanded almost smooth when dry. The undersides of
the wings 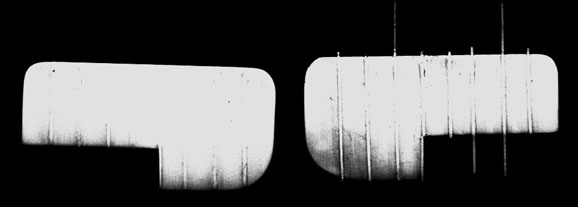 were
also sanded from 1/3 chord towards the trailing edge in order to achieve
a smooth progression to a razor sharp TE . Rib stations on the underside
of the wings were achieved by tracing them on with watercolour pencil
at a much later stage. The ailerons were then cut and I now feel that
the Owers drawings are wrong in this respect, since the ailerons should
be much wider in chord than the plans show according to the photographs
of the real aircraft. When I noticed it it was already too late, so on
I went and made a new tailplane, elevators and rudder from thin sheet
plastic, all rib detail here being achieved by means of the already mentioned
watercolour pencils.
were
also sanded from 1/3 chord towards the trailing edge in order to achieve
a smooth progression to a razor sharp TE . Rib stations on the underside
of the wings were achieved by tracing them on with watercolour pencil
at a much later stage. The ailerons were then cut and I now feel that
the Owers drawings are wrong in this respect, since the ailerons should
be much wider in chord than the plans show according to the photographs
of the real aircraft. When I noticed it it was already too late, so on
I went and made a new tailplane, elevators and rudder from thin sheet
plastic, all rib detail here being achieved by means of the already mentioned
watercolour pencils.
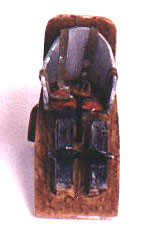
 I
now had almost all the parts done and ready to assemble so I scratchbuilt
some cockpit details that I felt would be right (I did not have any cockpit
shots to guide me), painted the side walls a wooden colour and was ready
to cement the fuselage halves together.
I
now had almost all the parts done and ready to assemble so I scratchbuilt
some cockpit details that I felt would be right (I did not have any cockpit
shots to guide me), painted the side walls a wooden colour and was ready
to cement the fuselage halves together.
Had I done this the fuselage would look too narrow, so I glued a large piece of 0.40" plastic to one side of the fuselage, right after the instrument panel. When this had settled (the next day) I finally brought the two fuselage halves together and laid it to rest for a day or two to make sure I had a good joint. The excess plastic was them trimmed away with files and wet and dry.
 I
forgot to mention that the holes of the "chinaman's face" on the front
of the fuselage, which in fact were cooling intakes for the engine, were
blanked off with some sheet plastic before closing the fuselage.
I
forgot to mention that the holes of the "chinaman's face" on the front
of the fuselage, which in fact were cooling intakes for the engine, were
blanked off with some sheet plastic before closing the fuselage.
A fairly good touch of filler was needed in order to close the gap that the addition of the plastic to the front half had caused at the rear end, but Milliput took care of the situation with ease and competence.
The louvre details on the fuselage were also retouched by means of adding new louvre panels made with streched sprue and sheet plastic and the fuselage was prepared to accept the wings and tailplane, the trickiest part of the build-up, since the wings were too thin to insert locating pins.
 Since
the wings, once in place, would not stand too much handling I painted
them first (Humbrol 122 was used) and carefully outlined them in black
with the help of a micron pigma marker. I made longitudinal indentations
on the fuselage with the back of a blade to get the wings to rest on a
more positive surface and holding my breath and wishing hard secured the
wings one at the time with a touch of CA.
Since
the wings, once in place, would not stand too much handling I painted
them first (Humbrol 122 was used) and carefully outlined them in black
with the help of a micron pigma marker. I made longitudinal indentations
on the fuselage with the back of a blade to get the wings to rest on a
more positive surface and holding my breath and wishing hard secured the
wings one at the time with a touch of CA.
The struts were carved out of a bamboo chopstick and once cut to appropriate length they rested easily in small locating indentations I had made on the wings.
The tailplane was glued the same way as the wings and I was now ready to attack the undercarriage. This was made with pieces of Evergreen rod scraped to a thinner section, while the axle was but a section from a straight pin. Drilling holes in the fuselage at the correct angle for the undercarriage arms ensured that they would later be easily inserted in their correct places.
I was getting nearer the end and I rigged the model with nylon sewing monofilament, taking advantage of the rigging holes I had drilled into the wings and fuselage before with a .3 mm drill.
 As
I said the model was painted overal in Humbrol 122 (matt pale blue) and
then the ribs were accentuated on the upperside of the wings with a white
watercolour pencil, while on the underside rib detail was achieved by
lightly scribing it in with a grey watercolour pencil.
As
I said the model was painted overal in Humbrol 122 (matt pale blue) and
then the ribs were accentuated on the upperside of the wings with a white
watercolour pencil, while on the underside rib detail was achieved by
lightly scribing it in with a grey watercolour pencil.
Except for the German Eizerne Kreuze on the wings and rudder there were no markings on the Floh. My crosses came from an Almark sheet (A29 - German Crosses Eiserne Keruz 1916-17) and since one of the photos shows that the right upper aileron was, at some stage, probably replaced because there is no trace of the wing cross on it, I chose to simulate this to make things a bit more interesting. The decals were only laid after coating the surface with one or two coats of Klear to ensure there would be no silvering.
I used Klear to lay them in place, as I always do, since I find it better than any decal setting solution, and they conformed very well to the surface. A word of advice though about the decals since they are very thin and will break easily.
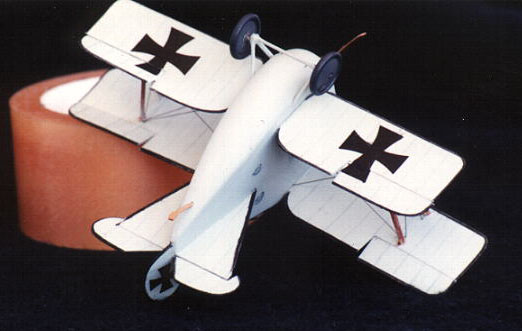 The
wheels came from an Extraparts resin set with the covers painted in a
darker shade of grey (Humbrol 92) and the propeller is an Aeroclub article
I found in my spares box that I tried to approximate to the real thing
with a fair amount of filing and sanding, although I'm not totally happy
with it.
The
wheels came from an Extraparts resin set with the covers painted in a
darker shade of grey (Humbrol 92) and the propeller is an Aeroclub article
I found in my spares box that I tried to approximate to the real thing
with a fair amount of filing and sanding, although I'm not totally happy
with it.
A final overall spray of Humbrol satin coat and the Floh was ready to park amongst my growing collection of WW1 scale aircraft models.
Conclusion
All in all I am very happy with the final result, the more so since I was able to try out many techniques I had never used before, but of paramount importance was the help that all through the building up I got from my friend Len Smith, who not only generously offered me the kit in first place but also guided me through all the scratchbuilding techniques that were fairly new to me.
A word of thanks too to Mike Franklin for the help provided and to all the members of the WW1 modeling mailing list who were always ready to answer the questions I asked.