
This article originally appeared in the December 1998 issue of Internet Modeler.
 Building the Toko Siemens Shuckert D.III
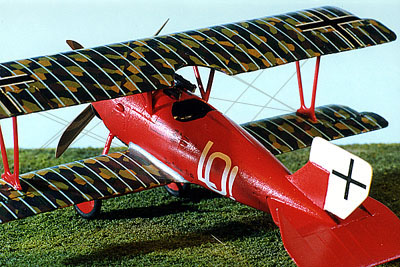
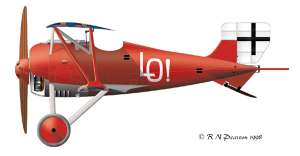
After reading about the new Toko biplane kits, I picked up a couple: the Pfalz D.XII and the Siemens Shuckert D.III/IV. The SSW D.III hit my workbench first, and upon opening up the box, I was struck by the amount of material given for only $10 retail. The detail is crisp, although there is some flash. The cockpit interior looked good, and providing all the parts to do either a D.III or a D.IV was a very nice touch. Of course, this forced me to decide which variant to make right away. The decal choices are for a D.IV with a green fuselage flown by Oberleutenant Alfred Lenz (misidentified as Alfred Lerner in the instructions), and Ernst Udet’s red D.III. While I am partial to the color green, nothing says WWI Germany like a red biplane, so Udet it is! (For even MORE interesting SSW D.III markings, be sure to check out Bob Pearson's Siemens Schuckert D.III page).
 The first step of construction was to take all the pieces off the sprues
and do a quick dry fit to see where the trouble spots would be. In fitting
everything together, I noticed something didn’t look right around
the tail. Checking the old Profile Publication on the Siemens Shuckert
D.III/D.IV, I could see that the elevator was too small in the kit. I
then went to the experts who gather on the WWI Modeling Mailing List and
discovered that, indeed, the elevator was about 25 percent too small for
a D.III. Now that I knew the trouble spots, I promptly set the model aside
for a month.
The first step of construction was to take all the pieces off the sprues
and do a quick dry fit to see where the trouble spots would be. In fitting
everything together, I noticed something didn’t look right around
the tail. Checking the old Profile Publication on the Siemens Shuckert
D.III/D.IV, I could see that the elevator was too small in the kit. I
then went to the experts who gather on the WWI Modeling Mailing List and
discovered that, indeed, the elevator was about 25 percent too small for
a D.III. Now that I knew the trouble spots, I promptly set the model aside
for a month.
 After a suitable time had passed, I picked the kit up again and started
in on the cockpit. The detail present in the kit is very nice. I painted
everything inside with a dark brown, then painted light brown streaks
over that to simulate the wood grain. When that had dried thoroughly,
I went over the entire interior with a black wash. This lowered the contrast
of the wood grain and accented the shadows in the corners very well. Once
dry, I lightly drybrushed the edges around the cockpit, then glued everything
in place. With the fuselage closed, none of this can be seen, but I know
it’s in there.
After a suitable time had passed, I picked the kit up again and started
in on the cockpit. The detail present in the kit is very nice. I painted
everything inside with a dark brown, then painted light brown streaks
over that to simulate the wood grain. When that had dried thoroughly,
I went over the entire interior with a black wash. This lowered the contrast
of the wood grain and accented the shadows in the corners very well. Once
dry, I lightly drybrushed the edges around the cockpit, then glued everything
in place. With the fuselage closed, none of this can be seen, but I know
it’s in there.
I turned next to fixing that elevator. At first I thought I would just add a section to the rear of the kit part and blend it in, but that would be tough to do and keep it to scale thinness. So instead, I cut the kit elevator off and made a whole new one out of sheet plastic. I used a copy of the SSW D.III plans from the Datafile and cut the elevator out of .020 plastic card.
 With the basic shape done, I attacked it with files and sandpaper until
it tapered off on the trailing edge. I was extremely pleased with how
it looked, until I compared it to the wings and rudder. The kit pieces
weren’t nearly as thin as my nice elevator! So, taking the path of
least resistance, I ran some sandpaper on my elevator and trimmed off
that super-thin trailing edge!
With the basic shape done, I attacked it with files and sandpaper until
it tapered off on the trailing edge. I was extremely pleased with how
it looked, until I compared it to the wings and rudder. The kit pieces
weren’t nearly as thin as my nice elevator! So, taking the path of
least resistance, I ran some sandpaper on my elevator and trimmed off
that super-thin trailing edge!
Now that I had a proper elevator, I took some .005 plastic strips and added ribs. When these were dry, I sanded them down until they were almost gone, leaving just a hint of the rib. A coat of paint would help smooth them out, too.
With the elevator looking good, I turned back to the fuselage. I glued the lower wing on and started in on the other problem spot. The fit of the lower wing wasn’t very good, and it left a gap I filled with 3M Acryl Blue body putty, followed by some sanding. Once the contours were smoothed out under the wing, it was time to look towards the front of the plane.
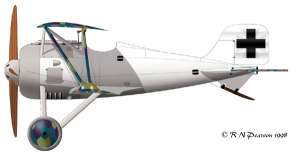
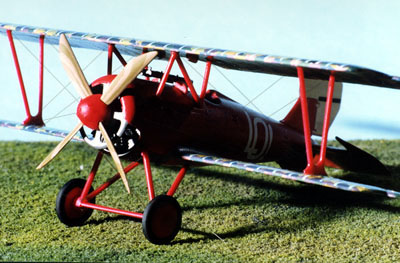
The kit engine is very nicely done, giving a decent representation
of the 11-cylinder Siemens-Halske rotary engine. Although a white metal
replacement could improve the looks of the engine, once the cowling and
propeller are on little remains visible, so I just used the kit piece.
I started it by painting it with Testors Metalizer Titanium. When that
was dry, I did a wash with black oil paint, followed by drybrushing of
Metalizer aluminum. This really brought out the detail, which disappeared
once the cowling was put over it. The firewall was painted with Metalizer
titanium, as was the inside 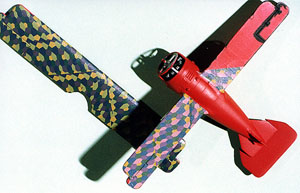 of the cowling. All of this was glued into place, and then a bit of sanding
blended it in to the rest of the fuselage.
of the cowling. All of this was glued into place, and then a bit of sanding
blended it in to the rest of the fuselage.
With everything looking good, I started digging out the red paint. I ended up choosing Pactra Insignia Red, but instead of spraying it directly over the gray plastic, I put down a coat of Testors Metalizer Aluminum first. When the red was sprayed over that, it wasn’t as bright and looked more appropriate. While I sprayed the red on the fuselage, I also sprayed the wings, even though they would be covered with lozenge decal. The paint would give the decals something to adhere to. In retrospect, I should have painted the wings a dark color, or one of the lozenge colors, so the gaps in the decalling wouldn’t be quite as noticeable.
With everything painted, it was time to apply the decals.
Here’s where the fun really began. Both wings of the SSW D.III were
covered in lozenge fabric, which looks really neat but is a pain to get
just right. The kit decals included the lozenge, but it had only 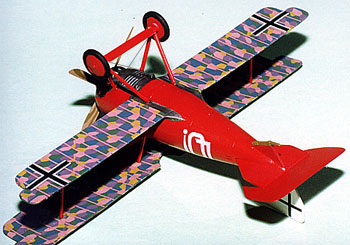 four colors, and four wrong colors at that. I got out my Aeromaster five-color
lozenge sets and got to work. The SSW D.III had its lozenge running at
45-degree angles, so I drew up a quick template to get the proper angles
and started cutting decal. My first piece ended up being too short, of
course, but I didn’t notice this until I had already put it in place
and applied liberal amounts of Solvaset. I fixed this later with a "field
patch" that blended in surprisingly well. Slow and steady is the
name of the game here, and it took me about a week to do the upper wing
alone. I had to wait for each piece of lozenge to dry completely before
putting the next one on.
four colors, and four wrong colors at that. I got out my Aeromaster five-color
lozenge sets and got to work. The SSW D.III had its lozenge running at
45-degree angles, so I drew up a quick template to get the proper angles
and started cutting decal. My first piece ended up being too short, of
course, but I didn’t notice this until I had already put it in place
and applied liberal amounts of Solvaset. I fixed this later with a "field
patch" that blended in surprisingly well. Slow and steady is the
name of the game here, and it took me about a week to do the upper wing
alone. I had to wait for each piece of lozenge to dry completely before
putting the next one on.
With the upper lozenge done on both the upper and lower wings, I turned to the lower lozenge. Being a different set of colors, it really stood out in contrast to the upper, so I had to take special care and make sure that I didn’t end up with any overlap curling onto the upper lozenge. After working the lower lozenge into place, I set everything aside and took a couple days off to let everything dry out. The next step proved to be even more tedious: the rib tapes.
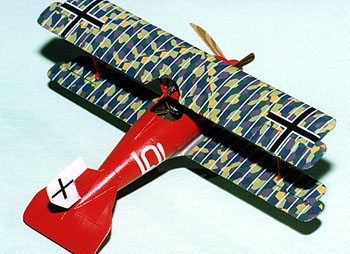 The lozenge pattern was held in place by rib tapes; blue on top and pink
on bottom. I started with the upper wing again, and I did a set of four
rib tapes at a time. After the fourth one was on and trimmed up, liberal
amounts of Solvaset were applied and the wing was set aside. Between the
lozenge pattern and the rib tapes, the amount of Solvaset used pretty
much guaranteed that these decals were never coming off. I finished up
the top of the upper and lower wings and set them aside to dry for a couple
days before attempting the lowers.
The lozenge pattern was held in place by rib tapes; blue on top and pink
on bottom. I started with the upper wing again, and I did a set of four
rib tapes at a time. After the fourth one was on and trimmed up, liberal
amounts of Solvaset were applied and the wing was set aside. Between the
lozenge pattern and the rib tapes, the amount of Solvaset used pretty
much guaranteed that these decals were never coming off. I finished up
the top of the upper and lower wings and set them aside to dry for a couple
days before attempting the lowers.
When I came back to the kit, I took the rib tape decals and started cutting them. But instead of cutting them individually, I left them all connected to one backing paper. When I laid this out on the kit, I discovered that the rib tapes were put on the decal paper at just the proper spacing for the ribs on the kit. As I was going slightly mad from all of this decalling, I thought I would try something a little different. So, I did all the tapes at once. There were 9 tapes to a section of decal paper, and I was able to do all nine at once, sliding them off one at a time in perfect alignment. What had taken me three days to do on the upper tapes took only one night on the lowers. This meant that I might actually finish the kit before the millennium!
 With the lozenge part done, I turned to the other decals. I sprayed Future
on the fuselage and over the completed wings to provide a smooth surface
for the decals and a consistent finish to the plane. The kit decals were
considerably thicker than the lozenge decals, but they responded well
to Solva-Set and eventually snuggled down onto the fuselage. Udet’s
"LO!" markings were very opaque and no red showed through, which
was a relief.
With the lozenge part done, I turned to the other decals. I sprayed Future
on the fuselage and over the completed wings to provide a smooth surface
for the decals and a consistent finish to the plane. The kit decals were
considerably thicker than the lozenge decals, but they responded well
to Solva-Set and eventually snuggled down onto the fuselage. Udet’s
"LO!" markings were very opaque and no red showed through, which
was a relief.
With all the decalling done, all that was left was the
fiddly bits. The propeller was brush-painted dark brown, then the lighter
wood was painted in. It looks good from a distance, which is as close
as I’ll let anyone get to this model. The struts were superglued
in place on the lower wing and fuselage, then the upper wing was fitted
in place. Some careful tweaking was needed to get everything aligned and
seated properly. The landing gear went together very well, and was also
superglued in 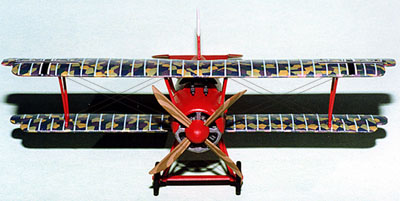 place. Now it was beginning to look like a finished model! A bit of rigging
with the PS-W4 method, and my Siemens Shuckert D.III was done.
place. Now it was beginning to look like a finished model! A bit of rigging
with the PS-W4 method, and my Siemens Shuckert D.III was done.
This kit was a nice break from all those WWII types, and the red fuselage and lozenge patterned wings really stands out on the shelf. I’m really looking forward to building up the Toko Pfalz, Snipe, and Salamander in the future. World War One aviation seems to be enjoying a golden age these days, and Toko is leading the pack with these great kits. A little patience and some time are all that’s needed to turn these kits into showstoppers.