
This article originally appeared in the December 1998 issue of Internet Modeler.
 Copper State 1/48 Fokker D V
By Robert Karr
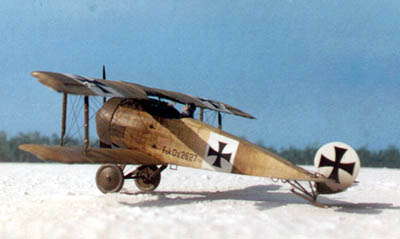
A product of late 1916, the Fokker D V never received the acclaim that its more famous stablemates enjoyed. Underpowered and deemed structurally questionable by the German authorities, it managed to earn its keep as an advanced trainer. Reportedly pleasant to fly, it soldiered on through 1918 in the schools and in a few frontline units as a hack. Perhaps its greatest contribution was allowing the Fokker company to stay busy and solvent in the lean time before the DR-I and D VII were sprung upon the world. Around 300 were built.
The Model
Upon opening the box of the Copper State 1/48 Fokker D V kit, I was
struck by the seeming completeness. Main airframe parts are in a pleasing
tannish-pink resin with fine details done in photo-etched nickel-silver
and cast pewter. Instructions are rather sketchy, but anyone familiar
with biplanes and multi-media kits shouldn't have too much trouble. However,
great scale drawings of the real item by Martin 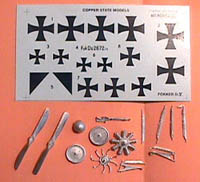 Digmayer are included, and these supply most of the answers to most of
the construction questions.
Digmayer are included, and these supply most of the answers to most of
the construction questions.
I've worked with all these media before, but I must confess that this was my first venture into building a model whose main parts were all resin. Another confession is that I cordially dislike cast metal and photo-etch for any structural members such as struts. With these confessions and prejudices out of the way, I'll begin the kit!
A quick rinse in soapy water to remove mold gunk allowed a closer inspection
of the resin bits. NO pits or tiny air bubbles! None! The wings are perhaps
the best part of the kit, having very thin trailing edges and just the
right amount of rib detail. Five minutes of general refinement and leading
edge cleanup with a sanding 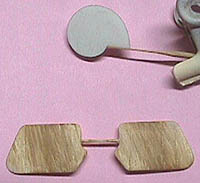 stick and the wings are ready. Moving to the tail surfaces, I found the
outlines to be good, with the rudder needing just a few gentle kisses
with sandpaper to pull it into shape. However, unlike the wings, these
parts are overly thick planks and lack finesse. Since the rib detail wasn't
so great to begin with, I elected to sand and file these parts to the
correct cross section, first marking the perimeters with a felt tip pen.
The rudder was just generally thinned down, while the elevators were given
a slight airfoil shape and razor thin trailing edges. Despite this rather
harsh sounding treatment, the job was accomplished in a few minutes and
was much easier than scratchbuilding new parts. To get all of the cleanup
out of the way, I next tackled the fuselage, grinding out and enlarging
the cockpit cavity. The fuselage is split horizontally and a test fit
revealed a warp or bow in the pieces.
stick and the wings are ready. Moving to the tail surfaces, I found the
outlines to be good, with the rudder needing just a few gentle kisses
with sandpaper to pull it into shape. However, unlike the wings, these
parts are overly thick planks and lack finesse. Since the rib detail wasn't
so great to begin with, I elected to sand and file these parts to the
correct cross section, first marking the perimeters with a felt tip pen.
The rudder was just generally thinned down, while the elevators were given
a slight airfoil shape and razor thin trailing edges. Despite this rather
harsh sounding treatment, the job was accomplished in a few minutes and
was much easier than scratchbuilding new parts. To get all of the cleanup
out of the way, I next tackled the fuselage, grinding out and enlarging
the cockpit cavity. The fuselage is split horizontally and a test fit
revealed a warp or bow in the pieces. 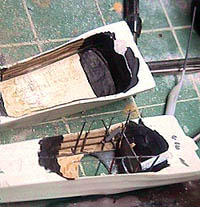 If the nose was held together, the tail halves wouldn't meet. Instead
of the heat-and-bend method of straightening, I just flat sanded the halves
as one would a vac form. This actually brought the model into true conformity
with the drawings. The overall outline looks good, but the major weakness
of the kit is the fuselage. The detail is too soft and indistinct - the
stringers of the real thing are sharp and pronounced, but the kit merely
has some flabby facets. The one area of sharp detail is the lacing along
the bottom, and this is grossly over scale. Fortunately, some sanding
does take this down, and it doesn't look all that bad.
If the nose was held together, the tail halves wouldn't meet. Instead
of the heat-and-bend method of straightening, I just flat sanded the halves
as one would a vac form. This actually brought the model into true conformity
with the drawings. The overall outline looks good, but the major weakness
of the kit is the fuselage. The detail is too soft and indistinct - the
stringers of the real thing are sharp and pronounced, but the kit merely
has some flabby facets. The one area of sharp detail is the lacing along
the bottom, and this is grossly over scale. Fortunately, some sanding
does take this down, and it doesn't look all that bad.
My resin learning curve was rising steeply. In my cockpit grinding,
I found out that resin cockpit walls don't like being too thin. Upon realizing
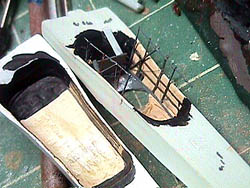 that I wouldn't be able to accurately stuff this area with everything
needed, I went for a cover-up strategy. I would hide alot of the interior
with a pilot! Not a terribly popular thing in modeling these days, I find
it to be a wonderful solution whenever there's a problem with getting
the cockpit just right. I built some internal structure using very thin
sprue for the stringers and longerons and thin strips of typing paper
coated with craft acrylic paint for the vertical formers. These assemblies
were built and painted outside the cockpit and installed into the upper
half. A few never-to-be-seen-again pieces were made and installed - a
hand pump here and an instrument there. A dummy
that I wouldn't be able to accurately stuff this area with everything
needed, I went for a cover-up strategy. I would hide alot of the interior
with a pilot! Not a terribly popular thing in modeling these days, I find
it to be a wonderful solution whenever there's a problem with getting
the cockpit just right. I built some internal structure using very thin
sprue for the stringers and longerons and thin strips of typing paper
coated with craft acrylic paint for the vertical formers. These assemblies
were built and painted outside the cockpit and installed into the upper
half. A few never-to-be-seen-again pieces were made and installed - a
hand pump here and an instrument there. A dummy 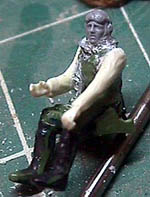 ammunition box facade was made from plastic sheet and stuck up under the
front coaming supported from the back with a crude scrap stick. Lurking
on the photo-etch frame in the kit is a truly wonderful ammo box, which
I elected to save for some future project.
ammunition box facade was made from plastic sheet and stuck up under the
front coaming supported from the back with a crude scrap stick. Lurking
on the photo-etch frame in the kit is a truly wonderful ammo box, which
I elected to save for some future project.
The pilot consumed the most effort in this area. He was hashed together
from three different figures, including 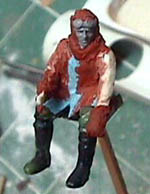 an old Lindberg Me262 pilot, an Airfix Stuka pilot, and an Aurora ground
crew guy. With the various body parts arranged, a long flying coat and
scarf were built up and the flight helmet altered using good ol' tube
style Bondo auto body putty reduced with MEK and lacquer thinner. I keep
this mix on hand at all times, mixed in a bottle and ready to work with
an old brush, literally painting on detail. Once this had set, and after
a bit of clean-up sanding and filing, I shot it with gray primer.
an old Lindberg Me262 pilot, an Airfix Stuka pilot, and an Aurora ground
crew guy. With the various body parts arranged, a long flying coat and
scarf were built up and the flight helmet altered using good ol' tube
style Bondo auto body putty reduced with MEK and lacquer thinner. I keep
this mix on hand at all times, mixed in a bottle and ready to work with
an old brush, literally painting on detail. Once this had set, and after
a bit of clean-up sanding and filing, I shot it with gray primer. 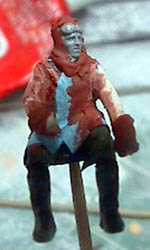 I fixed the remaining rough spots and then did the final painting. To
this finished figure, I started adding more cockpit bits, including the
kit's great rudder pedals and control stick grip. The belts and strappings
were made from the acrylic-soaked paper. The underside of the "leather"
coaming was painted and a block of wood glued under the turtle where a
seat back would go, and the fuselage was ready to receive the pilot. He
was unceremoniously shoved up into the upper half and his back glued to
the block and the cockpit detailing was complete. To this point, all assembly
was accomplished using green label Zap-A-Gap. The halves were put together
with 2- part epoxy to allow plenty of working time to get the pieces lined
up. Some Bondo-mix filled the side seam, a bit of sanding and the fuselage
was ready for priming. This was
I fixed the remaining rough spots and then did the final painting. To
this finished figure, I started adding more cockpit bits, including the
kit's great rudder pedals and control stick grip. The belts and strappings
were made from the acrylic-soaked paper. The underside of the "leather"
coaming was painted and a block of wood glued under the turtle where a
seat back would go, and the fuselage was ready to receive the pilot. He
was unceremoniously shoved up into the upper half and his back glued to
the block and the cockpit detailing was complete. To this point, all assembly
was accomplished using green label Zap-A-Gap. The halves were put together
with 2- part epoxy to allow plenty of working time to get the pieces lined
up. Some Bondo-mix filled the side seam, a bit of sanding and the fuselage
was ready for priming. This was 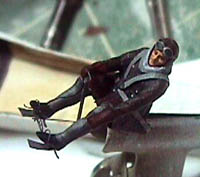 sprayed and left to dry.
Turning back to the flying surfaces, I connected the elevators with
a rod of skinny bamboo, shaved out of a kabob skewer. Bamboo is far stronger
than plastic and easier to work than metal wire. A notch was cut into
each elevator half and the ends of the bamboo rod glued into these notches.
Bondo-mix was slopped on the joint, slight cleanup performed and my elevators
were connected. I needed to replace the rib indications on the elevators,
and this I did by masking off each rib location and spraying several thick
coats of paint. When this had dried, I peeled off the tape, and 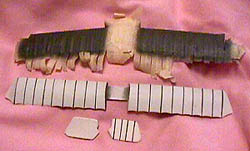 gently sanded the proud paint stripes, leaving subtle but noticeable raised
detail. The wings also had their already fine ribbing enhanced using the
same method. The rudder had some material cut away to allow for a bamboo
hinge post, and with a little touch of sandpaper, all was ready for priming.
This was done and the major components were ready for a version of the
Fokker streaked paint job.
gently sanded the proud paint stripes, leaving subtle but noticeable raised
detail. The wings also had their already fine ribbing enhanced using the
same method. The rudder had some material cut away to allow for a bamboo
hinge post, and with a little touch of sandpaper, all was ready for priming.
This was done and the major components were ready for a version of the
Fokker streaked paint job.
Everything was first sprayed with a fabric color mixed from Model Master flat white with a few drops of the same brand's Skin Tone Base - Light, and insignia yellow. This was allowed to dry for maybe twenty-four hours, then the fun began. I had a film canister sitting around marked "Fokker green-brown water base". I have no idea what's in it, but it looked good. Taking an old stiff brush, I started at the front of the fuselage brushing vertical strokes until the brush needed recharging, following what was probably the actual method. Except for the prototype, all other D Vs seemed to have the same pattern of dense opaque strokes starting just behind the cowl, thinning out behind the cockpit, and more opaque denseness sprouting out behind the white cross field. The wings were similarly streaked, with the strokes perpendicular to the leading edge - NOT angled as on later Fokker products.
The elevators did receive angled strokes. This same color was also used to paint practically everything that wasn't fabric such as the struts, cowl, fasteners and all manner of minutia. Searching about for an underside color, I spied another mystery film canister, this one labled "WW I Ger Turq oil base". I opened and sniffed. It looked to be a usable light turquoise blue.
Declaring it to be satisfactory, I masked and sprayed the 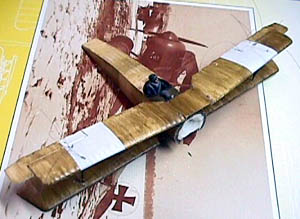 fuselage bottom along the longeron line (apparently correct for the D
V). The elevator and wing undersurfaces also got shot with this stuff,
with the bottom of the bottom wing having the fabric colored areas masked
where the crosses would go. All sources consulted were uncertain about
whether the flying surface undersides were clear doped fabric or painted
in the turquoise light blue. I went with blue - just because it looks
good! When all this was thoroughly dry, I "varnished" it using
tinted Future floor wax. I filled a film canister (handy things!) roughly
2/3 with Future and added a couple of drops of brown craft acrylic and
a drop of yellow. The acrylic colors were very generically labeled, being
in fact called "brown" and "yellow". This stuff was
hand brushed all over the components, giving a very pleasing and accurate
appearance. After this "varnish" dried, I masked and sprayed
the white cross fields on the top of the top wing.
fuselage bottom along the longeron line (apparently correct for the D
V). The elevator and wing undersurfaces also got shot with this stuff,
with the bottom of the bottom wing having the fabric colored areas masked
where the crosses would go. All sources consulted were uncertain about
whether the flying surface undersides were clear doped fabric or painted
in the turquoise light blue. I went with blue - just because it looks
good! When all this was thoroughly dry, I "varnished" it using
tinted Future floor wax. I filled a film canister (handy things!) roughly
2/3 with Future and added a couple of drops of brown craft acrylic and
a drop of yellow. The acrylic colors were very generically labeled, being
in fact called "brown" and "yellow". This stuff was
hand brushed all over the components, giving a very pleasing and accurate
appearance. After this "varnish" dried, I masked and sprayed
the white cross fields on the top of the top wing.
Meanwhile, I needed some struts, an engine, some wheels, a cowl and
a gun. As stated 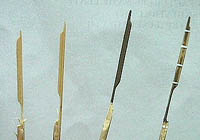 before, I dislike cast metal struts. This project did nothing to change
my mind. The kit-supplied pieces are pretty rough and need lots of careful
clean up. Indeed I was defeated. By the time they were even remotely smoothed,
they had become so bent and irredeemably misshapen, that I resorted to
my favorite material for parts such as these- bamboo. Strong, easy to
shape, glue-and-paint loving bamboo! Hacked out of the ends of skewers,
the shaped struts were coated with Zap-A-Gap, sanded, and the ties uniting
the steel tubes and wood fairings of the real objects were painted on
using white glue mixed with a little white paint - the white merely providing
an indicator of where I'd been. Moving to the engine, I must say the kit
piece is a jewel. It has the best cooling fins I've seen. Just be sure
to put the etched
before, I dislike cast metal struts. This project did nothing to change
my mind. The kit-supplied pieces are pretty rough and need lots of careful
clean up. Indeed I was defeated. By the time they were even remotely smoothed,
they had become so bent and irredeemably misshapen, that I resorted to
my favorite material for parts such as these- bamboo. Strong, easy to
shape, glue-and-paint loving bamboo! Hacked out of the ends of skewers,
the shaped struts were coated with Zap-A-Gap, sanded, and the ties uniting
the steel tubes and wood fairings of the real objects were painted on
using white glue mixed with a little white paint - the white merely providing
an indicator of where I'd been. Moving to the engine, I must say the kit
piece is a jewel. It has the best cooling fins I've seen. Just be sure
to put the etched 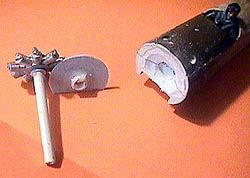 rod assembly on the FRONT of the engine, disregarding the instructions
on this matter. A dark black-brown wash, followed by the Future "varnish"
mix and you'll be looking at a perfect miniature of a real Oberursel rotary.
It's too bad that it will be almost completely obscured by the cowl and
spinner. After the great engine, I was disappointed when I looked at the
wheels. From the side, they appear fine, but head-on they're not just
thin, they're cardboard thin. Scaled up, they wouldn't support a bicycle.
It's really a shame because they have good diameter and detail. Digging
into the scrap box, I found a couple of wheels from who knows what old
kit.
rod assembly on the FRONT of the engine, disregarding the instructions
on this matter. A dark black-brown wash, followed by the Future "varnish"
mix and you'll be looking at a perfect miniature of a real Oberursel rotary.
It's too bad that it will be almost completely obscured by the cowl and
spinner. After the great engine, I was disappointed when I looked at the
wheels. From the side, they appear fine, but head-on they're not just
thin, they're cardboard thin. Scaled up, they wouldn't support a bicycle.
It's really a shame because they have good diameter and detail. Digging
into the scrap box, I found a couple of wheels from who knows what old
kit.
The gun. Hmmmm. Copper State makes great photo-etch gun jackets so it was a surprise to find the kit only contained a one piece solid casting. Harumph! Out came an Eduard Spandau set. After dealing with the gun, the cowl was next. Like all such cast parts, it's heavy and at first glance appears somewhat crude. Before anything else, I shot it with primer and was pleasantly surprised with the surface finish, as there were very few pits or other anomalies. I now cheerfully grabbed the Dremel and thinned out the rear edge, and cleaned up the front opening. I added the retaining wire from some fine stuff I got out of an old clothes drier coil, Zapped it on, gave it another primer shot and was truly pleased.
Assembly 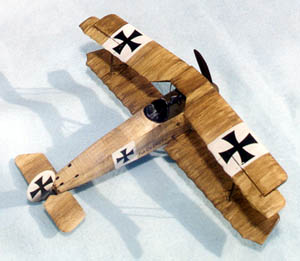 went quickly - the bottom wing fit perfectly into a wide slot in fuselage
(particularly fine work here, Copper State!). The gun was mounted and
feed and ejection chutes added. Strut holes were emphasized with a bit
in a pin vise and rigging holes drilled with a home made bit chucked into
a battery powered Dremel. The homemade bit is nothing more than a piece
of .007" guitar string jammed into the end of a piece of bamboo and
Zapped in place. Cheap and disposable, it will drill true provided a starter
dimple is pricked. I like structural rigging, and because I've heard horror
tales about resin wings sagging over the years, this was the way I went.
The holes are drilled all the way through. Starting with the photo-etch
cabane struts, I mounted the top wing and made sure everything was lined
up. I wish I had made my own bamboo cabanes - the etched units are just
too weak and wobbly. Oh well. Using a little more than ordinary care,
I cut the bamboo interplane struts to length, wedged them between the
wings, got a couple of them secured with Zap and rested for a bit. After
caffeinating myself, I took some so-called "invisible thread"
nylon monofilament and started running it through all the holes. All lines
were first secured at the top positions using drug- store brand name Krazy
Glue. This stuff holds tighter and stronger for rigging. When the top
glue joints had set, I went about pulling strands through the bottom holes,
tweaking here, pulling tighter there, gluing as I went along, getting
the alignment right, using the model's rigging to true and trim. When
all had set firm, I trimmed the sprouts with a new #11 blade, gave the
spots a little sanding and then touched up the cross fields on the wings.
The fuselage white field was also masked and sprayed at this time.
went quickly - the bottom wing fit perfectly into a wide slot in fuselage
(particularly fine work here, Copper State!). The gun was mounted and
feed and ejection chutes added. Strut holes were emphasized with a bit
in a pin vise and rigging holes drilled with a home made bit chucked into
a battery powered Dremel. The homemade bit is nothing more than a piece
of .007" guitar string jammed into the end of a piece of bamboo and
Zapped in place. Cheap and disposable, it will drill true provided a starter
dimple is pricked. I like structural rigging, and because I've heard horror
tales about resin wings sagging over the years, this was the way I went.
The holes are drilled all the way through. Starting with the photo-etch
cabane struts, I mounted the top wing and made sure everything was lined
up. I wish I had made my own bamboo cabanes - the etched units are just
too weak and wobbly. Oh well. Using a little more than ordinary care,
I cut the bamboo interplane struts to length, wedged them between the
wings, got a couple of them secured with Zap and rested for a bit. After
caffeinating myself, I took some so-called "invisible thread"
nylon monofilament and started running it through all the holes. All lines
were first secured at the top positions using drug- store brand name Krazy
Glue. This stuff holds tighter and stronger for rigging. When the top
glue joints had set, I went about pulling strands through the bottom holes,
tweaking here, pulling tighter there, gluing as I went along, getting
the alignment right, using the model's rigging to true and trim. When
all had set firm, I trimmed the sprouts with a new #11 blade, gave the
spots a little sanding and then touched up the cross fields on the wings.
The fuselage white field was also masked and sprayed at this time. 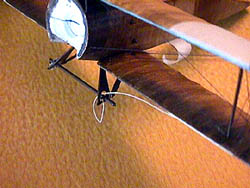
After the previous day's work had dried overnight, the landing
gear received its due. I DID use the kit cast struts as they were sturdy
enough to withstand the cleanup. I cut an axle from wire-cored plastic
rod and using all three hands somehow managed to get all three pieces
lined up and stuck on. The D V had a rather unusual bungee arrangement
and I duplicated this using a small piece of plastic rod for a spool,
glued above the axle on the outside of the struts. To make the bungee
chord itself, I used cotton thread that had been treated with white glue.
There are four separate bungee coils, so for each one, I Zapped one end
of the thread to the spool and started wrapping till it looked right and
then cut and tucked. Next came all of the model's little bits and doo-dads:
steps, rear fuselage handholds, a windshield from cigarette package cellophane
and elevator horns. The D V's tail skid mount was an inverted pyramid
of tubing and the kit's etched parts 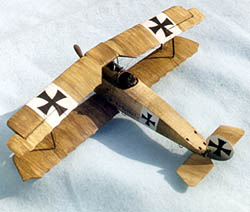 were just too flat so I used stretched sprue. Also, the kit's part list
shows a tail skid among the cast items, but there was none to be found.
Here again, the miracle of bamboo saved the day. The elevators were now
glued on, directly across the knife-edge of the rear fuselage. The rudder
received its control horns, the post was trimmed to length and this unit
attached. Control wires were made from stretched sprue and stuck on. Now
the beast was starting to look like a little Fokker!
were just too flat so I used stretched sprue. Also, the kit's part list
shows a tail skid among the cast items, but there was none to be found.
Here again, the miracle of bamboo saved the day. The elevators were now
glued on, directly across the knife-edge of the rear fuselage. The rudder
received its control horns, the post was trimmed to length and this unit
attached. Control wires were made from stretched sprue and stuck on. Now
the beast was starting to look like a little Fokker!
It still needed its engine. Copper State has thoughtfully molded a little
peg on the back of the crankcase and over this I glued an extension of
plastic tubing to form the basis of a rotating mount. A firewall was cut
and a piece of tube the inner diameter of which would receive the engine
extension was lined up and glued into a carefully cut hole. The rear of
the little motor was now offered up to the firewall, it's tiny plastic
extension fitting into the firewall hole-and-tube. A retaining cap was
glued on and I had a rotary engine that would spin on the firewall! Let
me say here that
I usually don't go for movable parts on models- it's just more things
to break and fall off. But I make a big exception in the case of props-
and especially when attached to spinning WW I rotary motors. I've noticed
that with most kids and some adults, the first they do when they see a
propeller is flick it with their fingers. If the prop can't move freely-
SNAP! There's a murder to be committed and a repair to be made. In that
order. If there's a chance your model will be shown in public or your
friends and relatives are congenital "prop spinners", you must
make the thing move! Yes, where were we? Ah, the engine mount. To allow
the firewall-engine unit to be glued to the nose of the fuselage, I grabbed
the Dremel and hollowed out the nose interior immediately behind where
the firewall would fit. After attaching the unit to the nose and popping
on the cowl takes, the prop was next. The kit includes two kinds - a 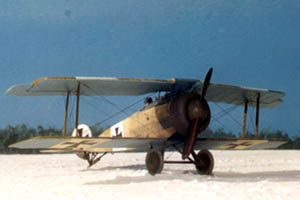 Garuda and a Germania. They both look good, but I chose to use a scrapbox
plastic prop modified to look like a Garuda. The kit spinner just didn't
look right to my eye, appearing too pointy and narrow. Back to the scrap
box. The spinner I chose ended up being too flat and fat, which covered
even more of the great engine. Rats!
Garuda and a Germania. They both look good, but I chose to use a scrapbox
plastic prop modified to look like a Garuda. The kit spinner just didn't
look right to my eye, appearing too pointy and narrow. Back to the scrap
box. The spinner I chose ended up being too flat and fat, which covered
even more of the great engine. Rats!
On to the decals. Printed by Microscale, they're GREAT. They're well
printed, thin, non-curling and they're pretty much perfect. Copper State
also did a very nice thing by including two sheets. They mention in the
instructions that they goofed and the sheet only included one serial number,
when two are required. Bless 'em - they just threw in another entire sheet!
If there is one gripe about the markings, it's that the serial number
- 2672/16- is for a machine that had plywood aileron gap fairings. This
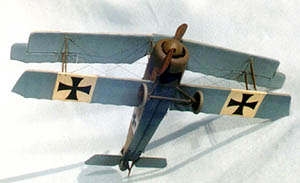 mod could be done, and it does show up on most pictures of the bird, but
it's almost a shame to do too much fiddling with the great wings. For
my markings, I just reversed the last two digits and this still gives
me a machine in the right serial range.
mod could be done, and it does show up on most pictures of the bird, but
it's almost a shame to do too much fiddling with the great wings. For
my markings, I just reversed the last two digits and this still gives
me a machine in the right serial range.
In the home stretch now, I gently Futured the entire airplane and let this dry for a few days. I added the wheels and made and attached aileron control horns on the top of the top wing. Engine inspection side panels were painted on. I then dry-brushed and sprayed some rotary engine gunk around and underneath as these rotary powered planes could get incredibly filthy. An attempt was made to bring out the soft stringer detail by adding some airbrushed shadows in a few spots. A coat of half-shook Testors flat was sprayed overall for a semi-matte finish and all that was left to do was hit a few spots with a small brush and Future - the pilot's goggles, his leather jacket and the cockpit coaming.
 The kit has its problems, but overall I enjoyed making it. If I decided
to put on my "evil killer contest hat" and construct a world
beating Fokker D V model, would I get this kit? YES! The basics plus a
lot more are contained in this small box. Aside from my personal problems
regarding some metal parts, the only real disappointment is the soft fuselage
detail, and this could be dealt with. Please just don't ask me how right
now - I'm tired!
The kit has its problems, but overall I enjoyed making it. If I decided
to put on my "evil killer contest hat" and construct a world
beating Fokker D V model, would I get this kit? YES! The basics plus a
lot more are contained in this small box. Aside from my personal problems
regarding some metal parts, the only real disappointment is the soft fuselage
detail, and this could be dealt with. Please just don't ask me how right
now - I'm tired!
Bibliography
Windsock Mini Datafile 11 by PeterGrosz, 1997 Albatros Productions Ltd.
Windsock International Vol 4 , No4 Winter 1988
Cross and Cockade Journal Vol 5, No3 Autumn 1964