
This article originally appeared in the November 1999 issue of Internet Modeler.
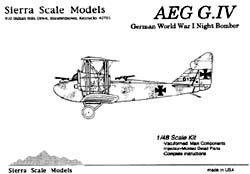
 Sierra Scale 1/48 Scale AEG G.IV German Bomber

By Candice Uhlir
Introduction
I have a thing about big German WWI bombers, they look so cool. Unfortunately there aren't many offerings on the subject available. I've built the old Aurora Gotha and plan to someday do the Aurora DH-10A (ok kit collectors - so shoot me!). Ever since the Gotha project I've been on the lookout for kits of these big flying beasts. I had recently come across a series of offerings by Sierra Scale Models and noticed the AEG G.IV German Bomber in my beloved 1/48 scale. But then I noticed something - it was a vacuform kit!! I haven't been in this hobby very long and I've heard a lot of things about vacs that kind of frightened me off. I'm sure many of you have heard the same, cutting out those pieces from a sheet of plastic is difficult, the models are structurally weak, and there's not a lot of detailed parts supplied. After hearing all that I just said "Why Bother?". There are a lot of great injection molded kits just begging to be built.
Anyway I couldn't get the AEG IV out of my mind!. It is such a cool looking airplane! So naturally I asked some of my fellow modelers for advice. Two comments I received pushed me over the edge to try a vac - "Vacs are just like injection molded kits once you get the parts cut out!" and "Once you do a vac you're a bona fide model fanatic". So here I am to tell you that vacs are actually pretty cool. I survived the experience on a pretty large model, learned a lot in the process, and had a lot of fun doing it.
Historical Background
 The AEG series
of twin engine bombers are largely the forgotten member of the German
bomber triad consisting of the AEG, Gotha and the Friedrichshafen. The
Gotha was the long range workhorse, however they were very tail heavy
and tiring to fly, especially after the bomb load was dropped and the
center of gravity shifted. Friedrichshafens were considered mid range
bombers and the AEG was the short range cousin. However the AEG G.III/IV
is considered by some to be the best airplane of the three. The AEG had
a greater payload capacity than the Friedrichshafen (1235 kg vs. 952 kg).
While Gotha crews struggled to keep their heavy aircraft aloft, the AEG
was renowned as an easy machine to fly. As testimony to its good flying
qualities the crews of Kampfgeschwader 4 are known to have flown up to
seven combat missions a night on the Italian front. When the war ended
in November 1918 the allies were surprised that only 320 AEG G. IV aircraft
existed. By flying five or more missions a night the allies were led the
believe that the German bomber force was much larger than it actually
was.
The AEG series
of twin engine bombers are largely the forgotten member of the German
bomber triad consisting of the AEG, Gotha and the Friedrichshafen. The
Gotha was the long range workhorse, however they were very tail heavy
and tiring to fly, especially after the bomb load was dropped and the
center of gravity shifted. Friedrichshafens were considered mid range
bombers and the AEG was the short range cousin. However the AEG G.III/IV
is considered by some to be the best airplane of the three. The AEG had
a greater payload capacity than the Friedrichshafen (1235 kg vs. 952 kg).
While Gotha crews struggled to keep their heavy aircraft aloft, the AEG
was renowned as an easy machine to fly. As testimony to its good flying
qualities the crews of Kampfgeschwader 4 are known to have flown up to
seven combat missions a night on the Italian front. When the war ended
in November 1918 the allies were surprised that only 320 AEG G. IV aircraft
existed. By flying five or more missions a night the allies were led the
believe that the German bomber force was much larger than it actually
was.
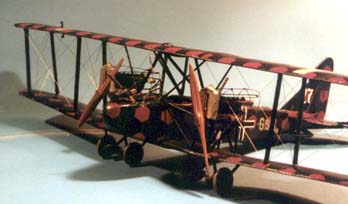
The AEG G.IV also had a quality that endeared it to the men who flew it - it was an extremely rugged aircraft. Unlike the other German bombers the AEG featured an all metal welded tube frame. Photos of AEG crashes usually show the wings crumpled while the crew compartments stayed intact allowing the men to walk away from the crash.
Kit Overview
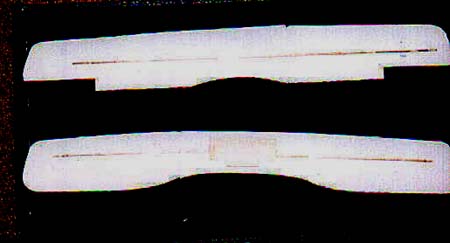
 The kit comes as a series of vacuform sheets containing the basic aircraft
parts. Besides the wings and fuselage, the wheels, struts, engine fairings
and internal cockpit details are all vacuform. Two parabellum machine
guns are provided in white metal and appear to be Aeroclub parts. The
engine radiators, undercarriage axle, and propellers are resin. No decals
are provided. One sheet of instructions is included that show nice drawings
of the finished aircraft as well as rudimentary step by step instructions
for assembly. I also picked up the Windsock Datafile No.51 on the AEG
IV. Given the very basic detail available in a vac kit the Datafile proved
indispensable in crafting the detailed look I wanted.
The kit comes as a series of vacuform sheets containing the basic aircraft
parts. Besides the wings and fuselage, the wheels, struts, engine fairings
and internal cockpit details are all vacuform. Two parabellum machine
guns are provided in white metal and appear to be Aeroclub parts. The
engine radiators, undercarriage axle, and propellers are resin. No decals
are provided. One sheet of instructions is included that show nice drawings
of the finished aircraft as well as rudimentary step by step instructions
for assembly. I also picked up the Windsock Datafile No.51 on the AEG
IV. Given the very basic detail available in a vac kit the Datafile proved
indispensable in crafting the detailed look I wanted.
Ok, I now have sheets of plastic and a bunch of parts that are supposed to assemble into this nice bomber model - now what am I supposed to do!!
Building a Vac
The friend who told me that a vacuform kit was just like an injection molded kit once you have the parts cut out actually was telling the truth - well sort of. But before I got to test that statement I had to cut out these pretty big parts from these big plastic sheets. The other thing that struck me was that these parts would probably be pretty flimsy once I removed them from their carrier sheet. If this was going to be a big model the last I needed was droopy parts! So I did what any budding vac builder would do . . I asked for help and searched the Internet for vacuform building tips. Drop me a line at my email address and I'll send out the URLs for the sites I found.
Cutting out the Parts
 There are a lot of methods to cutting out vac parts so I had to choose
one. First I outlined each part with a black felt tip pen on the plastic
carrier sheet Get the outline as close to the part as possible because
this line is your guideline when sanding the part free of the plastic
carrier sheet. Then I cut the part from the carrier as close to my outline
as I could without damaging the part or eradicating the outline. Now the
fun starts - it's time to start sanding. My friend suggested that I take
two pieces of 150 grit sandpaper, glue them to a board, and start sanding
until all my black outline disappeared. That seemed like a lot of sanding
but what had I to lose. One tip here - I used rubber gloves when I did
this sanding. I found out that this improves your grip on the part when
moving it over the rough sandpaper. I actually used the gloves at first
to protect my manicure !! However, once I started sanding
There are a lot of methods to cutting out vac parts so I had to choose
one. First I outlined each part with a black felt tip pen on the plastic
carrier sheet Get the outline as close to the part as possible because
this line is your guideline when sanding the part free of the plastic
carrier sheet. Then I cut the part from the carrier as close to my outline
as I could without damaging the part or eradicating the outline. Now the
fun starts - it's time to start sanding. My friend suggested that I take
two pieces of 150 grit sandpaper, glue them to a board, and start sanding
until all my black outline disappeared. That seemed like a lot of sanding
but what had I to lose. One tip here - I used rubber gloves when I did
this sanding. I found out that this improves your grip on the part when
moving it over the rough sandpaper. I actually used the gloves at first
to protect my manicure !! However, once I started sanding 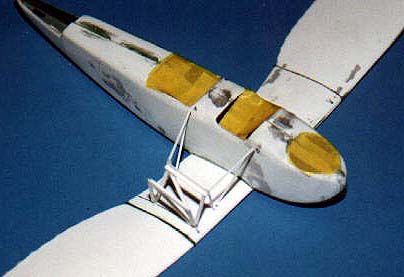 it didn't take very long to get the parts cut out very precisely. Perhaps
I spent about 15 minutes on each wing and less on the smaller parts. I
needed to do some further sanding on the leading and trailing edges of
the wings to get the airfoil shape right, however this represented only
about 15 minutes of additional careful sanding. I had all the parts cut
out, other than those I mentioned I had discarded, in about three hours.
it didn't take very long to get the parts cut out very precisely. Perhaps
I spent about 15 minutes on each wing and less on the smaller parts. I
needed to do some further sanding on the leading and trailing edges of
the wings to get the airfoil shape right, however this represented only
about 15 minutes of additional careful sanding. I had all the parts cut
out, other than those I mentioned I had discarded, in about three hours.
My perception that the cut out vac parts would be flimsy was dead on. This kit had to be built with some kind of structural integrity which meant I had some scratchbuilding to do. I decided that I would treat the large vac parts such as the wings and fuselage as just 'skins' while I built a stronger skeleton to beef the structure. With this in mind I immediately discarded the vacuform struts, internal details, and wheels. I'd make my struts from bamboo or basswood. I also ordered the Aeroclub white metal German wheel set and Toms Modelworks German interior PE detail sets. I also ordered two Aeroclub 6-cylinder Mercedes engines. The basic kit comes with two engine fairings to represent the powerplants as delivered by the AEG factory. However, once in the field it was found that engine cooling was improved by removing these fairings, so I decided to build my kit with the engines exposed as they would have been in a combat unit back in 1918.
'Basic' Detailing
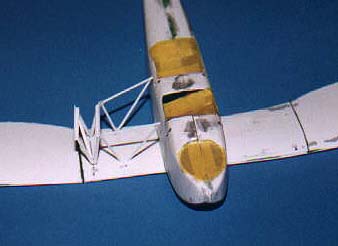
 The AEG bomber had wing and fuselage bomb bay areas as well as a rear
trap door in the floor of the aircraft that allowed a gunner to fire at
targets beneath and behind the aircraft. The trap door and fuselage bomb
bays are nowhere to be found on the vac fuselage and the underwing bomb
bays are molded into the plastic. I cut my own trap door and fuselage
bomb bay openings using the datafile drawings for guidance and just cut
open the wing bomb bays as they were molded.
The AEG bomber had wing and fuselage bomb bay areas as well as a rear
trap door in the floor of the aircraft that allowed a gunner to fire at
targets beneath and behind the aircraft. The trap door and fuselage bomb
bays are nowhere to be found on the vac fuselage and the underwing bomb
bays are molded into the plastic. I cut my own trap door and fuselage
bomb bay openings using the datafile drawings for guidance and just cut
open the wing bomb bays as they were molded.
A note of caution about the trap door opening - don't throw it away after cutting!! You're going to need it to build the trap door later and this becomes important if you choose to decal the aircraft with 'Handpainted' hex lozenge as I did.
'Beefing Up' the Structure
Two areas had to be strengthened, the wings and the fuselage. The wings
need to be rigid alone their length given the model wing span is almost
15 inches. The upper wing also has no dihedral while the lower wing has
 a pronounced dihedral with the center section of the lower wing having
none. Each wing assembly consists of four parts, two upper and two lower
portions. The portion where they connect does not correspond to the location
where the dihedral on the lower wing was to be installed. I wanted to
install the dihedral without cutting the wing plastic and getting it marred.
a pronounced dihedral with the center section of the lower wing having
none. Each wing assembly consists of four parts, two upper and two lower
portions. The portion where they connect does not correspond to the location
where the dihedral on the lower wing was to be installed. I wanted to
install the dihedral without cutting the wing plastic and getting it marred.
What I did was pretty simple after browsing though the hobby shop to get some ideas. I took some 2mm diameter brass rod and cut it to the length of the entire wingspan. I installed the dihedral directly to the rod at the appropriate points. Then I just used CA to attach the rod to the inside surface of the vac wing.. Instant perfect dihedral and rigidity. The upper wing was easier - no dihedral, so no bending brass rod. Just make sure the rod is true and you get instant zero dihedral.
To beef up the insertion points for the wing struts I installed .015" plastic card inside the wings at the strut insertion points. This stiffened the wing in this area and provided some good plastic for strut bonding later on.
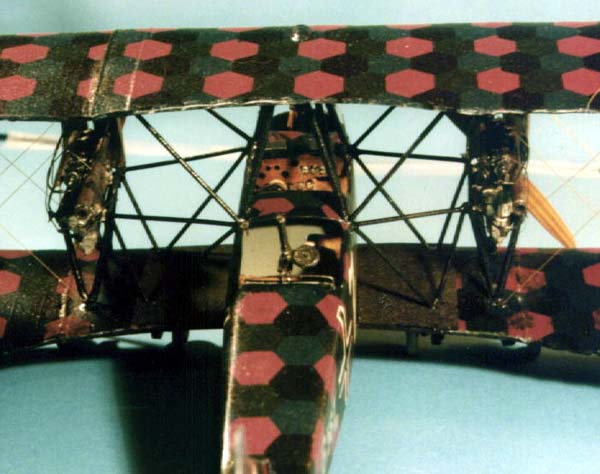
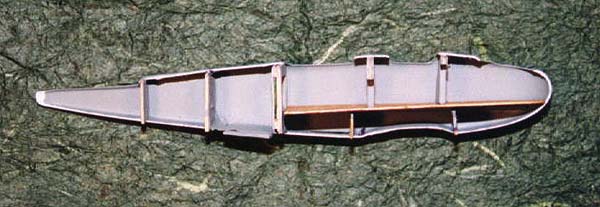 The fuselage was a little more difficult to strengthen because the supporting
structures I was to build would also provide cockpit detail. I also knew
the fuselage had to be strong because the weight I put into the wings
with the brass rod, coupled with my planned use of white metal engines
and wheels would probably warp the fuselage during final assembly. Here's
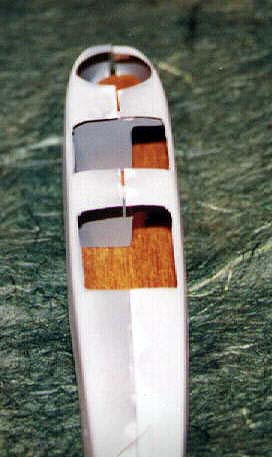
where the Datafile became essential. The AEG cockpit is a three person
affair, with a 'crawl' passage on the starboard side of the aircraft.
There are bulkheads that separate the forward gunner compartment, pilot
compartment, and rear gunner compartment. These bulkheads are visible
and structural. Fortunately Sierra Scale did an excellent job in scaling
The fuselage was a little more difficult to strengthen because the supporting
structures I was to build would also provide cockpit detail. I also knew
the fuselage had to be strong because the weight I put into the wings
with the brass rod, coupled with my planned use of white metal engines
and wheels would probably warp the fuselage during final assembly. Here's
where the Datafile became essential. The AEG cockpit is a three person
affair, with a 'crawl' passage on the starboard side of the aircraft.
There are bulkheads that separate the forward gunner compartment, pilot
compartment, and rear gunner compartment. These bulkheads are visible
and structural. Fortunately Sierra Scale did an excellent job in scaling
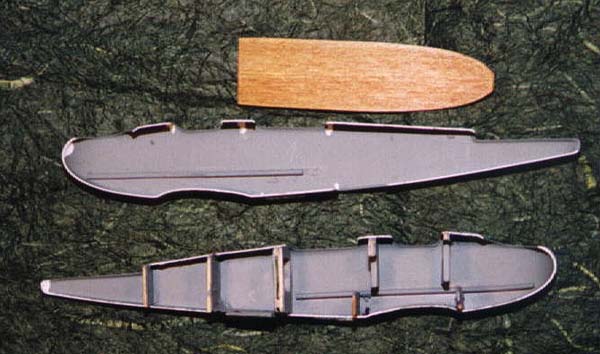 the fuselage. The datafile had fuselage cross section drawings for each
of these bulkheads as well as for further aft into the fuselage and these
matched the Sierra Scale fuselage perfectly. I traced these cross sections
onto 1/16" basswood sheet and sanded them to fit. This was working
out well because I also wanted a wooden floor in the aircraft. I made
this out of basswood sheet and stained it with brown shoe polish. Since
I wanted the visible bulkheads to look good I had to sand the basswood
surfaces smooth, however I found that basswood is pretty fragile stuff
and didnąt think that thinning it by sanding the surfaces smooth was a
good idea. I got the smooth bulkhead surface I needed by laminating .015"
plastic sheeting over the basswood bulkheads and cutting and sanding to
fit the basswood template. The resulting bulkheads were now very tight,
very strong, and could be glued into place with just Tenax.
the fuselage. The datafile had fuselage cross section drawings for each
of these bulkheads as well as for further aft into the fuselage and these
matched the Sierra Scale fuselage perfectly. I traced these cross sections
onto 1/16" basswood sheet and sanded them to fit. This was working
out well because I also wanted a wooden floor in the aircraft. I made
this out of basswood sheet and stained it with brown shoe polish. Since
I wanted the visible bulkheads to look good I had to sand the basswood
surfaces smooth, however I found that basswood is pretty fragile stuff
and didnąt think that thinning it by sanding the surfaces smooth was a
good idea. I got the smooth bulkhead surface I needed by laminating .015"
plastic sheeting over the basswood bulkheads and cutting and sanding to
fit the basswood template. The resulting bulkheads were now very tight,
very strong, and could be glued into place with just Tenax.
Now its just like an Injection Molded Kit!
 From this point on it really is just this simple. I scratchbuilt a cockpit
using the usual techniques. I used the vacuform struts and undercarriage
parts as templates to make my own bamboo or plastic rod parts. Wing struts
are made from bamboo skewer; cabanes from basswood; and engine and undercarriage
supporting structures from .040 or .080 plastic rod. And remember that
trap door? I backed the plastic 'door' I had cut out with 1/16" basswood
and connected it to the inside of the fuselage using a piece of old cotton
rag and CA. The 'door' could now open and close to just about a perfect
fit with the basswood overhanging just enough inside the fuselage to provide
a stop. The capability to open and close the trap door becomes important
when we decal the fuselage. Before decaling I attached the lower wing,
horizontal, and vertical stabilizer to the fuselage. I filled any gaps
with Squadron Green putty because it is easier to sand given the relatively
soft vacuform plastic I was working with.
From this point on it really is just this simple. I scratchbuilt a cockpit
using the usual techniques. I used the vacuform struts and undercarriage
parts as templates to make my own bamboo or plastic rod parts. Wing struts
are made from bamboo skewer; cabanes from basswood; and engine and undercarriage
supporting structures from .040 or .080 plastic rod. And remember that
trap door? I backed the plastic 'door' I had cut out with 1/16" basswood
and connected it to the inside of the fuselage using a piece of old cotton
rag and CA. The 'door' could now open and close to just about a perfect
fit with the basswood overhanging just enough inside the fuselage to provide
a stop. The capability to open and close the trap door becomes important
when we decal the fuselage. Before decaling I attached the lower wing,
horizontal, and vertical stabilizer to the fuselage. I filled any gaps
with Squadron Green putty because it is easier to sand given the relatively
soft vacuform plastic I was working with.
Decaling
 What makes an AEG aircraft so distinctive is the hand painted hexagon
camouflage with a distinctive dark 'bluish' cast. I painted all surfaces
with Testors Midnight Blue so any decal gaps or tears will be hidden.
Then I gave the structure a good coat of Future.
What makes an AEG aircraft so distinctive is the hand painted hexagon
camouflage with a distinctive dark 'bluish' cast. I painted all surfaces
with Testors Midnight Blue so any decal gaps or tears will be hidden.
Then I gave the structure a good coat of Future.
Americal/Gryphon makes an excellent set of AEG hex decal as well as markings for a myriad of AEG bombers in both 1/72 and 1/48 scale. Since the hex decal is to represent hand painted camouflage it is important that the pattern be lined up so that there are little if any distinct breaks in the pattern. That's why I attached the horizontal and vertical stabilizers to the fuselage. I also lightly glued the control surfaces into position on the stabilizers and wings so I could decal those entire assemblies at one time. Later I just broke off the control surfaces to prepare them for permanent installation later. I cut paper templates for each area to be covered in hex decal and tried to ensure that my patterns were pretty intact over the necessary seam areas.
Now that trap door. Since I hinged it and provided a tight fit I now simply closed it and decaled the hex pattern over the entire underside of the fuselage. With a little cutting through the dried decal we can now open the trap door and the hex pattern looks exactly like it was painted intact.
Wings are done in the same hex pattern for both upper and lower surfaces. The outer portions of each wing are done in mirror images of the hex pattern to each other. The center span is done separately and actual photos of AEG IVs often show some off-shape hex patterns in this area, appropriate for a careful decal seam.
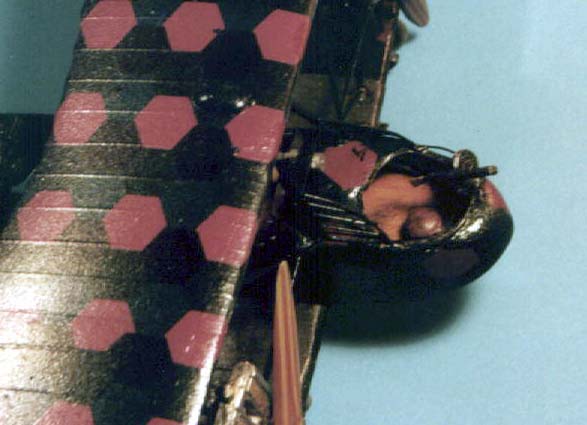
'Detailed' Detailing
Vacs don't come with a lot of detail parts! I had to make a lot of these myself. These included the instrument panel (basswood and Toms ModelWorks Bezels), gun mounts (plastic rod and .009 stiff wire), tail skid and control horns (.015" plastic sheet), gunner seats (wood with 'cushions' made of Krystal Klear), protective screening (.020" plastic rod), walkways (brass screening), engine mountings (.040" plastic rod and channel), and engine fairing bracing (.009" wire). This was a lot of work, but I also learned a lot while doing it.
I think the only vac detail part I did use was the fuselage fuel tank. Since this is pretty well hidden it served as a platform to mount the pilot's seat. Sierra supplies a vac seat, but I used an old German PE seat from my scraps box.
Final Assembly
At this point we have an everyday model to assemble. Just use your usual plastic injection molded construction techniques. No problem at all.
 Rigging this model is pretty straightforward. I use .006" stiff wire
for all my rigging and just attached it with white glue. I donąt need
the rigging for any structural strength since we took care of that during
the initial assembly. I used Americal/Gryphon decals to represent a 1918
era AEG.IV bomber of Bosta 27. The only modification I made to the reported
paint scheme is that I kept the AEG hex pattern intact over the entire
fuselage. This aircraft was photographed after it had crashed showing
a dark blue painted forward fuselage. However I like the way the hex pattern
looks. I rationalized that, since the previous series of aircraft were
completely hex covered that I just 'happened' to catch this one before
the 'crew' painted their forward fuselage blue. Who's going to prove me
wrong anyway??
Rigging this model is pretty straightforward. I use .006" stiff wire
for all my rigging and just attached it with white glue. I donąt need
the rigging for any structural strength since we took care of that during
the initial assembly. I used Americal/Gryphon decals to represent a 1918
era AEG.IV bomber of Bosta 27. The only modification I made to the reported
paint scheme is that I kept the AEG hex pattern intact over the entire
fuselage. This aircraft was photographed after it had crashed showing
a dark blue painted forward fuselage. However I like the way the hex pattern
looks. I rationalized that, since the previous series of aircraft were
completely hex covered that I just 'happened' to catch this one before
the 'crew' painted their forward fuselage blue. Who's going to prove me
wrong anyway??
This kit also allowed me to use 'Dry transfers' for the first time. The AEG has fabric lacing running along the aft center underside of the fuselage and it is not represented on the vac. Even if it were on the vac I would of sanded it away during my sealing of any seams. Archer Dry Transfers makes a great series of dry transfer surface decals for various models, one being WWI aircraft stitching in 1/72 , 1/48, and 1/28 scale. These just 'rubbed on' to my fuselage - instant perfect aircraft stitching.
The stock kit comes with two Parabellum machine guns. I installed a third to mount to fire through the bottom trap door as well. I did this because my husband saw the trap door and couldn't figure out what this big hole in the airplane was for. Putting a machine gun there clarifies its purpose pretty well.
Final Thoughts
This was a really fun project. It was easier than I had 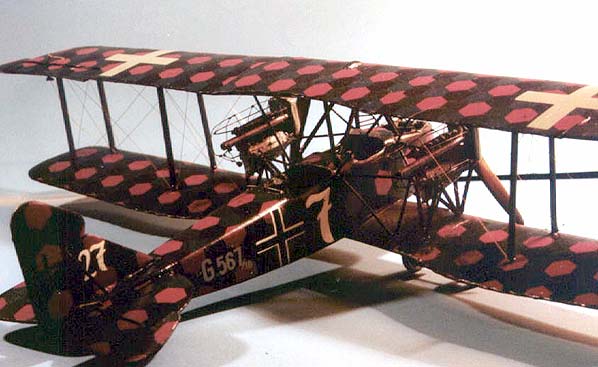 thought it would be to build a vac, however I did more scratchbuild detail
work on this project than any other I have done. Perhaps it was because
I chose to tackle a particularly difficult subject that was pretty big
to boot. But now that I did one I have to admit I like them. I have a
model that not many people have seen. A good friend of mine told me that
the sign of having built a good vac is that people think it is really
an injection molded kit. So far I have fooled about three people so I
guess it came out pretty well. However a lot of credit goes to Sierra
Scale, they turn out a fine product. The bottom line - . . I would encourage
anyone who has a few WWI aircraft under their belts to try a vac. I don't
think you'll be sorry you did.
thought it would be to build a vac, however I did more scratchbuild detail
work on this project than any other I have done. Perhaps it was because
I chose to tackle a particularly difficult subject that was pretty big
to boot. But now that I did one I have to admit I like them. I have a
model that not many people have seen. A good friend of mine told me that
the sign of having built a good vac is that people think it is really
an injection molded kit. So far I have fooled about three people so I
guess it came out pretty well. However a lot of credit goes to Sierra
Scale, they turn out a fine product. The bottom line - . . I would encourage
anyone who has a few WWI aircraft under their belts to try a vac. I don't
think you'll be sorry you did.