
This article originally appeared in the October 1999 issue of Internet Modeler.
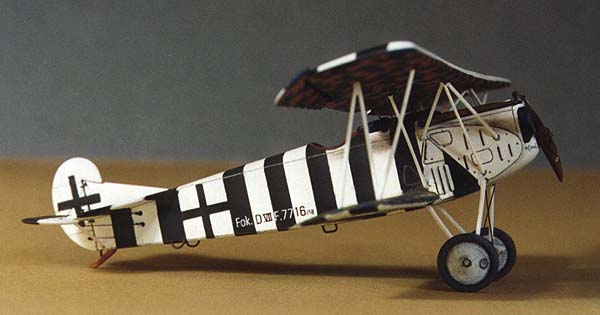
 FOKKER D.VII (Late Fokker-built) CONVERSION using the 1/72 Roseparts
conversion kit
FOKKER D.VII (Late Fokker-built) CONVERSION using the 1/72 Roseparts
conversion kit

by Steve Hustad
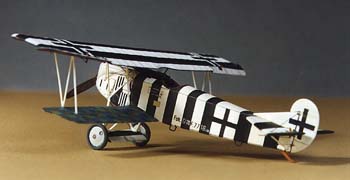
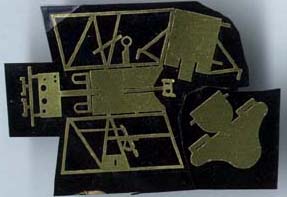
This resin conversion set was provided courtesy of Rosemont Hobbies and represents (one version of) the late Fokker built type cowling. Also included in this set is a resin seat, exhaust stack, two LMG 08/15 "Spandau" machine guns and an axial type propeller. All parts are finely cast in a high quality opaque tan colored resin.
This set is one of four Fokker D.VII cowling conversion sets all released at the same time by Roseparts.
The Fokker D.VII is famous (or notorious!) among us modelers as having numerous different cowling sides/louver arrangements and Roseparts has reproduced four of the more commonly encountered versions for our modeling pleasure!
 This 'late
Fokker built' version (the subject of my review) appears to be based upon
the drawings contained in the Windsock Datafile No.9 - Fokker D.VII, or
the Squadron/Signal book: Fokker D.VII in Action (as they both contain
essentially the same selection of cowling drawings). But also note that
Albatros Publication's newer "Fokker D.VII Anthology part 1" (an excellent
reference!) instead, contains a drawing for yet another style of late
Fokker built cowlings.
This 'late
Fokker built' version (the subject of my review) appears to be based upon
the drawings contained in the Windsock Datafile No.9 - Fokker D.VII, or
the Squadron/Signal book: Fokker D.VII in Action (as they both contain
essentially the same selection of cowling drawings). But also note that
Albatros Publication's newer "Fokker D.VII Anthology part 1" (an excellent
reference!) instead, contains a drawing for yet another style of late
Fokker built cowlings.
These sets are meant to give the modeler a quick, simple and (reasonably) accurate way to replicate the more common cowling varieties without the intensive kit surgery and labor otherwise necessary to do so. And in this regard, these sets succeed admirably!
The engine and radiator is cast integrally with the cowling making for a solid single piece to be married to the Revell kit's fuselage. (The front radiator appears to be directly from the Revell kit and is common to all four cowling conversion sets - it is not quite right for each variety though - but is acceptable for the late Fokker built type).
 This new nose piece terminates somewhat aft of the rear of the cowling
position, necessitating more of the Revell kit's fuselage to be removed
than just the cowling itself.
This new nose piece terminates somewhat aft of the rear of the cowling
position, necessitating more of the Revell kit's fuselage to be removed
than just the cowling itself.
The louver arrangement is faithful to the Datafile's drawings and is very crisply cast - though with an odd light graininess texture overall. (To avoid giving the wrong impression though I want to mention that this 'graininess' is quite subtle and is not a problem under a coat of paint). Note that this conversion piece does not correct the Revell kit's 'short nose engine syndrome', nor is it meant to - though this is not obvious, nor evident in the finished model.
The resin seat included is wrong for the D.VII - being too short in the back and the sides are of the wrong shape. However, It is nicely cast and will be useful for other WW I aircraft projects, so relegate this to the spares box.
The propeller is very nice with a delicately cast in prop boss. This whole piece can be used 'as is' for a very nice representation of the 'axial' version. (Note that some of the other sets include optional style propellers - a nice feature).
The LMG 08/15 "Spandau" machine guns are also about as nice as can be done in resin and are also sharply cast - complete with the gun jacket's cooling holes, etc. being very evident and accurate appearing. Very nice. I did only use the MG butts though, opting for Tom's Modelwork's photo etched cooling jackets instead as I like the looks of this better, but this is a personal choice.
 The exhaust stack is correct for this version and is also very nicely
cast, though it would have been nice to have had it's exhaust exiting
hole hollowed out a little bit.
The exhaust stack is correct for this version and is also very nicely
cast, though it would have been nice to have had it's exhaust exiting
hole hollowed out a little bit.
Overall, Roseparts is to be commended with their new resin casting process (obviously using a high pressure system?) as the detail is very fine and no flaws were evident. It's equal to the best out there and is a vast improvement on their old resin castings of not so many years ago. Bravo!
On to the actual construction now:
The instructions indicate that a cut is necessary 7/8" from the front of the Revell fuselage (measured w/o the radiator piece in place). This cut then falls approximately at the front edge of the upper fuselage cut out for the machine guns. The resin cowling piece is to be initially cemented in place utilizing a liquid cement (yes I know this is a resin nose!), which melts the plastic around the resin. Then use super glue on the inside of the fuselage to fix it permanently into place. This process worked surprisingly well and is not difficult. Very little sanding results. I'm impressed! We move on...
 I did encounter
one drawback - and it was a drawback only because I'd also opted to use
the Roseparts photoetched (also available, but not included with this
resin conversion set) interior for this model. The problem comes about
because of the length of the resin cowling and its being a solid casting.
This casting encroaches considerably into the cockpit area. Now, I didn't
want to cut the PE interior sidewall structure and floorboard (which I
would have had to do all the way up to the foot pedals !), so the only
other option was to reduce the resin cowling somehow. I didn't want to
cut the cowling and risk losing the detail, cutting the engine, or botching
the whole job either - so what's a boy to do? What I ended up doing was
getting out the 'ol "Dremel Mini-Mite" motor tool and with a couple of
different sized grinding bits I carefully ground out the resin cowling's
insides up to the point where the PE cockpit extended. I was apprehensive
about tackling this, but it worked surprisingly well and was really quick
and easy. So I was able to keep both the full cockpit PE and the resin
cowling intact.
I did encounter
one drawback - and it was a drawback only because I'd also opted to use
the Roseparts photoetched (also available, but not included with this
resin conversion set) interior for this model. The problem comes about
because of the length of the resin cowling and its being a solid casting.
This casting encroaches considerably into the cockpit area. Now, I didn't
want to cut the PE interior sidewall structure and floorboard (which I
would have had to do all the way up to the foot pedals !), so the only
other option was to reduce the resin cowling somehow. I didn't want to
cut the cowling and risk losing the detail, cutting the engine, or botching
the whole job either - so what's a boy to do? What I ended up doing was
getting out the 'ol "Dremel Mini-Mite" motor tool and with a couple of
different sized grinding bits I carefully ground out the resin cowling's
insides up to the point where the PE cockpit extended. I was apprehensive
about tackling this, but it worked surprisingly well and was really quick
and easy. So I was able to keep both the full cockpit PE and the resin
cowling intact.
I strongly recommend this procedure if you want a full cockpit to be visible - regardless of what kind of cockpit you decide to put in! - otherwise (seriously!) you'll have a cockpit of about 2/3 rd 's to 3/4 th 's the size it should be!
The Roseparts 'fold-up' cockpit PE is an older item so I won't go into detail about it here, but it still works well when the flat PE sections are rounded a bit with diluted layers of white glue, parts added and 'flushed out' with added detail/dimension, etc. I used the accurate seat from this same PE set instead of the resin one provided in the conversion set (mentioned above), as this PE seat is accurate. I did substitute the PE seat bottom for a plastic card one and added a seat cushion made from epoxy putty.
 The new resin cowling contains the same cabane strut receiving hole arrangements
as the Revell kit's original. No doubt these are meant to be used with
the Revell kit's huge out of scale struts - which would explain why these
holes are so large (same size as on the original Revell kit's cowling)
- but I for one would have preferred that these holes were reproduced
at about half the size that they are - after all, if you're concerned
enough with accuracy to buy this nice resin conversion kit, then I'd bet
you're also inclined to replace the kit's struts with something more in
scale!
The new resin cowling contains the same cabane strut receiving hole arrangements
as the Revell kit's original. No doubt these are meant to be used with
the Revell kit's huge out of scale struts - which would explain why these
holes are so large (same size as on the original Revell kit's cowling)
- but I for one would have preferred that these holes were reproduced
at about half the size that they are - after all, if you're concerned
enough with accuracy to buy this nice resin conversion kit, then I'd bet
you're also inclined to replace the kit's struts with something more in
scale!
Anyway, connection to the top wing was without problems (using new scratchbuilt 'in scale' struts of course!) - but I did have to fill in the gaps (not too bad!) resulting from those big strut receiving holes with some undiluted white glue, carefully painted over with a brush. After dullcoating it's not noticeable.
The only other problem with this step was the exhaust stack. It's position atop the cowling interferes with the placement of the Starboard forward 'group of three' of cabane struts - the one that's at the rear of this cluster of three. I sort of 'jury rigged' the strut, receiving hole and exhaust to get a decent impression. I think this cabane strut/exhaust stack conflict is due to the Revell cowling (and consequently the Roseparts replacement piece) being a tad too short. Easily correctable if you expect it - somewhat difficult if you don't.
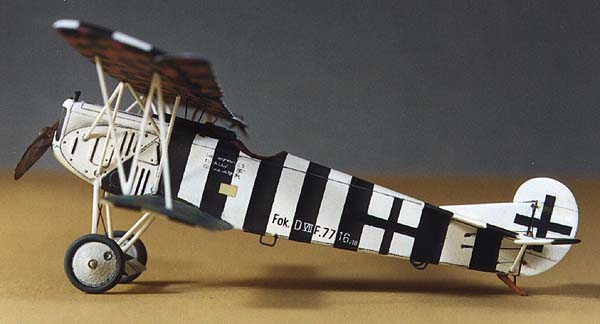
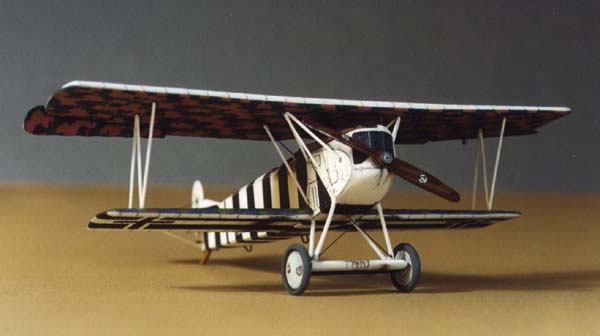
The balance of the model was corrected, detailed, painted, and decaled as per my usual process (which I won't bore you with here) and is not a part of this review.
Overall, I can recommend this set and believe it represents good value
for your money.
- Steve Hustad (The Mad Norseman!)