
This article originally appeared in the October 1999 issue of Internet Modeler.
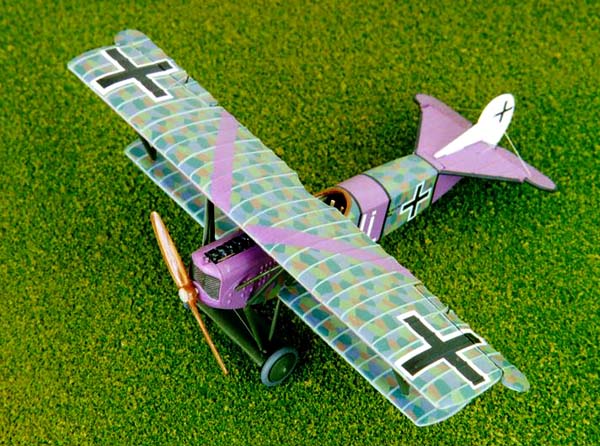
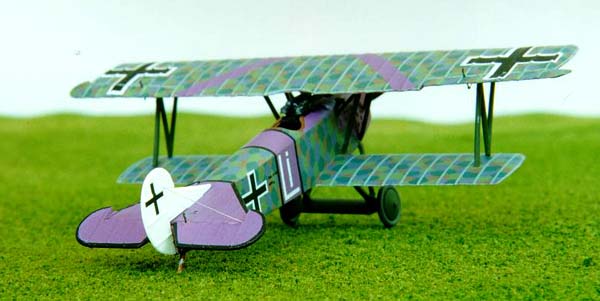
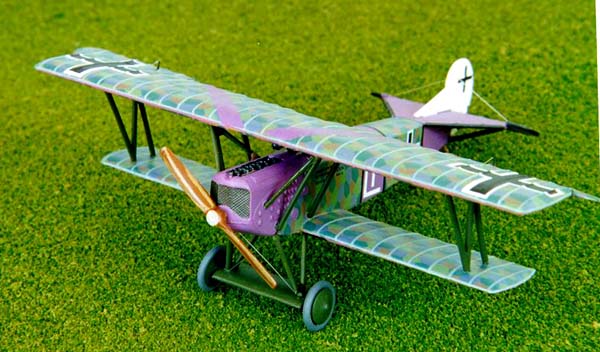
 FOKKER D.VII
(OAW) CONVERSION using the 1/72 Roseparts
conversion kit
FOKKER D.VII
(OAW) CONVERSION using the 1/72 Roseparts
conversion kit
By Michael Kendix
Introduction
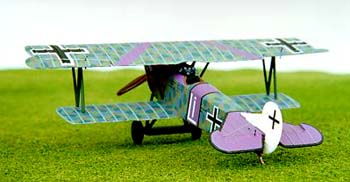
Roseplane produces a resin casting of the O.A.W version for the Fokker D.VII's cowl and nose. This high quality product gave me an ideal opportunity to enter the world of "conversions". This conversion piece is finely molded with crisp detail, and the 1/72nd scale Revell Fokker D.VII kit is well known for its simplicity and relative accuracy. These were used in combination with a VLE Models/RoseParts photoetched interior.
Sanding and filling
My first task was to sand down the bumps and fill the various holes in the Revell kit. While this is an excellent kit for the price (around $6), it contains a number of molding discs imprinted into the surface, and flash marks, that need to be either removed by sanding, or filled in; I used Squadron White putty. This completed, I began the cockpit interior.
Cockpit interior
The V.L.E. Models/Roseparts cockpit interior folds into a frame that sits in the fuselage. The seat was painted leather, the frame was painted U.S. neutral grey and the instruments on the frame were painted scale black. The instrument panel was painted brown and a clear plastic backing was added on which was painted white to show through the dials. A few dabs of scale black were added to the dials for realism. The foot rudder was painted aluminum, the joy stick was painted black, and the joy stick handle was painted leather. It took some effort to squeeze the cockpit into the fuselage. The Revell kit's fuselage was cut off just in front of the little plastic gun mounts, and the gun mounts were removed in order to accommodate the photoetch instrument panel. I added some seat belts from a Tom's Modelworks German Cockpit Interior - shoulder harnesses and lap belt. I then painted the interior of the cockpit "Dirty White".
The Conversion
 After cutting off the front end of the Revell kit's fuselage, I attached
the conversion nose to the fuselage using Testors' tube glue and then
after 30 minutes I squirted a bit of CA glue down the join as best I could.
In general, attaching the conversion was most straightforward, once I
accepted the world wouldn't end just because I chopped a perfectly good
fuselage in two. The Rosemont conversion really did fit remarkably well
into the kit's fuselage. It was, however, difficult to get the front of
the photoetch cockpit interior to jam into the cockpit area, and the photoetch
had to be trimmed in order to fit the nose conversion onto the fuselage.
The lower wing was then attached, and it needed a little bit of Squadron
Green putty on the bottom and the wing joins. The resin gun mount provided
with the conversion was not wide enough - possibly I made the gap at the
top of the fuselage too wide, and I scratched a new one from plastic card
and strip, which was relatively easy.
After cutting off the front end of the Revell kit's fuselage, I attached
the conversion nose to the fuselage using Testors' tube glue and then
after 30 minutes I squirted a bit of CA glue down the join as best I could.
In general, attaching the conversion was most straightforward, once I
accepted the world wouldn't end just because I chopped a perfectly good
fuselage in two. The Rosemont conversion really did fit remarkably well
into the kit's fuselage. It was, however, difficult to get the front of
the photoetch cockpit interior to jam into the cockpit area, and the photoetch
had to be trimmed in order to fit the nose conversion onto the fuselage.
The lower wing was then attached, and it needed a little bit of Squadron
Green putty on the bottom and the wing joins. The resin gun mount provided
with the conversion was not wide enough - possibly I made the gap at the
top of the fuselage too wide, and I scratched a new one from plastic card
and strip, which was relatively easy.
I sprayed the entire fuselage/lower wing assembly with German Mauve, which served to reveal that I had not puttied the underside of the fuselage's seam properly. Thus, I had to sand, putty, using Squadron White this time, and repaint.
Decals and painting - part I - the fuselage
 The
next task was to decal and paint the fuselage and wings; quite a proposition,
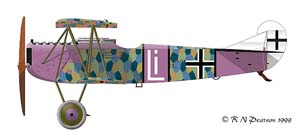
given my mildly adventurous choice of colour scheme; Ltn. Rudolph Stark's
"Li". I decided to use decal paper, airbrushed with appropriate colours,
rather than attempt complex masking schemes. First, I coated the entire
fuselage with Future to help the decals adhere. Next, I sprayed some clear
decal paper with black paint. I cut thin strips and applied these onto
the fuselage to give the black bands that border the mauve painted sections
between the cockpit and tail, and the straight edges of the horizontal
tail parts. I also had to mask off and paint the curved part of the tail
elevator to paint the part of the black band that goes around
The
next task was to decal and paint the fuselage and wings; quite a proposition,
given my mildly adventurous choice of colour scheme; Ltn. Rudolph Stark's
"Li". I decided to use decal paper, airbrushed with appropriate colours,
rather than attempt complex masking schemes. First, I coated the entire
fuselage with Future to help the decals adhere. Next, I sprayed some clear
decal paper with black paint. I cut thin strips and applied these onto
the fuselage to give the black bands that border the mauve painted sections
between the cockpit and tail, and the straight edges of the horizontal
tail parts. I also had to mask off and paint the curved part of the tail
elevator to paint the part of the black band that goes around 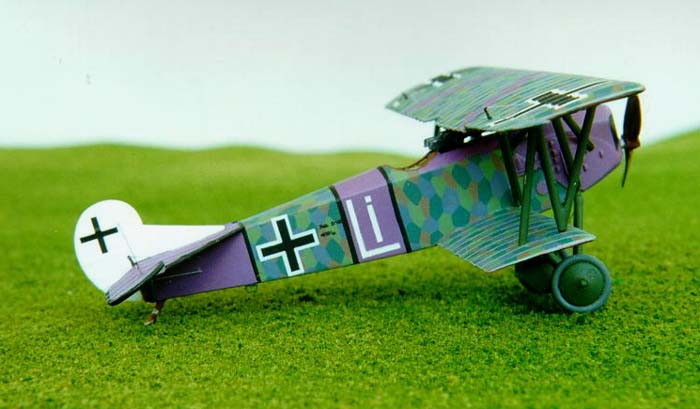 there. Attempts to cut curved narrow decal strips to lay on this area
were not successful but masking with Parafilm did the trick. I then began
the process of decaling the four-colour lozenge, beginning with the upper
surfaces' colour lozenge, which is applied to the fuselage's upper surface
and sides, and upper surfaces of the wings. In retrospect, I should have
done the black bands after the lozenge decals, because cutting the decals
to the exact size to fit inside the bands is difficult, and I had to redo
the bands in a number of cases. The lozenge decals adhered well to the
fuselage. I used Americal/Gryphon four-colour lozenge; upper lozenge for
the upper fuselage and fuselage sides, and lower lozenge for the underneath.
The lozenge decals were applied using a combination of Microscale Decal
Softener, Microscale Decal Set, and Solvaset. Some decals disintegrate
with Solvaset but Americal's lozenge decals do not. They wrinkled but
that's supposed to happen. After letting it sit for a few minutes, I smoothed
out these wrinkles carefully with a brush dipped in decal softener.
there. Attempts to cut curved narrow decal strips to lay on this area
were not successful but masking with Parafilm did the trick. I then began
the process of decaling the four-colour lozenge, beginning with the upper
surfaces' colour lozenge, which is applied to the fuselage's upper surface
and sides, and upper surfaces of the wings. In retrospect, I should have
done the black bands after the lozenge decals, because cutting the decals
to the exact size to fit inside the bands is difficult, and I had to redo
the bands in a number of cases. The lozenge decals adhered well to the
fuselage. I used Americal/Gryphon four-colour lozenge; upper lozenge for
the upper fuselage and fuselage sides, and lower lozenge for the underneath.
The lozenge decals were applied using a combination of Microscale Decal
Softener, Microscale Decal Set, and Solvaset. Some decals disintegrate
with Solvaset but Americal's lozenge decals do not. They wrinkled but
that's supposed to happen. After letting it sit for a few minutes, I smoothed
out these wrinkles carefully with a brush dipped in decal softener.
Decals and painting - part II - the wings
 First, I cut
off the ailerons by scribing carefully along the join until the part could
be easily snapped off. Next, I coated the surfaces with Future and allowed
that to dry. The wing lozenge are somewhat tricky, it is best to coat
the surface with water, so that you can move these rather large decals
into place easily. The lozenge were applied chord wise (except on the
ailerons where they were applied span wise), so I cut strips that were
long enough to cover the chord of the wing with just a little left over,
which can be trimmed. Ideally, you do not want to have to trim at both
the leading and trailing edge of the wing, therefore, I placed the decal
so that it just covered the leading edge, up to where the join with the
lower surface was located. Then, I only had to trim the decal that hangs
over the trailing edge. Where possible, I tried to get the decal chords'
to join at a rib. This looks neater and the join is covered with a rib
tape. Once the upper lozenge was completed, I did the same for the lower
facing lozenge; the technique is the same. Again, I used Microscale decal
softener and Microscale setting solution on the decals. I then used Solvaset
to really force these decals to lay down.
First, I cut
off the ailerons by scribing carefully along the join until the part could
be easily snapped off. Next, I coated the surfaces with Future and allowed
that to dry. The wing lozenge are somewhat tricky, it is best to coat
the surface with water, so that you can move these rather large decals
into place easily. The lozenge were applied chord wise (except on the
ailerons where they were applied span wise), so I cut strips that were
long enough to cover the chord of the wing with just a little left over,
which can be trimmed. Ideally, you do not want to have to trim at both
the leading and trailing edge of the wing, therefore, I placed the decal
so that it just covered the leading edge, up to where the join with the
lower surface was located. Then, I only had to trim the decal that hangs
over the trailing edge. Where possible, I tried to get the decal chords'
to join at a rib. This looks neater and the join is covered with a rib
tape. Once the upper lozenge was completed, I did the same for the lower
facing lozenge; the technique is the same. Again, I used Microscale decal
softener and Microscale setting solution on the decals. I then used Solvaset
to really force these decals to lay down.
 The next task was to adhere the rib tapes; there are approximately 92,
not including the tapes on the leading and trailing edges, or the extra
bits you have to cut for the ailerons' ribs. I looked at the rib tapes
that come with some after market lozenge decals and they appeared too
wide; each tape should be approximately .66mm wide. I decided to make
my own. I sprayed light blue paint onto some clear decal paper. I then
did the same for the lower rib tapes' material by mixing some "Pink" using
red, white and a bit of German Mauve. Red and white alone make a sort
of salmon pink, which is too orange; the mauve brings it back into the
"serious" shocking pink colour. My method was to cut one tape that was
approximately the correct width, then "eyeball" the rest, knowing what
a proper width should look like. In order for the decal paper not to curl
when I cut these thin strips, I used the entire flat part of a
The next task was to adhere the rib tapes; there are approximately 92,
not including the tapes on the leading and trailing edges, or the extra
bits you have to cut for the ailerons' ribs. I looked at the rib tapes
that come with some after market lozenge decals and they appeared too
wide; each tape should be approximately .66mm wide. I decided to make
my own. I sprayed light blue paint onto some clear decal paper. I then
did the same for the lower rib tapes' material by mixing some "Pink" using
red, white and a bit of German Mauve. Red and white alone make a sort
of salmon pink, which is too orange; the mauve brings it back into the
"serious" shocking pink colour. My method was to cut one tape that was
approximately the correct width, then "eyeball" the rest, knowing what
a proper width should look like. In order for the decal paper not to curl
when I cut these thin strips, I used the entire flat part of a 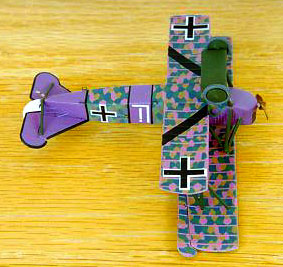 number 11 X-acto knife. I cut a few at a time, dipped a couple in water,
placed them on a paper towel and then waited about 20 seconds. They then
come off the backing paper easily and can be laid onto the ribs. This
takes a long time (it took me the best part of a week, working an average
of 2 to 3 hours per night) and you have to have patience, but it looks
good when you finish. In my darker moments, I tried to think of the admiring
looks I'd generate when I'd show it to my mates at the club, or their
looks of pity when they realized how I'm wasting my life and headed for
the nuthouse! The tapes are also applied to the leading and trailing edges,
however, for the scalloped shaped trailing edges, it was easier to paint
them since decal paper strips do not go around corners too well. One advantage
of making your own rib tapes is that the paint will match when you paint
trailing edges and do touch ups. The mauve and black chevrons on the upper
and lower facing wing surfaces, respectively, were made from clear decal
paper strips sprayed with the respective colours.
number 11 X-acto knife. I cut a few at a time, dipped a couple in water,
placed them on a paper towel and then waited about 20 seconds. They then
come off the backing paper easily and can be laid onto the ribs. This
takes a long time (it took me the best part of a week, working an average
of 2 to 3 hours per night) and you have to have patience, but it looks
good when you finish. In my darker moments, I tried to think of the admiring
looks I'd generate when I'd show it to my mates at the club, or their
looks of pity when they realized how I'm wasting my life and headed for
the nuthouse! The tapes are also applied to the leading and trailing edges,
however, for the scalloped shaped trailing edges, it was easier to paint
them since decal paper strips do not go around corners too well. One advantage
of making your own rib tapes is that the paint will match when you paint
trailing edges and do touch ups. The mauve and black chevrons on the upper
and lower facing wing surfaces, respectively, were made from clear decal
paper strips sprayed with the respective colours.
Detailing the small parts
 The next task was to detail the propeller, engine, radiator and the guns.
The propeller (one of the resin ones from Roseparts) was painted a combination
of "Leather" and "Wood" brown, and then covered with Future. I had the
choice of the kit's guns or a pair of resin guns supplied with the conversion.
I chose the kit's guns because they come in one piece, attached to a base
and as such I avoided any alignment problems. For me, this advantage outweighed
the slightly better detail on the resin guns. I used black paint mixed
with a little aluminum in a bottle cap to paint the guns and the main
part of the engine. This gave a slightly silvery look. Similarly, I mixed
black with a few drops of brass to paint the radiator; again, achieving
a black finish with a little sparkling appearance. The starboard exhaust
was painted a mixture of Leather Brown and Brass, as were the engine mounts.
The next task was to detail the propeller, engine, radiator and the guns.
The propeller (one of the resin ones from Roseparts) was painted a combination
of "Leather" and "Wood" brown, and then covered with Future. I had the
choice of the kit's guns or a pair of resin guns supplied with the conversion.
I chose the kit's guns because they come in one piece, attached to a base
and as such I avoided any alignment problems. For me, this advantage outweighed
the slightly better detail on the resin guns. I used black paint mixed
with a little aluminum in a bottle cap to paint the guns and the main
part of the engine. This gave a slightly silvery look. Similarly, I mixed
black with a few drops of brass to paint the radiator; again, achieving
a black finish with a little sparkling appearance. The starboard exhaust
was painted a mixture of Leather Brown and Brass, as were the engine mounts.
Mounting the upper wing, tail parts and landing gear
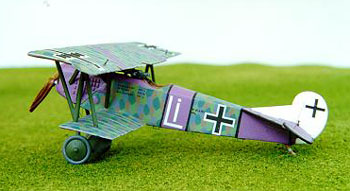
 Mounting the top wing was far easier for this model compared to other
biplanes, primarily because of the N-shaped interplane struts. The cabane
struts had to be trimmed a little. It is possible that I had not adhered
the top wing correctly or that the holes in the conversion are not exactly
correct, however, it was fairly straightforward to do the trimming and
attach these struts. All the cabane and interplane struts were painted
dark green.
Mounting the top wing was far easier for this model compared to other
biplanes, primarily because of the N-shaped interplane struts. The cabane
struts had to be trimmed a little. It is possible that I had not adhered
the top wing correctly or that the holes in the conversion are not exactly
correct, however, it was fairly straightforward to do the trimming and
attach these struts. All the cabane and interplane struts were painted
dark green.
The tail was next, however, before gluing it onto the fuselage, I painted the vertical tail piece white and drilled a couple of small diagonal-downward-direction holes through the horizontal tail planes. These holes are for the rigging, which runs from the horizontal tail stabilizers' control horns, through the forward part of the horizontal tail and into the side of the upper rear fuselage. The tail pieces fit easily.
The landing gear was straightforward to attach; it was painted Dark Green and the tires were painted dark grey. A number of photographs show the wheel hubs and landing gear spreader painted a combination of colours; probably green and mauve. I attempted this but it did not look right, so I re-painted with dark green.
Decals and painting - part III
 The remainder of the decals were then applied. I used the Revell kit's
crosses for the tail and wings, however, a couple of wing crosses caused
an opaque film to form on the lozenge decals underneath; I created a patch
of underside lozenge to cover up this mess. Although I could not blame
the Revell kit decals for certain, I used after market decals for the
fuselage crosses and the "weight" information next to the cockpit. I then
used my HP LaserJet IIIp to produce the "Fokker D VII (OAW) 4523/18" designation.
Thin strips of white decal paper were used to make the "Li" on the fuselage
sides. After all this had been completed and the decals covered with Solvaset
and Future, I noticed that my sources showed the crosses on the fuselage
should be flush up against the rear black border of the purple end of
the fuselage. I have left a gap, which though possibly incorrect, will
have to remain. Thus, since "Perfection is a flaw in itself" my effort
can be considered highly perfect, or highly flawed, depending upon your
view.
The remainder of the decals were then applied. I used the Revell kit's
crosses for the tail and wings, however, a couple of wing crosses caused
an opaque film to form on the lozenge decals underneath; I created a patch
of underside lozenge to cover up this mess. Although I could not blame
the Revell kit decals for certain, I used after market decals for the
fuselage crosses and the "weight" information next to the cockpit. I then
used my HP LaserJet IIIp to produce the "Fokker D VII (OAW) 4523/18" designation.
Thin strips of white decal paper were used to make the "Li" on the fuselage
sides. After all this had been completed and the decals covered with Solvaset
and Future, I noticed that my sources showed the crosses on the fuselage
should be flush up against the rear black border of the purple end of
the fuselage. I have left a gap, which though possibly incorrect, will
have to remain. Thus, since "Perfection is a flaw in itself" my effort
can be considered highly perfect, or highly flawed, depending upon your
view.
Final bits and pieces
 The rigging was done with .005 inch straight wire from SmallParts, and
the control horn's were from a Tom's Modelworks photoetch. The only awkward
part of this were the wires that go through the horizontal tail pieces,
discussed above. The entire model was then sprayed with a mixture of Aeromaster
Clear Flat and Clear Semi-Gloss (50 percent each), thinned with Windex.
The rigging was done with .005 inch straight wire from SmallParts, and
the control horn's were from a Tom's Modelworks photoetch. The only awkward
part of this were the wires that go through the horizontal tail pieces,
discussed above. The entire model was then sprayed with a mixture of Aeromaster
Clear Flat and Clear Semi-Gloss (50 percent each), thinned with Windex.
So, there it was, my first conversion attempt, and a fairly modest effort at that. For those who want a wide choice of Fokker D.VII colour schemes, that choice has now been widened four-fold (there are 3 other Rosemont conversions). Moreover, the quality of these conversion pieces is superior to that of the original kit, in terms of detail and clarity.
References
Brannon, Edgar D. "Fokker D.VII In Action; Aircraft Number 166." Color by Don Greer. Illustrated by Joe Sewell. Squadron/Signal Publications, 1996.
Acknowledgements
I would like to thank Rosemont Hobbies for the conversion kit and interior, Matt Bittner, Bob Pearson, Dennis Ugulano and Shane Weier for their help, advice and encouragement. Any errors, however, are my own responsibility.