
This article originally appeared in the October 1999 issue of Internet Modeler.
 Revell 1/72 nd Fokker D.VII with Roseparts Early Nose Conversion
By Matt Bittner
Photograhy By David Van Wagoner
HISTORY
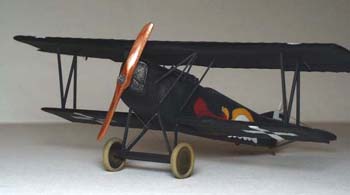
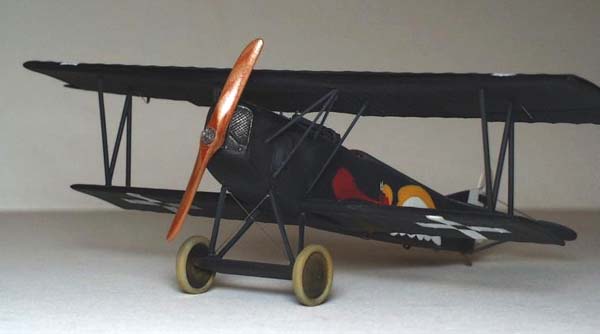
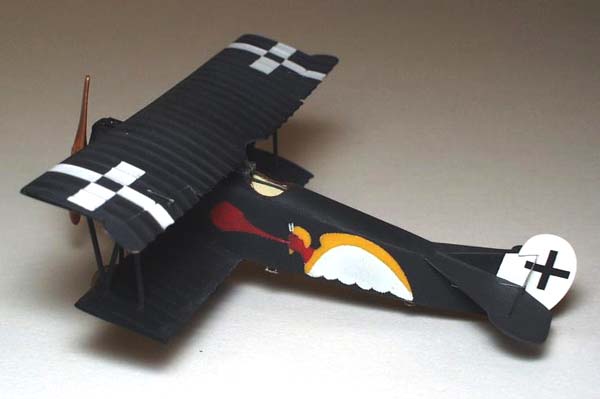
Since the history of the Fokker D.VII is vast - and the space here short - I would like to mention that there were approximately 300 D.VII's built which used the "early nose". These machines tended to have the wings covered with four-color lozenge, while the rest of the airframe was left the typical early Fokker streaky finish, with turquoise undersurfaces. Josef Jacobs is best known as the highest scoring Triplane ace (far surpassing Richthofen and Voss in number of kills while flying a Triplane) and his total count is approximately 48. Even though little is known about Jacobs' D.VII, it does appear in one photograph of the Jasta 7 lineup as found in the D.VII Anthology, Part 1.
CONVERSION NOSE

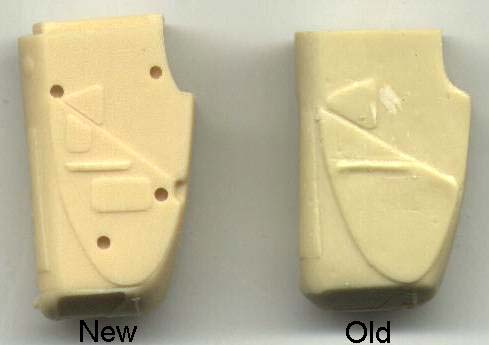 Rosemont is on what I call their "new generation" of resin casting. When
compared to the "old generation", the "new" is 300% better. Parts are
crisper, detail is excellent and there are no airholes present. As you
can see from the photographs, the "new generation" is much better than
the "old generation". Hats off to Rosemont for improving their process.
Also, you can see from the photo's of Gabriel's D.VII how the "old generation"
nose built-up compares to the
Rosemont is on what I call their "new generation" of resin casting. When
compared to the "old generation", the "new" is 300% better. Parts are
crisper, detail is excellent and there are no airholes present. As you
can see from the photographs, the "new generation" is much better than
the "old generation". Hats off to Rosemont for improving their process.
Also, you can see from the photo's of Gabriel's D.VII how the "old generation"
nose built-up compares to the 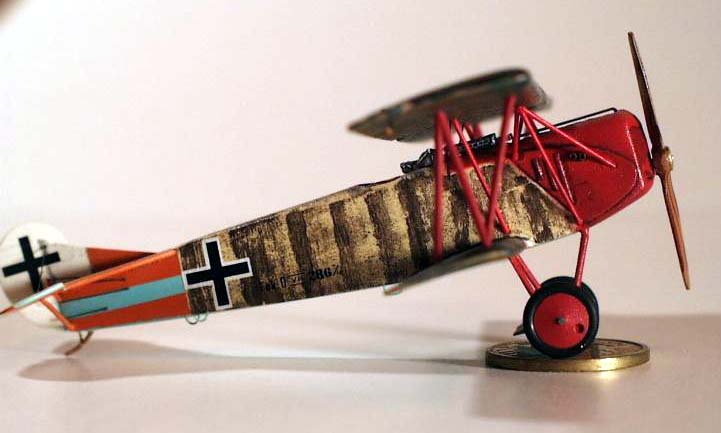 "new". The construction process is almost the same - the "new generation"
nose is actually longer - but the "new generation" is nicer in different
ways, the most important being the inclusion of center strut mounting
holes. (In my opinion,
"new". The construction process is almost the same - the "new generation"
nose is actually longer - but the "new generation" is nicer in different
ways, the most important being the inclusion of center strut mounting
holes. (In my opinion, 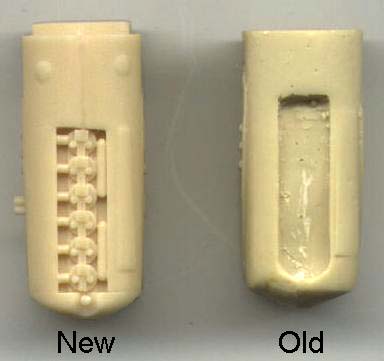 though, the kit supplied center struts are much too thick, resulting in
holes on the conversion nose that are much too big. However, to provide
the easiest form of conversion - utilizing the kit struts - Rosemont decided
to mold the holes to accept the Revell struts out of the box. Only of
few of "us" would be concerned over the size of the holes.)
though, the kit supplied center struts are much too thick, resulting in
holes on the conversion nose that are much too big. However, to provide
the easiest form of conversion - utilizing the kit struts - Rosemont decided
to mold the holes to accept the Revell struts out of the box. Only of
few of "us" would be concerned over the size of the holes.)
THE KIT
The Revell Fokker D.VII dates back to 1964. While it is still in the Revell catalog, it's obvious the mold is starting to show its age. In the later releases all of the fuselage detail is becoming softer, which means a "standard nose" D.VII will require some refinement. Since I replaced the nose with the Roseparts conversion, there was no reason for me to enhance the soft nose molding.
 The kit contains 27 injected molded pieces, and the current decal scheme
that comes with the kit is for Berthold's D.VII with a winged sword on
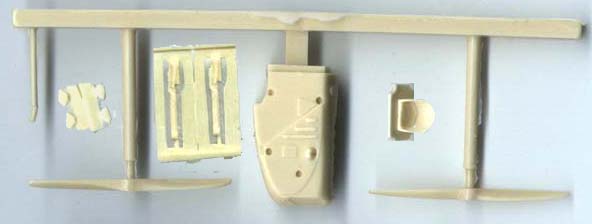
the side. The Roseparts Early Fokker resin conversion nose consists of
11 parts: one nose, two props, an exhaust extension, one replacement seat,
four cartridge chutes for the guns, and two replacement Spandaus.
The kit contains 27 injected molded pieces, and the current decal scheme
that comes with the kit is for Berthold's D.VII with a winged sword on
the side. The Roseparts Early Fokker resin conversion nose consists of
11 parts: one nose, two props, an exhaust extension, one replacement seat,
four cartridge chutes for the guns, and two replacement Spandaus.
I used the Roseparts/V.L.E. photoetch cockpit for the D.VII. As the
photoetch process doesn't allow round, 3-dimensional parts, some may think
the photoetch cockpit isn't very accurate. However, with judicious paint
application, you can give the impression 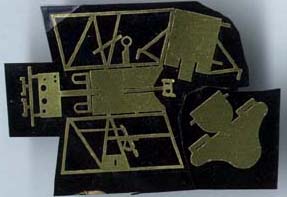 of the tubular structure found in the D.VII cockpit. The Roseparts cockpit
is a neat fold-up affair. The cockpit was painted RLM 02 and the cockpit
sides were painted Clear Doped Linen (CDL) since this was an earlier machine.
Once everything is painted then all you have to do is insert the cockpit
into one fuselage half and glue the other half on, trapping the folded
up cockpit. (There was some thinning of the cockpit sides required. I
ended up thinning the top portion of the fuselage, around the area where
the guns sit.) I decided to also dress up the cockpit a little. I photocopied
and scaled down the drawing of the compass in the Datafile Anthology Part
1, and added it to a piece of round sprue, which itself was attached to
a smaller piece of round sprue and glued into the photoetch compass frame.
To this I added a Fotocut photoetch "bezel" then filled it in with Kristal
Kleer. I deviated from the Roseparts/V.L.E. set since I used the resin
seat that came with the nose conversion instead of the photoetch one contained
with the photoetch set. The seat received seat belts from the Tom's
Modelworks German photoetch set. (In hindsight, the photoetch seat
is more accurate than the resin one. Ah well!) In addition, there were
some smaller details I added, such as the rudder pedals and control column
control wires, the "instrument" between the gun butts, etc.
of the tubular structure found in the D.VII cockpit. The Roseparts cockpit
is a neat fold-up affair. The cockpit was painted RLM 02 and the cockpit
sides were painted Clear Doped Linen (CDL) since this was an earlier machine.
Once everything is painted then all you have to do is insert the cockpit
into one fuselage half and glue the other half on, trapping the folded
up cockpit. (There was some thinning of the cockpit sides required. I
ended up thinning the top portion of the fuselage, around the area where
the guns sit.) I decided to also dress up the cockpit a little. I photocopied
and scaled down the drawing of the compass in the Datafile Anthology Part
1, and added it to a piece of round sprue, which itself was attached to
a smaller piece of round sprue and glued into the photoetch compass frame.
To this I added a Fotocut photoetch "bezel" then filled it in with Kristal
Kleer. I deviated from the Roseparts/V.L.E. set since I used the resin
seat that came with the nose conversion instead of the photoetch one contained
with the photoetch set. The seat received seat belts from the Tom's
Modelworks German photoetch set. (In hindsight, the photoetch seat
is more accurate than the resin one. Ah well!) In addition, there were
some smaller details I added, such as the rudder pedals and control column
control wires, the "instrument" between the gun butts, etc.
 Regular construction then commenced. The wings were sanded to (a) remove
the mold markings, (b) remove the bogus "fabric weave", and (c) reduce
the thickness of the ribs. The fuselage halves were also sanded to remove
the "fabric weave". Both the horizontal and vertical tail surfaces were
sanded down to achieve a thinner cross section. "Rib tapes" were then
re-added to the tail surfaces using watercolor pencils. All control surfaces
were cut off and repositioned.
Regular construction then commenced. The wings were sanded to (a) remove
the mold markings, (b) remove the bogus "fabric weave", and (c) reduce
the thickness of the ribs. The fuselage halves were also sanded to remove
the "fabric weave". Both the horizontal and vertical tail surfaces were
sanded down to achieve a thinner cross section. "Rib tapes" were then
re-added to the tail surfaces using watercolor pencils. All control surfaces
were cut off and repositioned.
After the fuselage halves were glued together, it was time to perform
the "major" surgery to fit the conversion nose. According to the Roseparts
instructions, you're to measure 7/8ths of an inch from the end of the
kit nose - before adding the kit radiator - and mark this with a marker,
then place tape around this area. Remove the nose leaving some original
plastic in front of the tape. Sand the nose down to just before the edge
of the tape, ensuring a straight, level and true fit. 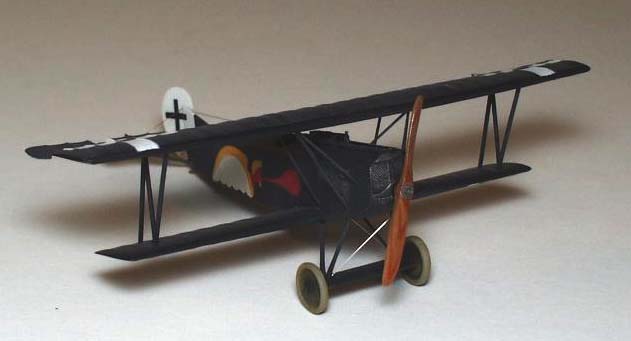 Dry-fit the lower wing to the fuselage notch, then glue the replacement
nose into place. The instructions recommend first using liquid cement,
thus melting the kit plastic into the resin nose, and then following that
up - after the nose is true and level - with liquid CA on the inside of
the joints. Unfortunately fitting the conversion nose means cutting away
some of the photoetch cockpit. Since I added the fuel tank to the cockpit,
I also had to sand most of this away so the conversion nose would fit.
(In hindsight, "Dremeling out" the resin nose in the area of the photoetch
cockpit may have been easier.)
Dry-fit the lower wing to the fuselage notch, then glue the replacement
nose into place. The instructions recommend first using liquid cement,
thus melting the kit plastic into the resin nose, and then following that
up - after the nose is true and level - with liquid CA on the inside of
the joints. Unfortunately fitting the conversion nose means cutting away
some of the photoetch cockpit. Since I added the fuel tank to the cockpit,
I also had to sand most of this away so the conversion nose would fit.
(In hindsight, "Dremeling out" the resin nose in the area of the photoetch
cockpit may have been easier.)
The interplane struts were made from Evergreen rod.  First I sanded down one of the kit struts to be more in scale then I photocopied
this strut. Using the photocopy I used Evergreen rod to construct new
struts. The center struts were also replaced with plastic rod, but they
were "built up" on the model, after the upper wing was on and attached
to the interplane struts. The axle fairing was sanded to remove the ribs
and fabric weave, and the landing gear struts were thinned. The underside
horizontal tail struts were also replaced with Evergreen rod.
First I sanded down one of the kit struts to be more in scale then I photocopied
this strut. Using the photocopy I used Evergreen rod to construct new
struts. The center struts were also replaced with plastic rod, but they
were "built up" on the model, after the upper wing was on and attached
to the interplane struts. The axle fairing was sanded to remove the ribs
and fabric weave, and the landing gear struts were thinned. The underside
horizontal tail struts were also replaced with Evergreen rod.
The guns are two part affairs. I used the butts of the guns that came with the conversion nose. To this I added Copper State Models photoetch cooling jackets. In my opinion nothing looks as good - even in 1/72nd scale - as photoetch Spandau gun jackets. The half-round gun "troughs" that are evident over the engine in front of the gun barrels are sanded down Evergreen rod.
Control horns are scratchbuilt out of Evergreen rod, and rigging is .005" surgical, stainless steel. The tailskid is scratchbuilt out of brass rod, while the area of the fuselage under the tailskid has been hollowed out, thinned and "blanked off" so as not to allow viewing through the entire fuselage. Wheels are 10mm Roseparts replacements.
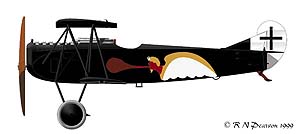 The "God of
the North Wind" decals were printed on an ALPS printer using Bob Pearson's
excellent profile. The rudder crosses are from Almark. The white crosses
on the wings are painted on by masking over white sprayed first on the
wings. "All" paints are Polly Scale while oils, watercolor pencils and
pastel chalk provide the weathering.
The "God of
the North Wind" decals were printed on an ALPS printer using Bob Pearson's
excellent profile. The rudder crosses are from Almark. The white crosses
on the wings are painted on by masking over white sprayed first on the
wings. "All" paints are Polly Scale while oils, watercolor pencils and
pastel chalk provide the weathering.
The white crosses on the wings are my "artistic license". While there appears to be one or two D.VII's in the overhead line up photograph in the Datafile Special, it seems that Jacobs' D.VII does not appear in this line up. I think it adds a bit to an otherwise all-black model.
CONCLUSIONS
 The Roseparts replacement, conversion noses provide a lot of Fokker D.VII
opportunities. There is no D.VII that one can not model. However, one
important consideration is to use a photograph of the machine you want
to model. D.VII's not only deviated in the nose from series of manufacturer,
but were also modified in the field.
The Roseparts replacement, conversion noses provide a lot of Fokker D.VII
opportunities. There is no D.VII that one can not model. However, one
important consideration is to use a photograph of the machine you want
to model. D.VII's not only deviated in the nose from series of manufacturer,
but were also modified in the field.
The conversion was a lot of fun. While there is some work involved - not only with the conversion, but also with updating the Revell kit - it was not that difficult and resulted in an enjoyable build.
Gee, now that I have his D.VII done, maybe I need to break out the Hawkeye Fokker Dr.I and build Jacobs' Triplanes
My thanks to Rosemont Hobbies for providing - well, almost everything. Without Barry Stettler and the whole Rosemont crew, WW1 modeling would not be as much fun.
REFERENCES
Fokker D.VII, Anthology 1, Albatros Productions
WW1 Aero, #154