
This article originally appeared in the October 2000 issue of Internet Modeler.
 Planet
Models 1/72 Resin SPAD XI
Planet
Models 1/72 Resin SPAD XI
by Dennis Ugulano
History
The first two-seater to be designed by Louis Bechereau, creator of the Spad fighters, was the Spad VIII, although this did not proceed beyond the design stage. Its subsequent development, however, led to the Spad XI, which appeared in September 1916. Externally it resembled the Spad VII single-seater, except that the two-bay wings had slight stagger and sweepback to balance the longer fuselage with its additional cockpit.
 The
Spad XIA.2 went into service in 1917, but its early production was affected
by teething troubles with the reduction gear of its 235 h.p. Hispano-Suiza
engine. It was armed with a single forward-firing synchronised Vickers
gun, offset to starboard, in front of the pilot, while one or two Lewis
guns could be installed on the ring mounting in the rear cockpit. A light
bomb load of about 70kg. (154 lb) could be carried under the lower wings.
Although sensitive on the controls, the Spad XI could have been a useful
aircraft under the right conditions; unfortunately it was easily affected
by uneven distribution of loads such as ammunition, cameras, photograpic
flares or bombs, and acquired a reputation for poor controllability. The
same factor also affected its climbing powers, for in anything but a shallow
climb the engine readily stalled. In 'clean' condition the Spad XI could
climb to 4,000m (13,123 ft) in 17 1/2 minutes. At least one machine was
fitted with a 220 h.p. direct-drive Renault engine, but the Hispano remained
standard. Despite its shortcomings, the Spad XI served with at least fifteen
escadrilles of the French Aviation Militaire and three Belgian
escadrilles during 1917 and early 1918; the Belgian Spads remained
in service until the armistice.
The
Spad XIA.2 went into service in 1917, but its early production was affected
by teething troubles with the reduction gear of its 235 h.p. Hispano-Suiza
engine. It was armed with a single forward-firing synchronised Vickers
gun, offset to starboard, in front of the pilot, while one or two Lewis
guns could be installed on the ring mounting in the rear cockpit. A light
bomb load of about 70kg. (154 lb) could be carried under the lower wings.
Although sensitive on the controls, the Spad XI could have been a useful
aircraft under the right conditions; unfortunately it was easily affected
by uneven distribution of loads such as ammunition, cameras, photograpic
flares or bombs, and acquired a reputation for poor controllability. The
same factor also affected its climbing powers, for in anything but a shallow
climb the engine readily stalled. In 'clean' condition the Spad XI could
climb to 4,000m (13,123 ft) in 17 1/2 minutes. At least one machine was
fitted with a 220 h.p. direct-drive Renault engine, but the Hispano remained
standard. Despite its shortcomings, the Spad XI served with at least fifteen
escadrilles of the French Aviation Militaire and three Belgian
escadrilles during 1917 and early 1918; the Belgian Spads remained
in service until the armistice.
 In
January 1918 a new version appeared. This was the Spad XVIA.2, powered
by a 235 h.p. direct-drive Lorraine-Dietrich 8 Fb. The Spad XVI was faster,
but had a poorer ceiling than the Spad XI and was no real improvement.
With its introduction into service, however, the French government then
sold thirty-five surplus Spad XI's to the A.E.F., two of whose squardons
flew the type during the summer of 1918. The A.E.F. also bought six Spad
XVI's, and another was supplied to Belgium in 1918. A later version of
the Spad XVI had twin guns fore and aft and a 250 h.p. Lorraine-Dietrich
8 Bb, but in March 1918 an explosion at the factory producing these aircraft
seriously affected production, and in July all two-seat Spads in French
service were withdrawn from the front.
In
January 1918 a new version appeared. This was the Spad XVIA.2, powered
by a 235 h.p. direct-drive Lorraine-Dietrich 8 Fb. The Spad XVI was faster,
but had a poorer ceiling than the Spad XI and was no real improvement.
With its introduction into service, however, the French government then
sold thirty-five surplus Spad XI's to the A.E.F., two of whose squardons
flew the type during the summer of 1918. The A.E.F. also bought six Spad
XVI's, and another was supplied to Belgium in 1918. A later version of
the Spad XVI had twin guns fore and aft and a 250 h.p. Lorraine-Dietrich
8 Bb, but in March 1918 an explosion at the factory producing these aircraft
seriously affected production, and in July all two-seat Spads in French
service were withdrawn from the front.
Construction
 Before
starting this kit, I highly recommend you read Matt Bittner's review,
and obtain the plans from the FLYING MACHINES PRESS (FMP) volume on French
aircraft. There are three modifications than can be made to make the model
more accurate. One is to build up the turtledeck to slope to the tail.
The second is to add a second cockpit control system for the observer
and the third is to add half ribs to the wings. Since I do not have the
FMP book, I did none of the modifications.
Before
starting this kit, I highly recommend you read Matt Bittner's review,
and obtain the plans from the FLYING MACHINES PRESS (FMP) volume on French
aircraft. There are three modifications than can be made to make the model
more accurate. One is to build up the turtledeck to slope to the tail.
The second is to add a second cockpit control system for the observer
and the third is to add half ribs to the wings. Since I do not have the
FMP book, I did none of the modifications.
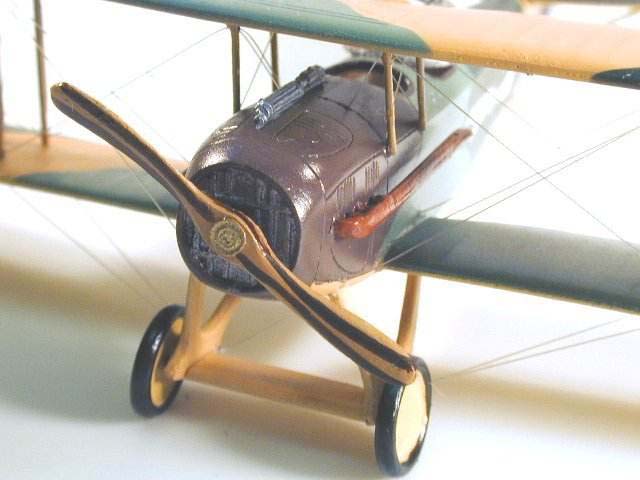
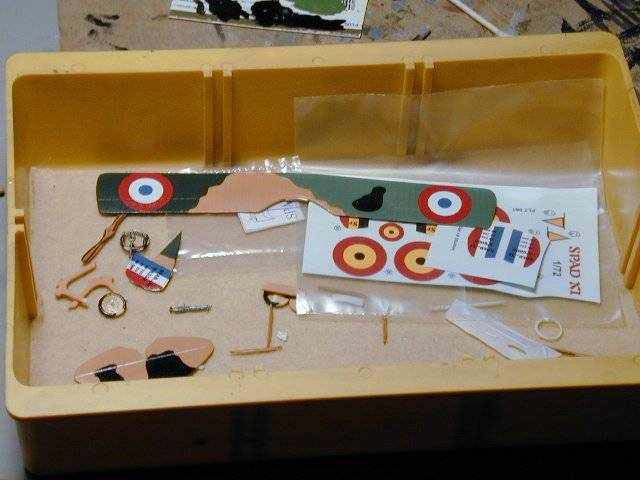
That being said, let's start the build. The kit is well molded with some flash on the smaller parts. The first thing I did was to hold the parts up to the light and look for what I call "resin landmines." These are voids in the resin that will show up when you sand. There were two or three on the wings, none on the fuselage or tail surfaces. The struts had none and that is good because a void on a strut is a kiss of death of the part. However, even though they did not show up, when the landing struts were painted, dozens of small holes appears. Several coats of paint filled them in but maybe a clear coat before painting will prevent their appearance.
Fuselage
 The
fuselage halves match up well so a mimimal amount of putty work needs
to be done. I added flat plastic stock to represent stringers and painted
them Testor's Wood. I modeled an interior using the Spad VII layout. The
kit provides a seat, floorboard, control stick, an instrucment panel and
a rear sling. Add detail to suit your tastes. After the interior is complete,
the halves are closed, putty applied as necessary and the radiator was
installed. Any panel lines lost during sanding were re-scribed. Since
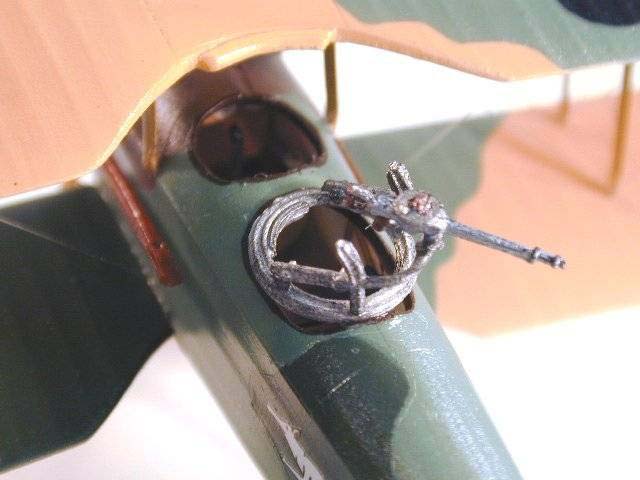
I replaced the kit Scarff ring, Lewis and Vickers with metal ones from
Aeroclub, I had to trim the observer's opening to accept the Scarff
ring. Before painting, with a round file, deepen the slot for the forward
firing Vickers. The gun fits deep as on all Spads. Without deepening this
slot, the gun will sit too high on the fuselage. The fuselage is painted
and decaled at this point.
The
fuselage halves match up well so a mimimal amount of putty work needs
to be done. I added flat plastic stock to represent stringers and painted
them Testor's Wood. I modeled an interior using the Spad VII layout. The
kit provides a seat, floorboard, control stick, an instrucment panel and
a rear sling. Add detail to suit your tastes. After the interior is complete,
the halves are closed, putty applied as necessary and the radiator was
installed. Any panel lines lost during sanding were re-scribed. Since
I replaced the kit Scarff ring, Lewis and Vickers with metal ones from
Aeroclub, I had to trim the observer's opening to accept the Scarff
ring. Before painting, with a round file, deepen the slot for the forward
firing Vickers. The gun fits deep as on all Spads. Without deepening this
slot, the gun will sit too high on the fuselage. The fuselage is painted
and decaled at this point.
Wings and Tail Surfaces
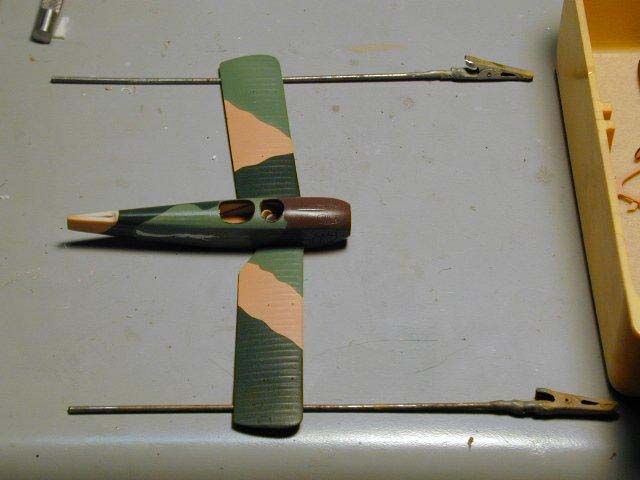 All
wing and tail surfaces are free of flash, well molded with not twisting
or distortions. A light sanding and I then painted these three parts.
Again to Matt's site for the correct colors and I used at least three
different brands of paints to achive the colors shown. After painting,
the surfaces were gloss coated and decals applied. As mentioned by Matt,
the decals are excellent. Two French and one Belgium squdron are included.
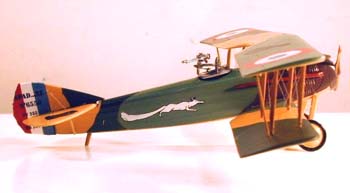
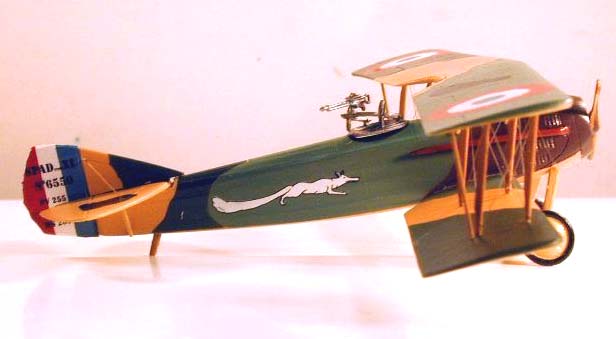
I chose SPA - Bi 34.
All
wing and tail surfaces are free of flash, well molded with not twisting
or distortions. A light sanding and I then painted these three parts.
Again to Matt's site for the correct colors and I used at least three
different brands of paints to achive the colors shown. After painting,
the surfaces were gloss coated and decals applied. As mentioned by Matt,
the decals are excellent. Two French and one Belgium squdron are included.
I chose SPA - Bi 34.
The lower wings were attached to the fuselage after scaping the paint off the locating area on the fuselage. Remember, the wings have a slight backwards rake, so match the bottom wing rake with the top wing. The tail surfaces were added and landing gear attached. A slight deepening of the slot for the tail surfaces is necessary.
 I
replaced the struts, not because they were bad, but because they were
too well made for my rigging method. After drilling out the locating holes
on both wings, I mounted the struts on the bottom wings with super glue.
This assembly is turned upside down and glued one hole at a time on the
top wing, checking for alignment. The cabanes are added and the model
was rigged using DURAS.
After the rigging is complete, the model is sprayed with TESTOR'S Clear
and allowed to dry.
I
replaced the struts, not because they were bad, but because they were
too well made for my rigging method. After drilling out the locating holes
on both wings, I mounted the struts on the bottom wings with super glue.
This assembly is turned upside down and glued one hole at a time on the
top wing, checking for alignment. The cabanes are added and the model
was rigged using DURAS.
After the rigging is complete, the model is sprayed with TESTOR'S Clear
and allowed to dry.
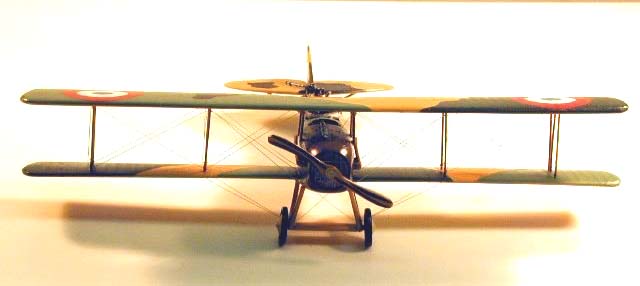
Final assembly consisted of adding the prop, observers gun, windscreen and exhaust. The exhaust pieces are very delicate and not exactly the same size. Extreme care must be used when cleaning these two parts. At this point the model is complete. It's an interesting addition to a collection but more research material would be a welcomed plus.
Conclusion
 From
start to finish, the kit took about 20 hours to build. There are no major
construction problems to alert you to with the exception of the struts.
I made new ones using the kits struts as a pattern. However, they appear
to be too long as the top wing appears too high above the fuselage after
completion.
From
start to finish, the kit took about 20 hours to build. There are no major
construction problems to alert you to with the exception of the struts.
I made new ones using the kits struts as a pattern. However, they appear
to be too long as the top wing appears too high above the fuselage after
completion.
Thanks to Lubos Vinar of Hobbyshop.CZ (formerly VAMP Mail Order) for the review sample
References
-
Kenneth Munson's "The Pocket Encyclopedia of World Aircraft in Color BOMBERS 1914-19 Patrol and Reconnaissance Aircraft, page 143-144.