
This article originally appeared in the July 1999 issue of Internet Modeler.
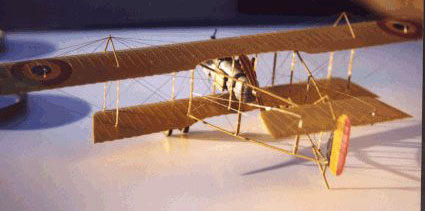
 Farman F-40bis
Building the Roseplane
1/72 Vacform kit
By Dennis Ugulano
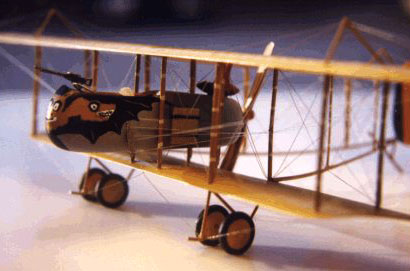
Toward the end of 1915, Henri & Maurice Farman produced a joint design incorporating the better features of the earlier, separate designs. This came at the request of the French Air Force to produce a replacement for the aging MF.11 aircraft. The result was the F.40, a two-seat pusher biplane with the crew nacelle mounted mid-way between the unequal-span wings.
Powered by the 135 hp Renault in June, 1915, complaints arose by the squadrons of poor maneuverability and performance. The decision to stop production was overruled by the need of aircraft and 10 squadrons were equipped with the type.
The Farmans entered service early in 1916 and were used widely for reconnaissance and bombing, even though only a small bomb load could be carried. The type was virtually outclassed from the time it entered service, but it was not declared obsolete until early 1917. Even then the type was used for night bombing until the arrival of the Breguet 14 . All Farmans were withdrawn from service in 1918 and sent to training establishments.
In a effort to over-come the poor performance problems the F-40 was re-engined with a 160 hp Renault engine. Unfortunately only a minimal addition of the types performance was achieved.
The F-40bis were operated by the French, Belgium and British (RNAS). Some French records list the F-40bis as a Type 56.
THE KIT
Six vacuform parts: wings, fuselage and tail surface (included
is a jig for the tail booms and landing gear struts)
Resin Parts: Four wheels, two seats, two radiators, exhaust, prop and
Lewis gun
Instructions: Four pages, history, instructions and partial 3-view and
rigging Instructions
There are no decals, strut or boom material
CONSTRUCTION
 After sanding the fuselage halves, my model was 1/8" to 5/16" too small
on the top left side. Before correcting this problem, the interior was
detailed using the kit diagram. My method of correction was to install
the floorboard and fire wall and glue the halves together at the bottom.
This way I was able to pull the top out as far as necessary to make
the sides parallel. Then, pie shaped wedges were added, putty and sanding
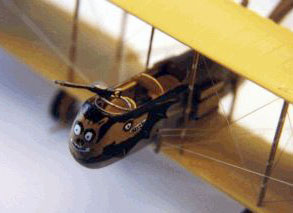
as necessary. After painting the gray exterior, the interior is completed.
The gun ring is made to fit from copper wire. The Bat insignia is painted
on at this time and the exhaust is attached. It is critical that the
fuselage be the correct width as it is going to wedge between the inner
struts when attached to the model.
After sanding the fuselage halves, my model was 1/8" to 5/16" too small
on the top left side. Before correcting this problem, the interior was
detailed using the kit diagram. My method of correction was to install
the floorboard and fire wall and glue the halves together at the bottom.
This way I was able to pull the top out as far as necessary to make
the sides parallel. Then, pie shaped wedges were added, putty and sanding
as necessary. After painting the gray exterior, the interior is completed.
The gun ring is made to fit from copper wire. The Bat insignia is painted
on at this time and the exhaust is attached. It is critical that the
fuselage be the correct width as it is going to wedge between the inner
struts when attached to the model.
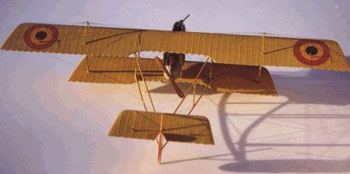
WINGS
Standard vacuform wings with enough thickness that a single thickness is adequate. After sanding and shaping, the ailerons are cut on the bottom of the wing. As for the lower ribs, there are three suggested methods. ROSEPLANE recommends using a striping tape. I use a single cut with a scribing tool that gives that gives the illusion of the rib. Two light parallel cuts with a X-acto knife will give the same results. A light table will aid in getting your tape or cuts aligned with the upper ribs.
The wings are now painted and decals applied. All support and control line holes are drilled. All strut locating holes are drilled, top and bottom wing. The upper wing supports are added and the rigging is attached. Leave the two outer most support wires about 6" too long. They will attach to the outer wings struts later down the road. The control horns were added and the wing is complete. The decals are Americal/Gryphon # 9.
TAIL SURFACES
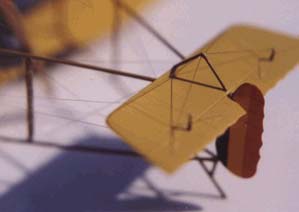 The same procedure was followed as for the wings. Lower surfaces are
scribed, the rigging supports are attached and rigging installed. The
rudder is sanded and painted in Belgian colors, custom matching the
AMERICAL roundel colors.
The same procedure was followed as for the wings. Lower surfaces are
scribed, the rigging supports are attached and rigging installed. The
rudder is sanded and painted in Belgian colors, custom matching the
AMERICAL roundel colors.
(Note: I add the wing and tail supports and rig prior to assembly only for the reason I feel it is easier to rig the model unassembled. All rigging can be done after assembly is complete.
TAIL BOOM AND UNDERCARRIAGE
Using .030 round rod and airfoil shaped strut material and the provided jig, the booms and undercarriage are constructed. I taped the material to the jig. When all alignments and lengths are correct, all joints are tacked with CA and kicked with Zip Kicker. Easy on the CA or the part will mate with the jig forever. After removal from the jig, CA all joints on both sides. At this time, paint and drill rigging holes. Light Ivory paint represents the tape on the struts and this assembly is complete.
ASSEMBLY
 The struts are now glued to the lower wing remembering that the front
struts are about 1/16" shorter than the rear so the wings will be parallel.
Turn the upper wing upside down but protect the support wires. Then,
one drop of CA at a time, the struts are attached. Check alignment and
allow the Ca to cure. This assembly is a surprisingly sturdy.
The struts are now glued to the lower wing remembering that the front
struts are about 1/16" shorter than the rear so the wings will be parallel.
Turn the upper wing upside down but protect the support wires. Then,
one drop of CA at a time, the struts are attached. Check alignment and
allow the Ca to cure. This assembly is a surprisingly sturdy.
The tail boom is now attached, The top and bottom horizontal supports butt up against the strut making attachment easier. Make sure to bevel the inside rear of the boom for a flush connection. Now attach the undercarriage, tail skid and tail control surfaces.
The nacelle is next. Mine was just snug enough that it stayed in place before some CA made it one unit. Radiators were attached and the model is ready for rigging.
RIGGING
 I use nylon sewing thread, smoked clear, to rig the model. I recently
learned this thread is about 3 pound test. A recent addition to DURAS
is 1 pound test leaded line for the control line. Using the kit instructions
and what reference matter that's available, the nylon is laced through
the pre-drilled holes.
I use nylon sewing thread, smoked clear, to rig the model. I recently
learned this thread is about 3 pound test. A recent addition to DURAS
is 1 pound test leaded line for the control line. Using the kit instructions
and what reference matter that's available, the nylon is laced through
the pre-drilled holes.
After the model is rigged, the machine gun and prop are added and the model is complete. A light coat of semi-gloss clear is added and the kit is complete. Building time was about 25 hours.
CONCLUSION
This is a nice kit of an obscure aircraft. If the kit has a fault, it is the lack of reference material but ROSEPLANE certainly is not responsible for that. They have produced a quality vacuform that builds up into a nice kit. It is not an easy kit to build and is not recommended as someone's first vacuform. But, with a few vacs behind you, this is not the hardest vacuform available.
CREDIT WHERE CREDIT IS DUE
Barry at ROSEMONT
HOBBY SHOP for providing the kit.
Bob Pearson for his Profiles and scans of nose art
Michael Kendix for an invaluable scan
REFERENCES
Bombers 1914-19 by Kenneth Munson