
This article originally appeared in the February 1999 issue of Internet
Modeler.
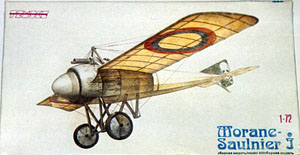
Building the Temeks/Eastern Express Morane-Saulnier Type I
 By
Matt Bittner
By
Matt Bittner
The Morane-Saulnier Type I was a result of trying to increase performance of the Type N. While most Type N's were fitted with deflectors on the propeller to ensure the airscrew would not be shot off by the Hotchkiss gun, the Type I used an interrupter gear on a Vickers gun. The Type I was "up-engined" with the 110hp Le Rhone, and the wing area was also increased.
The similarities between the Type N and Type I are most evident in the original designation of the Type I: Type Nbis. While the Type I saw very limited - if any - service with the French and British, it was widely used by the Imperial Russian Aviation Service. A major contributing factor for the lack of use - and quick demise - of the Morane-Saulnier single-seat monoplanes in both the French and British services was the introduction of the excellent Nieuport 11.
 Although
the Temeks Morane-Saulnier Type I can be built out of the box, it can
benefit from certain refinements, corrections and additions. This article
explains those refinements, corrections and additions.
Although
the Temeks Morane-Saulnier Type I can be built out of the box, it can
benefit from certain refinements, corrections and additions. This article
explains those refinements, corrections and additions.
First order of business was thinning the cockpit sides. This was needed primarily because the kit was molded with "slots" for the wings to sit in, so the plastic where these slots are is quite thick. A lot can be removed without worrying about "cutting through" the slot. Once this thick area of plastic was removed, then detail may be added to the rest of the cockpit.
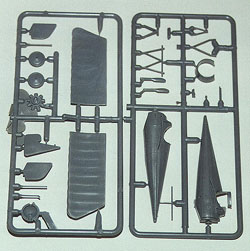 The
kit comes with no cockpit whatsoever. No seat. No pilot. Nothing. Everything
will have to be fabricated. I used thin plastic rod for the fuselage stringers
and plastic strip and sheet was used to make up the rest of the cockpit
structure. Since the seam on the bottom of the fuselage was horrid, a
false "floor" was added from plastic sheet. The seat and control
column were scratch-built, while the rudder pedals and engine "blip
switch" came from the Tom’s Modelworks French photoetch set.
The
kit comes with no cockpit whatsoever. No seat. No pilot. Nothing. Everything
will have to be fabricated. I used thin plastic rod for the fuselage stringers
and plastic strip and sheet was used to make up the rest of the cockpit
structure. Since the seam on the bottom of the fuselage was horrid, a
false "floor" was added from plastic sheet. The seat and control
column were scratch-built, while the rudder pedals and engine "blip
switch" came from the Tom’s Modelworks French photoetch set.
Once the cockpit was complete, the fuselage halves were glued together and any seams dealt with appropriately. The Temeks kit comes with a "panel line" (which is supposed to represent stitching) molded into the port fuselage half. I could only find photo’s of one or two machines with this stitching - which were Type N’s and not Type I’s - so this "panel line" was filled in. The forward area of the cockpit - which is the most distinguishing feature of the Type I - was re-worked. Temeks has you glue their gun "halves" together "trapping" the forward fuselage area between the two gun halves. On the real airplane, this area was "hollow" and "see through" so the gun passed through this area "complete". Using knives and files, this area was "hollowed" out. The cowl also received attention, thinning it considerably and correcting its outline.
 Construction
moved to the wings, which were thinned. A lot of plastic was removed to
bring them more into scale. Once the thinning was finished, the "rib
tapes" were added using plastic strip which was sanded down in scale
after all were glued on. Once all that was accomplished, the wings were
glued to the fuselage and the small seams were fixed.
Construction
moved to the wings, which were thinned. A lot of plastic was removed to
bring them more into scale. Once the thinning was finished, the "rib
tapes" were added using plastic strip which was sanded down in scale
after all were glued on. Once all that was accomplished, the wings were
glued to the fuselage and the small seams were fixed.
Next up were the tail surfaces. The horizontal tail was thinned considerably,
the outline was corrected, and "scallops" were added to the
 trailing
edge. The vertical tail was thinned, outline was corrected, and the rudder
was separated from the fin. Control horns for both surfaces come from
the Tom’s Modelworks French photoetch set. The tail skid struts were
also dealt with, thinning the kit’s "vee" portion while
replacing the "legs" with real metal guitar strings.
trailing
edge. The vertical tail was thinned, outline was corrected, and the rudder
was separated from the fin. Control horns for both surfaces come from
the Tom’s Modelworks French photoetch set. The tail skid struts were
also dealt with, thinning the kit’s "vee" portion while
replacing the "legs" with real metal guitar strings.
The rear of the fuselage was now corrected. Temeks has you mount the
horizontal tail like other kits, by sliding a peg into a matching hole.
However, the Morane-Saulnier Type I (as well as the Type N and Type V)
had a unique tail arrangement where each side of the horizontal tail was
connected through the fuselage by a central rod. This rod was external
and noticeable and was where the control horns were mounted. The kit’s
fuselage was 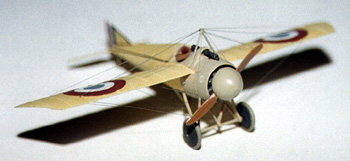 cut
and sanded to the correct configuration, and each piece of the horizontal
tail was drilled to accept a guitar string "rod" which passed
through the fuselage. Each horizontal tail piece was now connected to
this rod. The fin was added and seams were dealt with.
cut
and sanded to the correct configuration, and each piece of the horizontal
tail was drilled to accept a guitar string "rod" which passed
through the fuselage. Each horizontal tail piece was now connected to
this rod. The fin was added and seams were dealt with.
At this point I decided to correct the landing gear struts. My initial
thinking when starting this model was to utilize as many kit parts as
possible, but the landing gear struts were just "too wrong"
to accept. I scratchbuilt two sets of landing gear struts (each set consisting
of four struts) and I sent one pair to Rosemont Hobby Shop to resin cast.
Once I received a set of the resin struts, I built these struts according
to the instructions - which included brass rod for the axle and wire for
the supporting "rods" - and glued the landing gear onto the
fuselage. I also decided to replace the 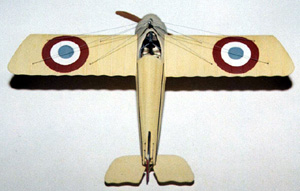 fuselage
underside "vee strut" which was used for the wing-warp wires.
This was replaced with Strutz! metal strut material for strength, and
a piece of guitar string was glued on for the horizontal rod.
fuselage
underside "vee strut" which was used for the wing-warp wires.
This was replaced with Strutz! metal strut material for strength, and
a piece of guitar string was glued on for the horizontal rod.
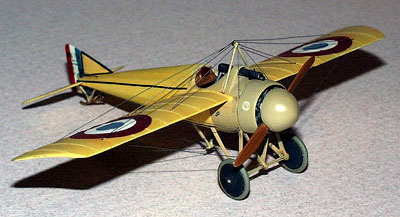
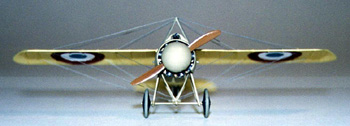
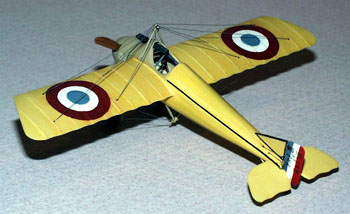
The French Clear Doped Linen (CDL) of the period had a range of off-white
to a yellow-tan. Polly Scale Ger. RLM 69 Lt. Tan was used for the CDL,
while Polly Scale "Concrete" was used for the metal areas. Before
the gloss was applied prior to adding the decals, the model was weathered
using watercolor pencils. This was the first time I used these pencils
for weathering, and it won’t be the last. One of the biggest advantages
with watercolor pencils is being able to feather the colors together.
A darker tan was used in the "crevices" of the fuselage fabric,
while a more yellow color was used for the highlights. Once they were
penciled in, then a damp brush (with most of the water gone) was lightly
brushed over the model, blending the colors in. The same process was used
on the wings, with the darker color being applied on the sides of the
rib 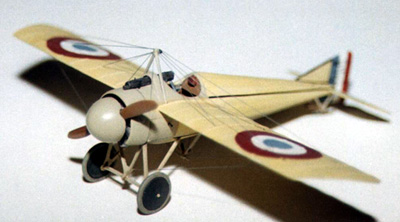 tapes,
while the lighter color was used on the tapes themselves.
tapes,
while the lighter color was used on the tapes themselves.
The French cockades are from Americal/Gryphon, and the rudder serials and stencils decals were generated from an ALPS printer applied over painted on rudder stripes. Rigging is carbon steel wire from Sopwith Hobbies, the engine is an Aeroclub item, the propeller a modified Aeroclub item and the Vickers gun is from Rosemont.
References:
Datafile #59, Morane-Saulnier Type N, I, V, Albatros Publications
French Aircraft of the First World War, Flying Machines Press