
This article originally appeared in the October 1999 issue of Internet Modeler.
 Emhar 1/72
Mk.IV Female
By Matt Bittner
Photos By David Van Wagoner
History
The British "heavy" tanks of WW1 can be considered the starting point of all modern tanks. British design started with "Little Willie" then moved quickly into "Mother". The really interesting part to me is that during their inception and initial deployment, the naval arm of the British was in charge of these "landships". Once the teething problems with "Mother" were figured out, the Mk.I hit the battlefields of France.
The line continued from the Mk.I to the Mk.IV and beyond. It appears that the Mk.IV was the most numerous mark produced, and served on the battlefield as well as it could. There were two types produced – a Male, which consisted of a larger sponson and was armed with two 6 pounders and 4 Lewis machine guns; and a Female, which had a smaller sponson, and was armed with only 5 Lewis machine guns. Emhar produces both types.
The Kit
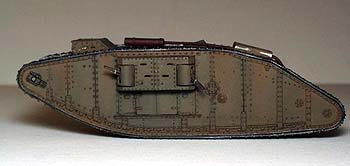
The Emhar kit of the Mk.IV Female consists of 31 injected molded pieces and four "rubberized" track pieces. There are four schemes represented by the decal sheet: a British machine marked "F.4", a British machine marked "J12", and two German machines, one with a "skull and crossbones", and one without.
 This kit is probably the most simple I have ever built. If you want a
1/72 nd WW1 piece of armor without a lot of fuss, this is it. However,
there are a few pit falls to watch out for.
This kit is probably the most simple I have ever built. If you want a
1/72 nd WW1 piece of armor without a lot of fuss, this is it. However,
there are a few pit falls to watch out for.
The first deals with the side sponsons. The instructions don't show this well, but the pistol ports on the sponsons are supposed to be toward the bottom of the tank. Plus, be sure to mount the turrets with the guns in the proper way. The smaller "tube" on the gun is supposed to also be toward the bottom of the tank.
Next in line is the drivers cupola. First sand off the raised "13", which designates the parts' number, since this interferes with the fit of the other parts. Then, be sure to dry fit this whole area since there is not a lot of "positive" mating surface.
I found it easiest to glue the bottom, lower hull plate (part 8) to the inner sides (parts 1 and 2) first. Be sure this whole area is square before the glue dries. Follow the sides - once firmly dried - with the rear hull, and finish it off with the top, upper hull. Again, once this whole assembly is dried, finish it by adding the outer sides, driver's cupola and – after bending to the correct shape – the exhaust. Be aware with the outer sides, though. You may have to cut off the mounting pegs get them to fit.
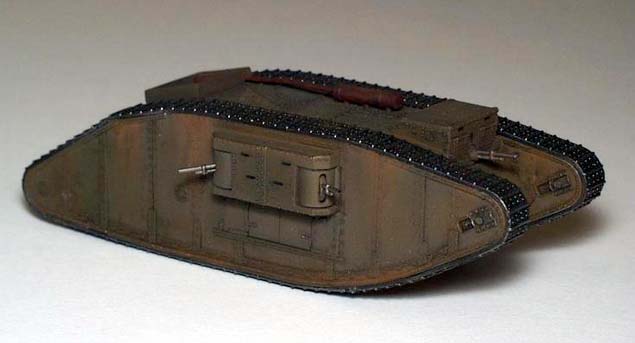
 The box that fits over the exhaust - if you glued the exhaust on correctly
to the left of the hatch on the top - is wrong. The tracks won't fit if
it isn't corrected. I chopped off the side closest to the half-circles,
cut the ends off from this side, and glued it back on. This resulted in
that side closest to the exhaust was now even closer. Another enhancement
I made was to thin this piece (part 4) more to scale.
The box that fits over the exhaust - if you glued the exhaust on correctly
to the left of the hatch on the top - is wrong. The tracks won't fit if
it isn't corrected. I chopped off the side closest to the half-circles,
cut the ends off from this side, and glued it back on. This resulted in
that side closest to the exhaust was now even closer. Another enhancement
I made was to thin this piece (part 4) more to scale.
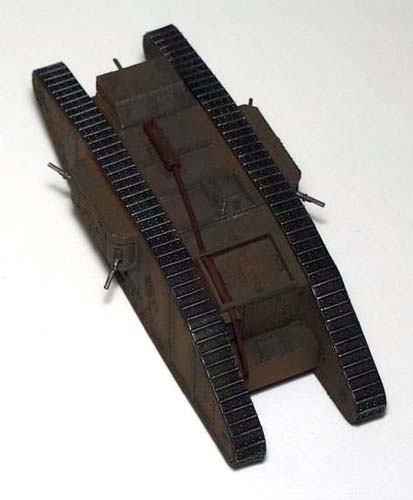
One last "problem" area is the fuel tank mounted on the rear. If you follow the instructions, it would have you mount the tank with the hatch facing away from the back of the tank. In actuality, the hatch is supposed to be towards the top of the tank with the hinge towards the rear. This means the hollow area will also have to be filled in, since this will be visible on the bottom of the tank. I just glued on sheet styrene and sanded it flush.
I have heard from members of the WW1 Modeling email list about potential problems with the ditching beam rails. Because of this I decided to leave them off, since there were Mk.IV's that did not have them. However, be aware that these take a little work to get them to fit correctly.
The "rubberized" tracks are in four pieces, two per side. I first glued the larger, single piece by using CA and starting at the top. I glued a little at a time, stopping once I made it to the ellipses. After waiting a full day for the glue to dry and cure, I then glued the track around the ellipses (you may find it easier to separate the tracks into individual links and glue those links around the ellipses). I first glued the track around the rear ellipse, waiting for the glue to set, then glued on the smaller track piece. Dry fitting is necessary here, since this area didn't line up well - what I ended up doing was notching the "tongue" just a bit so I had some side to side play. Once the smaller piece is glued and set, then I followed by gluing down the larger piece around the front ellipse. There were some gaps to deal with at the joints where the two track pieces meet, and that was handled using gap-filling CA.
 There is a running debate - which may never be cleared up - about the
colors of WW1 British tanks, the "heavies" in particular. There are three
color possibilities - khaki brown, olive or gray. Plus, the German machines
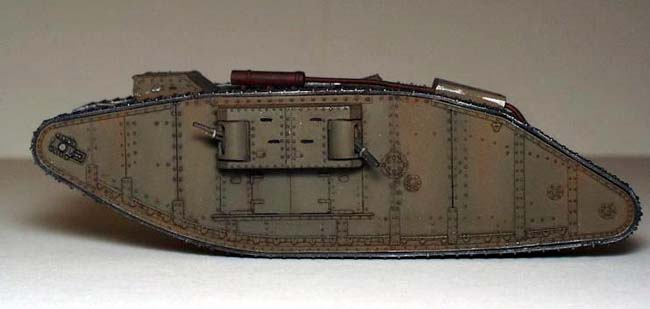
were camouflaged in four different colors. I decided to paint mine khaki
brown, and used Polly Scale's Soviet Khaki. Weathering was accomplished
with a combination of Polly Scale, oils and pastel chalk.
There is a running debate - which may never be cleared up - about the
colors of WW1 British tanks, the "heavies" in particular. There are three
color possibilities - khaki brown, olive or gray. Plus, the German machines
were camouflaged in four different colors. I decided to paint mine khaki
brown, and used Polly Scale's Soviet Khaki. Weathering was accomplished
with a combination of Polly Scale, oils and pastel chalk.
Conclusion
This kit was a blast. Very little is needed to build it into an accurate model, and it may be the only1/72 piece of armor I can build out of the box.
I would like to thank those members of the WW1 Modeling email list that helped during the construction of this model.
References
"Muck Bullets", by John Wells, Military Modelcraft International , August 1997 (build article of the Emhar Mk.IV Female this review was based on)
Bellona Military Vehicle Prints, Series Fourteen, 1967