
This article originally appeared in the May 1999 issue of Internet Modeler.
 Bristol
Scout C & D
Bristol
Scout C & D
Building the Injection-molded Aeroclub and the Vacuform Libramodels 1/72
kits
by Dennis Ugulano
HISTORY:
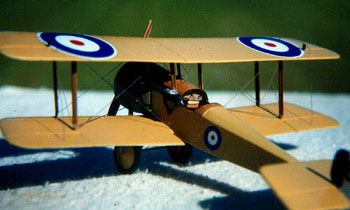
First flown in February 1914, the elegant little Bristol Scout was to serve the RFC in various capacities during the First World War. Used by both the RFC and the RNAS, the Bristol Scout ended its days as a highly prized 'personal' aircraft of instructors. The first Scout to be built in significant numbers was the Scout C, which entered service in early 1915. Ultimately 161 Cs were built. These were followed by 210 Scout Ds. The D was basically similiar to the C with minor changes to the engine mounting, cowl, strut and other fittings. Additionlly many D's also had a heightened rudder.
 The first Victoria Cross won for aerial combat was awarded to Captain
Lanoe George Hawker of No.6 Sqn RFC. Flying in Bristol Scout 'C' 1611
which was fitted with a Lewis gun angled out from the center-section at
a 45° angle to clear the propellor arc, Hawker attacked three German
aircraft and downed one in flames on 25 July 1915, with another being
forced to land. Adding to this he had downed another 4 days previously.
The first Victoria Cross won for aerial combat was awarded to Captain
Lanoe George Hawker of No.6 Sqn RFC. Flying in Bristol Scout 'C' 1611
which was fitted with a Lewis gun angled out from the center-section at
a 45° angle to clear the propellor arc, Hawker attacked three German
aircraft and downed one in flames on 25 July 1915, with another being
forced to land. Adding to this he had downed another 4 days previously.
THE KITS:
AEROCLUB:
1/72 Limited Production injection mold. Six molded plastic parts, strut and round rod. 15 metal parts: two engines, two cowlings, prop, struts, seat. Two decals sheets. Two sided instruction sheet.
A basic kit. Parts are heavy but clean and easy to work with. Early 1990 release.
LIBRAMODEL:
1/72 vacuform. Single sheet vacuform by Joe Chubbock. Complete interior, very clean, crisp mold, strut material. Five metal parts, decal sheet. Four page instruction sheet, exploded drawing.
Excellent vacuform kit, 1985 release.
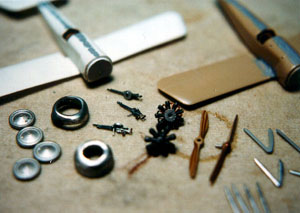
Wheels and Guns by AEROCLUB
CONSTRUCTION
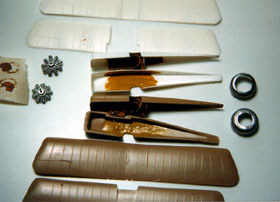 The vac
kit was cut out, sanded and filed into proper shape. The Aeroclub kit
interior was thinned as most short run kits are too thick and this was
no exception. I use a Dremel Mini-mite as it is light and does not have
warp 9 speed, which is not necessary with plastic.
The vac
kit was cut out, sanded and filed into proper shape. The Aeroclub kit
interior was thinned as most short run kits are too thick and this was
no exception. I use a Dremel Mini-mite as it is light and does not have
warp 9 speed, which is not necessary with plastic.
The interiors were constructed using the Libra parts as a guide. The Aeroclub kit has no interior.
Using the two Aeroclub cowlings, the "C" cowling was only thinned. The "D" version was thinned and the 'bulge' for the exhaust removal was added. This cowing was thinned at the rear to give the illusion of the larger cowling on the "13". To be 100% accurate, a new cowling could be constructed to represent this increased diameter.
After the interiors were complete, the fuselage halves were glued together. Both fits are good and require very little putty.
 The lower
wing on the Aeroclub was one piece and required filling and sanding to
make it fit. There are large gaps on the bottom that required putty. The
Libra kit has a two part lower wing. Trim the cowling fairing just a little
where the front of the wing makes contact with the fuselage. Check that
it's square. Testors glue set the wing in place. After it was square,
a thin line of CA was run along the top and bottom seam.
The lower
wing on the Aeroclub was one piece and required filling and sanding to
make it fit. There are large gaps on the bottom that required putty. The
Libra kit has a two part lower wing. Trim the cowling fairing just a little
where the front of the wing makes contact with the fuselage. Check that
it's square. Testors glue set the wing in place. After it was square,
a thin line of CA was run along the top and bottom seam.
The rear fuselage is notched slightly for the tailplane. The Libra tailplane was installed at this time as it will be painted Unbleached linen in its entirety. The Aeroclub will be painted prior to assembly to eliminate masking.
Next the engines and cowlings are glued in place. Putty and sanding removes all seams and gets the models paint ready. Any scribing should be done at this time. Also make sure the strut location holes have been drilled.
Using the Aeroclub metal parts as a guide, another set of undercarriage struts and wing struts were constructed, cleaned up, painted Testors Wood and drilled.
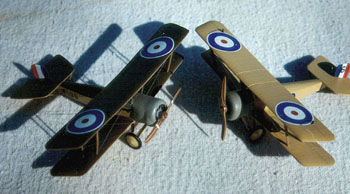
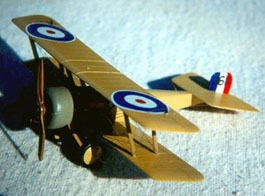
 One kit
was to represent Bristol Scout "C" 1611 flown by Lanoe G Hawker when he
won the VC. The other represents Bristol Scout "D" 8996 flown by F/S/L
G. T. Bysshe of C Flight No.2 WIng RNAS based at Imbros in early 1917.
One kit
was to represent Bristol Scout "C" 1611 flown by Lanoe G Hawker when he
won the VC. The other represents Bristol Scout "D" 8996 flown by F/S/L
G. T. Bysshe of C Flight No.2 WIng RNAS based at Imbros in early 1917.
After the fuselages were sanded, each section was masked off with scotch tape and sprayed with the exception of the upper deck of Hawker's plane. It was masked and handpainted to give the slight raised section for the drybrushed wood grain. After glossing the PCIO, all decals were applied. The Unbleached linen I use is gloss so does not require gloss coat. The kit decals would not lay down even with Solvaset, so they were replaced with Pegasus decals.
Undercarriage on both planes is attached, rigged and wheels added. I like to get the plane on its wheels as soon as possible. Tailskids and tailplane struts are attached.
 Next, the
machine guns. Hawker's Lewis is mounted at 30 degrees on the left side
per photo I of the DATAFILE. Bysshe's two guns are mounted per photos
72 & 87. Normally I attach guns last so as not to interfere with the rigging.
But due to the unusual mounting locations, it was easier to install them
prior to upper wing installation. Bysshe's prop was give an off white
stripe to paint to represent tape.
Next, the
machine guns. Hawker's Lewis is mounted at 30 degrees on the left side
per photo I of the DATAFILE. Bysshe's two guns are mounted per photos
72 & 87. Normally I attach guns last so as not to interfere with the rigging.
But due to the unusual mounting locations, it was easier to install them
prior to upper wing installation. Bysshe's prop was give an off white
stripe to paint to represent tape.
The wing struts are set in the lower wing at the approximate angle. The model is turned upside down and dry fit to the top wing. CA glue sets the wing, aligning it as the glue dries. Some "D" models had an increased wing stagger. If you want to do this, move the wing forward 3/32". After alignment of the wings is correct, the cabanes are added.
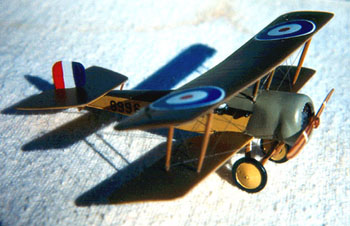
 The rigging
is now installed in both kits. The rigging is very straight forward and
takes less than an hour per kit. After rigging, wing skids, pitot tube
and props are installed. Gloss coat completes the process. The "D" has
a little windscreen and they are complete. Total building time is about
7-10 hours per kit.
The rigging
is now installed in both kits. The rigging is very straight forward and
takes less than an hour per kit. After rigging, wing skids, pitot tube
and props are installed. Gloss coat completes the process. The "D" has
a little windscreen and they are complete. Total building time is about
7-10 hours per kit.
PAINT USED:
Unbleached Linen: Custom mix
PCIO: Pactra International color
Wheels: Floquil Grimy Black
Cowl and Metal: Pactra International Battleship Grey.
REFERENCE MATERIAL:
WINDSOCK DATAFILE No.44: Bristol Scouts by J M Bruce