
This article originally appeared in the April 2000 issue of Internet Modeler.
 A
Whiter Shade of Grey.
A
Whiter Shade of Grey.
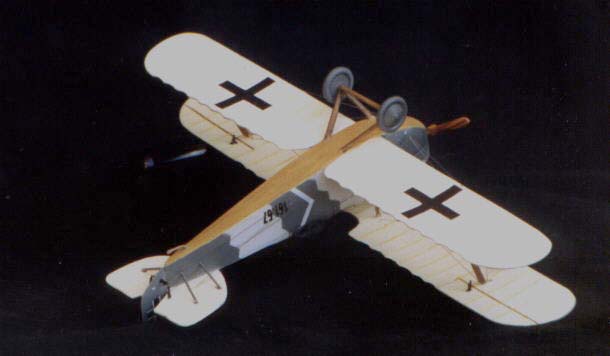
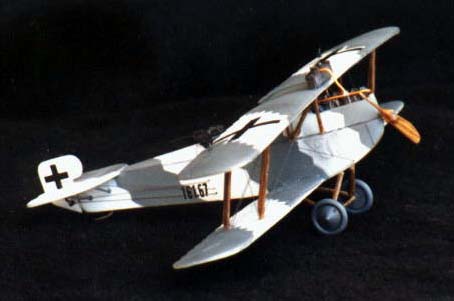
Building the Tom-M 1/72 Resin UFAG C.I

By Pedro Nuno Soares
Introduction
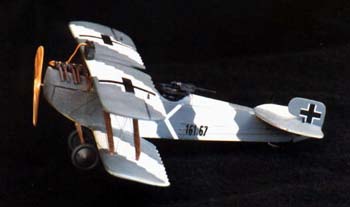
The UFAG CI was, as pointed out by Bob Pearson in his earlier review of the Tom-M kit, a direct descendant of the Brandenburg C.II, itself a very close relative to that most famous of all the Austro-Hungarian World War 1 aircraft, the Hansa Brandenburg D.I, or as commonly called, the starstrutter.
The heritage of the design is quite patent in the slab sided all wooden fuselage, although gone are the complex interlocking interplane struts that the C.II borrowed from the startstrutter.
Powered by a 230 hp Hiero engine, the C.I started its operational career in April 1918, when 11 aircraft were sent to Fliks 47/F and 58/D for frontline evaluation. The impression it caused was so great that by the end of May, production orders for 284 aircraft had been issued by the Fliegerarsenal.
By October 1918, 166 UFAG CI aircraft had been produced , of which 40 were manufactured by Phönix, a company that, like Hansa-Brandenburg and UFAG, was part of the aeronautical empire of the Viennese industrialist and financier Camillo Castigliogni.
Putting it together
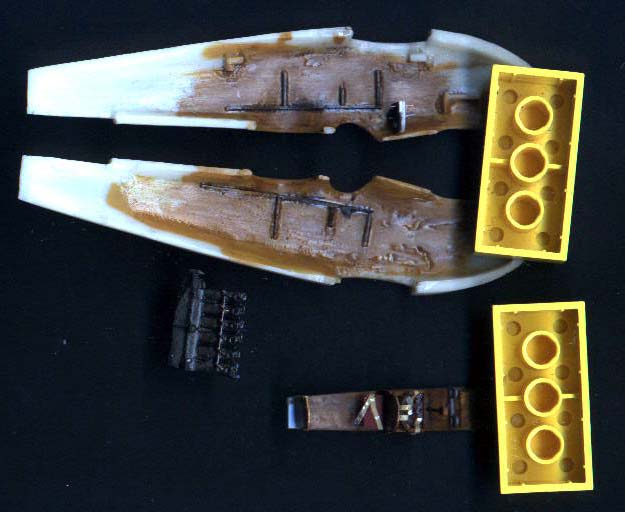
As usual I started with the cockpit. I used one of the seats the kit provided (a word of caution here: you'd better saw them off from the resin carrier with a jeweller's saw, since they are very delicate and might break if you try to separate them with a cutter), the floorboard and the stick. Other than that I made a new instrument panel (with an entirely fictional lay-out since I had no photo references) a couple of bulkheads and a folding seat for the gunner. A wooden structure was replicated on the fuselage sides with thin rod and all the area was painted in suitable wood shades, some details being then picked out with watercolour pencils. Last touch in the cockpit was the addition of seatbelts made of painted masking tape.
The very nice Hiero engine was painted black and lightly drybrushed with silver and aluminium. It was then installed in place and the fuselage halves were joined with CA and left to dry while I started working on the wings.
This is one of the not so good areas of the kit. As a matter of fact, all the wings and tail surfaces are way too thick, particularly at the trailing edges, what gives the finished model a somewhat 'bulky' appearance. Maybe this is due to casting limitations, I don't know, but Tom-M should improve this area in future issues.
 Also,
there are a number of inaccuracies in profile for the wings and tailplane.
In fact the kit parts look like they were made from Brandenburg C.II drawings,
since the rounded wing tips and tailplane are a feature of that aircraft,
not of the UFAG CI.
Also,
there are a number of inaccuracies in profile for the wings and tailplane.
In fact the kit parts look like they were made from Brandenburg C.II drawings,
since the rounded wing tips and tailplane are a feature of that aircraft,
not of the UFAG CI.
After drilling all the holes for the rigging on the wings and fuselage I glued the lower wing in place, and this was a very acceptable fit. The fuselage above the wing cut-out, on both sides, showed vestiges of inserts that were added to the masters, as the seams appear on the cast pieces. This is not readily apparent but it will show under a coat of paint, so these marks should also be sanded away, before attaching the lower wing. The tailplane was next and all the seams were sanded and puttied and sanded again until I was satisfied with the results. Since I was going for the kit's proposed painting scheme I sprayed the fuselage and upper surface of the lower wing in dark grey (Revel 77, as indicated).
Another word of advice here, before we go any further: The names of the colours are switched: Basalt grey should be RAL 7036 and Platinum Grey RAL 7012, not the other way round as the kit indicates. This confusion led me to a wrong interpretation of the proposed scheme and I ended up painting dark grey the areas that should be light grey - and vice-versa, of course ?.
The day after I painted the dark grey, the postman brought me my long
awaited copy of the Austro-Hungarian Army Aircraft published by FMP. I
immediately opened it at the UFAG entry, and what I had feared was now
totally confirmed: the gunner/observer's cockpit was completely inaccurate.
The kit completely failed to replicate the complex gun mount, that is
formed by some sort of metallic parabolic dish with lightening holes on
the sides on top of which sits a ring that supports the 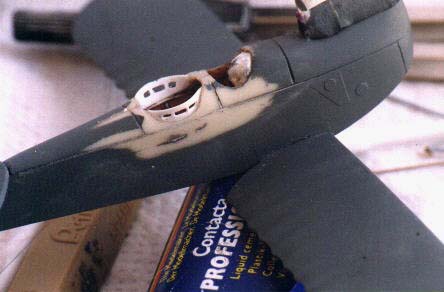 gun.
I hesitated before trying to improve the model, since it would imply a
bit of intrusive surgery and it really should have been done before gluing
the fuselage halves. But knowledge is a curse and I just had to try it,
so I carefully cut semi-circles on the sides of the rear cockpit. These
were cleaned and sanded and pieces of .15" sheet plastic were glued in
with CA, thus forming two concave sides to the cockpit. When dry, these
were sanded flush with the fuselage and the lightening holes carefully
drilled out with drills and files. It was not perfect, but it looked much
closer to the original, and I was satisfied with it.
gun.
I hesitated before trying to improve the model, since it would imply a
bit of intrusive surgery and it really should have been done before gluing
the fuselage halves. But knowledge is a curse and I just had to try it,
so I carefully cut semi-circles on the sides of the rear cockpit. These
were cleaned and sanded and pieces of .15" sheet plastic were glued in
with CA, thus forming two concave sides to the cockpit. When dry, these
were sanded flush with the fuselage and the lightening holes carefully
drilled out with drills and files. It was not perfect, but it looked much
closer to the original, and I was satisfied with it.
It was time to get on with the painting so I drew on millimetric paper the pattern for the serrated masks and took some photocopies of those since I would need quite a number of masks and drawing them was tedious and time consuming.
I overimposed the drawings on frisket paper and carefully cut the masks with a new 11 blade. They were then applied on the kit and I sprayed the platinum grey (Humbrol 147). Any overspray that might have occurred was immediately wiped away with a cotton bud and there was only need to retouch the serrated edges at one or 2 difficult places.
The exhaust pipes on the engine were now added and these were made with small pieces of telephone wire, inserted into pre-drilled holes in the cylinders (I left a small piece of exposed wire on each '"exhaust' this being the part that went into the cylinder).
I accentuated the holes for the struts on the wings and after painting the struts a wooden colour (a base of Humbrol 63 followed by a watercolour/future wash) I glued them one at the time with CA, eyeballing the incidence angle, taking the GA drawings on the instruction sheet for reference.
 The
lower surface of the upper wing had already been painted CDL and the rib
stations accentuated with an appropriate watercolour pencil so this was
glued on the interplane struts and left to dry. I then tried to install
the 'N' cabane struts but, no matter how, these wouldn't fit. I also noticed
only then that the locating holes for the 'N' struts were not symmetrical.
So I made new struts out of evergreen strip, and applied them in place.
The next day I had an unpleasant surprise: the top wing had sagged and
was slightly warped. This might have something to do with the fact that
I model with a 100 W bulb very close to my working area, and the heat
that it generated probably was the culprit for that. There was nothing
I could do, so I moved on and rigged the model with 'smoke' invisible
sewing thread.
The
lower surface of the upper wing had already been painted CDL and the rib
stations accentuated with an appropriate watercolour pencil so this was
glued on the interplane struts and left to dry. I then tried to install
the 'N' cabane struts but, no matter how, these wouldn't fit. I also noticed
only then that the locating holes for the 'N' struts were not symmetrical.
So I made new struts out of evergreen strip, and applied them in place.
The next day I had an unpleasant surprise: the top wing had sagged and
was slightly warped. This might have something to do with the fact that
I model with a 100 W bulb very close to my working area, and the heat
that it generated probably was the culprit for that. There was nothing
I could do, so I moved on and rigged the model with 'smoke' invisible
sewing thread.
The rigging holes on the wings were then puttied and sanded and the uppersurface of the top wing and the lower surface of the bottom wing were painted.
The ventral part of the fuselage was also painted wood and my recipe for this entails a base coat of Humbrol 63 followed (when dry, of course) by lightly scribing at random with a sharp watercolour pencil(s) in a contrasting shade(s) of brown, followed by a touch of future to seal the watercolour. To do this I use a cotton bud with future (not wet, just humid) that I roll over the painted surface. This is the most tricky part of it all since if there's too much future in the cotton it'll run and destroy the effect. after the first coat has dried you can apply a wet one since the colours will be securely sealed.
 The
kit provides the later fin and rudder that as correctly pointed out by
the instruction is not accurate for 161.67, that had the earlier balanced
rudder. I considered converting the kit part, but really this was a lot
of unnecessary trouble, so I just cut one new from .15" sheet, and installed
it in place after painting it.
The
kit provides the later fin and rudder that as correctly pointed out by
the instruction is not accurate for 161.67, that had the earlier balanced
rudder. I considered converting the kit part, but really this was a lot
of unnecessary trouble, so I just cut one new from .15" sheet, and installed
it in place after painting it.
Next came the undercarriage and I made some locating holes for it on the fuselage. This helped getting the struts in place and after gluing the prepainted wheels in place the undercarriage rigging was added.
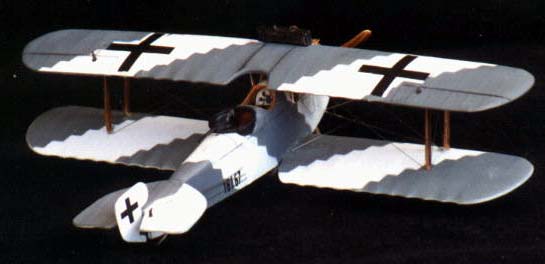
The final touch were the decals. Tom-M provides 4 sets of 1-9 numbers, so you can make up whatever combination you are after. This is good since it gives the modeller a greater freedom of choice but also is a bit of a pain, since you have to cut 12 very tiny pieces of decal and align the lot. The white borders on the crosses were not opaque enough and the dark grey showed a little through so I accentuated the white borders on the upper wings with a white ink pen.
The very nice radiator was glued on the top wing. The cooling system pipes were fashioned from the copper wire the kit provides and glued in place.
The last touch was the propeller that was painted with watercolour pencils over a base of Humbrol 63.
The kit was given a final coat of satin varnish and that was it.
Conclusion
 I
would not recommend this kit as a first venture into bi-plane modelling
due to the problems with the fitting of the top wing and if you're concerned
about the accuracy of your models, you'll have to at least do what I did
to the rear cockpit and this, although not difficult (even I could do
it) makes the kit a bit harder to put together. (The fuselage itself,
shows some more differences in outline to the drawings on the FMP book,
but these would be much harder to deal with so I left them out).
I
would not recommend this kit as a first venture into bi-plane modelling
due to the problems with the fitting of the top wing and if you're concerned
about the accuracy of your models, you'll have to at least do what I did
to the rear cockpit and this, although not difficult (even I could do
it) makes the kit a bit harder to put together. (The fuselage itself,
shows some more differences in outline to the drawings on the FMP book,
but these would be much harder to deal with so I left them out).
All in all, not being the type of modeller that is completely obsessed by absolute accuracy, I have to say I'm not displeased with the end result. What I really disliked was the sagging and warped wing, and this as I said, might have been my own fault - though the overthickness was not - and I now have in my collection a model that will most certainly draw some "what's that?" attention from friends at modelling meetings.
So, if you're into Austro-Hungarian Aircraft and won't mind a bit of extra work, there are not much options to chose from and Tom-M should be congratulated for putting out something out of the ordinary.
My thanks to Tom-M for the review kit and to Michal Beran, who forwarded it to me and who was also the guy behind the very clear English translation of the Czech instructions. The kit is available from Hobbyshop.cz (formerly VAMP) online Hobby shop.
References:
-
Austro-Hungarian Army Aircraft of World War One, Peter M. Grosz, George Haddow, Peter Schiemer; Flying Machines Press, Mountain View, California, USA,1993.