
This article originally appeared in the November 1999 issue of Internet Modeler.
 ROSEPLANE 1/72 Vacform
Oeffag C.II Series 52.5
Kit # 208
by Dennis Ugulano
A Brief History
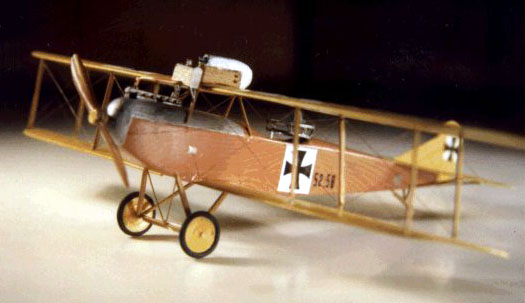
Oeffag signed a production contract on 8 February 1916 to supply 32 C.II reconnaissance biplanes to replace the C.I and the older Aviatik types. Although the Oeffag C.II represented a considerable design refinement over the C.I, its performance and maneuverability were below expectations. The C.II series 52 aircraft were dispatched to the Russian Front to serve singly with Fliks 3, 5, 13, 14, 18, 20, 22, 25, 27 and 30. They were used mainly for close reconnaissance and radio spotting.
A second batch of 32 C.II biplanes was ordered on 4 December 1916, known as the "lightened series 52." Designed for the 185hp Daimler engine, most flew with the 160hp engine.
Structurally, the C.II was designed for efficient production and ease of rigging. But the type was roundly criticized as being too narrow, having sluggish controls and unsuitable for combat. The C.II was retired from combat in 1917 and served as an advanced trainer.
 The Kit
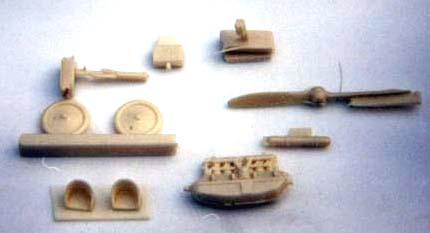
The kit consists of two sheets of instructions and history, one sheet of vacuformed parts and ten resin parts. There are no decals supplied with the kits. This is another model of a very obscure airplane. The kit is a basic vacuform, but of the high quality that one has come to expect from ROSEMONT HOBBY .
Construction
Before construction can begin on this kit, you must obtain the information found in "Austro-Hungarian Army Aircraft of World War One - Flying Machines Press 1993". This reference material will provide the much needed photos to build this model successfully.
 Construction begins with cutting all of the vacuformed parts from the
sheet. Using 80 grit wet/dry sandpaper, the parts are carefully sanded
to the proper shape. The upper wing has a center section cutout that can
be hidden with the resin fuel tank. But I decided to cut this section
out. It is clearly marked on the wing and with care should not present
any problems. The plastic is of sufficient thickness for a single thickness
wing. After obtaining the proper shape and thickness, the bottom of the
wing was scribed with a scribing to represent the ribs. The ailerons were
also scribed. I then painted and decaled the wings.
Construction begins with cutting all of the vacuformed parts from the
sheet. Using 80 grit wet/dry sandpaper, the parts are carefully sanded
to the proper shape. The upper wing has a center section cutout that can
be hidden with the resin fuel tank. But I decided to cut this section
out. It is clearly marked on the wing and with care should not present
any problems. The plastic is of sufficient thickness for a single thickness
wing. After obtaining the proper shape and thickness, the bottom of the
wing was scribed with a scribing to represent the ribs. The ailerons were
also scribed. I then painted and decaled the wings.
There is no information on the interior of this plane but using other Austrian two-seaters as a guide, an interior was built. The Austrians liked the single cockpit arrangement and several photos of other Austrian planes gives enough information to build the interior of this plane. After the interior is complete and the engine mounted, the fuselage is closed up, sanded and painted.
 Next, the lower wings and the tail planes are mounted. The lower wing
is located and attached using Testor's liquid glue. A bead of super glue
is used to strengthen this joint. The rear of the fuselage is notched
to accept the horizonal stabilizer. The bottom of the rudder has to be
shortened to match the bottom of the fuselage. It is just a touch too
long.
Next, the lower wings and the tail planes are mounted. The lower wing
is located and attached using Testor's liquid glue. A bead of super glue
is used to strengthen this joint. The rear of the fuselage is notched
to accept the horizonal stabilizer. The bottom of the rudder has to be
shortened to match the bottom of the fuselage. It is just a touch too
long.
The most difficult part of this model is the mounting of the top wing.
The struts slant inward and the alignment is critical. Before mounting
the landing gear, align the top wing upside down next to the lower wing.
Mark the lower wing strut positions and then mark the upper wing positions,
allowing for the slant of the struts. Check and recheck this arrangement
as this will create major problems when the wing is being attached. I
mounted the struts in the lower wing using liquid glue. Before  these dried completely, the upper wing was mounted with the same liquid
glue. Then mounting the plane on a piece of balsa wood, large straight
pins were used to set the alignment. The cabanes are added while still
in the jig. The cabanes gives the upper wing its final alignment and strength.
these dried completely, the upper wing was mounted with the same liquid
glue. Then mounting the plane on a piece of balsa wood, large straight
pins were used to set the alignment. The cabanes are added while still
in the jig. The cabanes gives the upper wing its final alignment and strength.
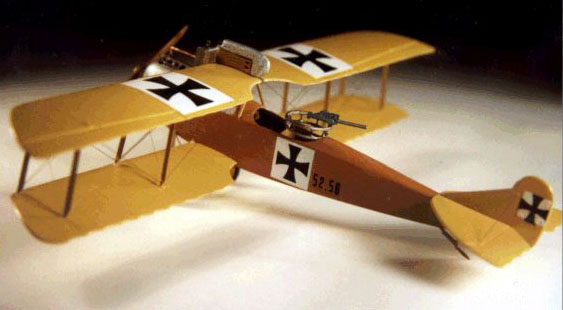
The landing gear is constructed and mounted and a tailskid made from sheet plastic. The radiator is mounted on the cabanes and exhausts are added. I replaced the above wing fuel tank with a gun housing. Where the fuel tank goes when this is done is unknown. It does not show on any of the photos in my possession. The machine gun ring is constructed and the gun is attached. This unit is then positioned on the model. The model is then rigged using DURAS method and it is complete.
The CDL is custom mixed; the dark wood is Testor's Wood with some red
added and the wood grain is Testor's wood 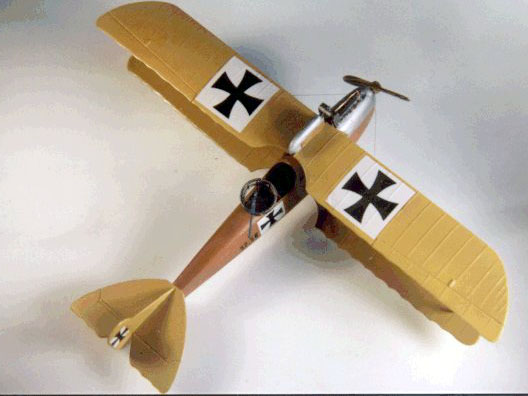 applied with a 10/0 long bristled brush. The decals are by AMERICAL.
This model depicts an aircraft from Flik 13, Sept 1917. It is shown with the fuselage crosses and white fields in eight positions. The crews complained that the fuselage crosses provided a good aiming point, hence they quite often removed thembefore the official decree of April 1916.
Conclusion
Start to finish took about 20 hours. With proper advanced planning on the top wing, you can avoid the grief of trying to attach the top wing more that once. This is an attractive kit when completed and represents nicely a very obscure aircraft.
Thanks to Barry at ROSEMONT HOBBY for providing the kit and Bob Pearson for the reference material.